Showing posts with label Poli. Show all posts

Saturday, August 22, 2020

Recipe : Ragi Idlis (Vegan)

I don’t remember the last time I made an overnight fermented batch of idlis from scratch (easy availability of ready made idli batter in most cities I've lived in or my instant rava idlis with sour curd recipe were the culprits 😁)

Totally inspired by Deepa (Paticheri)'s session at last weekends Desi Cultures workshop, I decided to make idlis from scratch.


I'd bought powdered ragi at the start of the lockdown and I knew I wanted to make idlis with ragi, rather than just rice to make it slightly more nutritious.

Using idli rava and ragi powder, helped shorten the process slightly. 

Ingredients:

1 cup urad dhal (split and skinned black gram)

1 tsp methi (fenugreek seeds)

1 cup ragi powder / ragi hittu / ragi flour

1 cup idli rava (this is ground idli rice)

Water to balance

Salt to taste


Method :

Soak the urad dhal & the methi seeds for  2 - 4 hours.

Grind smooth with a little water as necessary.

Transfer the ground urad dhal to a large vessel (10-12 cups volume)

Gently fold in the ragi flour and the idli rawa to the ground urad dhal.

Add water as necessary to get a thick idli batter.


Leave to ferment and rise for 8 hours / overnight.


Add salt to taste and give a gentle stir (I know some people add salt before fermenting, my nana always added salt just before cooking, so thats how I do it now)

Prepare your idli steamer (stove top or microwave)

Pour the batter into greased idli moulds (75% full) and steam until done.

It took me 5 minutes in my microwave steamer of 12 idlis at a time. The time is dependent on your steaming mechanism and how deep each idli mould is.

This quantity of batter gave me 36 medium idlis.

Take the idlis out of the moulds.

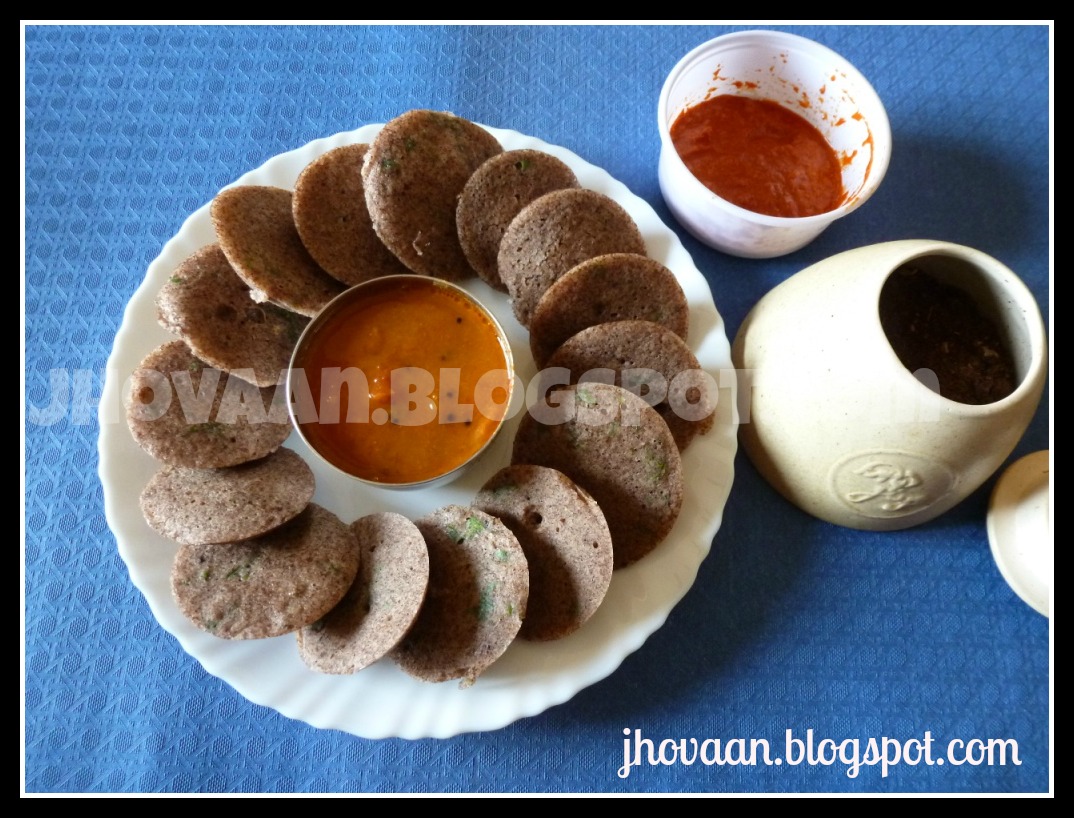
Serve hot with sambhar and chutney.


Today I served the idlis with spicy sambhar, Bangalore thela style green coconut chutney, Andhra style peanut chutney, a bit of chutney pudi in sesame oil.


Tips :

It’s been super cold here 3C in Joburg, but my friend Ajit Iyer & @paticheri’s tip to leave the maavu/batter in the oven with the pilot light on totally worked like a charm. 

Deepa's other suggestion, was to leave it on top of the fridge, but my fridge does not get warm on the top (rather on the rear)


Kim's Tips:

The batter is going to rise a lot, so when leaving it to ferment, put it in a vessel where it fills around half the volume.

Keep that vessel on a deep plate or bowl to catch any spills (especially if you are leaving to ferment overnight, inside your oven or on top of your fridge - it will save you valuable time if the batter overflows)

Work Backwards on timings. 

- If you want idlis for breakfast, you want to grind & mix everything just before you close the kitchen for the night. So soak the dhal around tea time.

- if you want idlis for dinner, then soak the dhal as soon as you wake up and give the batter at least 8 hours to fernent before you need to cook it for dinner.


Leftovers :

Leftover idlis work well later in the day, just give them a mild steam or sprinkle water and warm in a microwave.

Turn idlis into Masala Idlis.

Warm ghee, put some chutney powder in it and fry quartered idlis in it.

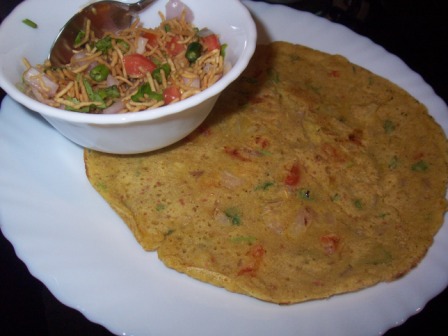
If batter remains and turns a bit sour, you can make ragi dosas from that batter or appes.

Friday, July 31, 2020

Recipe : Sheviyo Upma / Multigrain Vermicelli Upma - Vegan

I found a packet of dried multigrain vermicelli at the Indian store on our last trip. I had thought that I’d just steam it and serve it like sheviyos/idiyappam with coconut curry. But after the khao swey last week, this idea wasn’t as exciting and felt repetitive.

I remembered a dish that nana would make with leftover sheviyos and tried to recreate it. Not bad at all.


Ingredients:
200gms pack of multigrain or ragi vermicelli
1 tsp oil (coconut oil preferred, but any neutral oil works)
1 tbsp split channa dhal
2 tbsp split urad dhal
1/2 tsp mustard seeds
1-2 sprigs fresh curry leaves
2 dried red chillies - broken
1/2 cup fresh or frozen grated coconut
1-3 chopped green chillies for taste
Salt to taste
A squeeze of lime
Sugar - optional

Method :
Multigrain or ragi vermicelli is different from regular maida vermicelli and needs slightly different treatment.

If you packet comes with instructions, follow those.

If it doesn't have instructions, soak the multigrain or ragi vermicelli in warm to hot (not boiling water for precisely 3 minutes.

Don't leave it too long, it will start to dissolve.

Now drain the multigrain / ragi vermicelli and steam for 5-6 minutes either in a steamer or in a covered bowl in the microwave

If using, leftover sheviyos/idiyappam, they can be given a light steam only if they have begun to dry out too much, they don't need soaking

Take a wide bottom vessel, heat it and add the oil.

To this add channa and urad dhal and let them crisp up (not burn)

Now add mustard seeds, curry leaves and the dried red chilli.

When they splutter, add the coconut and stir fry for a bit, to your level of doneness 30sec - 4 minutes.

To this add the steamed vermicelli and stir fry. If it is too dry, add little splashes of water at a time.

Add chopped green chillies and salt to taste.

Mix well and take it off the heat. The vermicelli does not cook for more than 2 minutes.

Squeeze a bit of lemon on top.

Serving Options :
* a sprinkling of sugar
* a coconut chutney
* a salty mango pickle with a bit of coconut oil


Friday, July 11, 2014

Recipe : Masala Idli (Vegan)

This recipe is a great way to finish leftover idlis or rava idlis. Rava Idlis normally have chillies, peas, seasoning and some other vegetables in them. If you are using plain idlis, you may want to use more masala and spice for more flavour.

The husband prefers to have the idlis nicely crisped up in this dish. But if your rava idlis have dried up with the temperature/ weather/ refrigeration - you can crumble them up totally and turn it into a masala upma.

Quantities would depend on the size of the idlis that you have made and the flavouring (if any) that you have used, so feel free to adjust measurements as you see fit.


Ingredients:
8 rava idlis (small microwave sized) quartered
1 tsp oil / ghee
pinch of fresh jeera
pinch of fresh methi
pinch of fresh mustard
1 dried red chilli
1 sprig clean curry leaves
1 medium onion chopped fine
1 medium tomato chopped fine
1" ginger grated
2-3 green chillies chopped fine to taste
Chopped coriander for garnish
2-3 tsps of your favourite chutney pudi / gun powder (optional)

Method:
Heat a wide pan, and add the oil.
When the oil is hot, season with methi, jeera and mustard seeds.
Add the chutney pudi if using, before it can brown add the crushed red chilli and curry leaves.
Now add the onions and fry till semi transparent.
Add the tomatoes, ginger and green chilli and fry till cooked.
Now add the quartered idlis and fry till done.
Serve hot garnished with freshly chopped coriander leaves.


Kim's Tip:
If you have too many idlis and the pan isn't wide enough or your idlis are too soft or too dry, it will turn to upma.


Monday, November 26, 2012

Recipe : MTR Ragi Rawa Idli


I prepare Rawa Idlis at home quite frequently as they are quite easy and fast to make, but the other day I spied the MTR Ragi Rawa Idli mix at the supermarket. My only experience with Ragi until now, has been Ragi Muddhes at a friends house in Sakleshpur when I was in college. And with due apologies to everyone in Karnataka for whom it is a staple breakfast, it is one of my least liked food items, ever. I found it tasteless and heavy and no amount of extolling on the healthy properties of Ragi, has ever induced me to try them again.

However this new range of multigrain breakfast mixes by MTR sounded promising and I was hoping the ragi rawa idlis would be lighter on my tummy than the muddhes.

The recipe on the back was simple enough. Mix with 1 cup sour curd (yoghurt) rest for 3 minutes and steam for 12 minutes.

I tried this and the mixture did not seem very exciting. so I added a little salt, cashew nuts, 2 green chillies chopped fine and some finely chopped corriander to the mix.

I also added some eno for aeration to make the idlis fluffier and I was very happy with the result.

It costs 60Rs for a 500gms packet. I got 24 microwave size idlis. Ragi digests slowly and it is full of fiber, so it keeps you feeling full for quite a long time. We actually had them for a light lunch and the 24 idlis were more than enough for both of us.


Serve hot with sambhar and chutney or just ghee and chutney pudi.

We quite liked the taste, once we got used to the texture and so I think, I'll try incorporating ragi flour into some other dishes as well.

Tuesday, October 09, 2012

Recipe: Egg Hoppers - Appams with Egg - Breakfast Dish

Egg Hoppers aren't a dish made in Mangalore. From what I gather, this is a Sri Lankan dish, but the first time I ate it was in a Kerala restaurant in Dubai.

Its a lovely dish in itself and if you leave the egg half cooked, the yolk provides a nice liquid and colour contrast against the crisp appam. You really don't need a curry or chutney to eat this dish. Its quite satisfying in itself.

When I have leftover appam batter, this is a great breakfast dish the next morning.

Ingredients:
Appam Batter
Eggs
Salt & Pepper to taste

Special Equipment: Appam Chatti

Method:
The method to be followed is exactly the same as that for making Appams, but once you have added the batter and swirled the pan around, then you drop a raw egg in the center, sprinkle with salt and pepper and cover and cook until done.

Kim's Variations:
There are 2 ways to make these egg hoppers, you can either keep the yolk whole, like I have in these pictures, or you can break the yolk and then swirl it around like you swirl the batter.

You can even make a spicy scrambled egg (bhurji) batter and pour a bit over the appam batter when in the pan.

Serve hot

Recipe: Instant Apas / Appams / Hoppers

Manglorean Apas are called Appams in Kerala and Hoppers in Sri Lanka.

Normally the process to prepare the batter takes a fair amount of time and patience. This is an easy way to make instant appams.

This doesn't taste as yum as appams that are made with love and care, soaking, grinding, fermented with toddy etc etc. But if you want appams in a hurry and don't have a Manglorean/Kerala restaurant nearby who can deliver, this is a quick fix.


Ingredients:
1/2kg slightly grainy rice flour (not superfine)
4 tbsps sugar (adjust to taste)
1 tsp salt (adjust to taste)
1 200ml packet of Dabur coconut milk
water
eno (non flavoured) fruit salt

Special Equipment: appam chatti

Method:
Mix the rice flour, sugar, salt until well blended
Add coconut milk and mix together.
Add room temperature water until the batter reaches desired consistency - thinner than dosa batter, but thicker than neerdosa batter)
Mix well so that there are no lumps.
Let is stand for 10-15 minutes so sugar can dissolve and flavours even out.
Adjust salt and sugar to taste.

Heat the appam chatti and season the pan with a few drops of oil.
Add a little eno to the batter, so that it starts to froth up (aerate - this is a short cut to the fermenting process)
Mix well.
Pour half a ladle of batter into the center of the appam chatti.
Give the pan a quick swirl to leave behind a thin layer of batter around the thicker center.
Cover the pan and fry till done.

Do not turn over
The appam will start moving away from the sides of the pan when done.

The trick to making appams is the swirling of the pan so that you have a nice thin even circle around the thicker center and managing the heat, so that the sides crisp up and the center is cooked.

Serve hot with curry of your choice.

Kim's Note:
An appam chatti is similar in shape to a kadai, but much smaller.
It has handles on both ends that you need, to be able to swirl the pan.
The lid is also essential for proper cooking of an appam. (since it is only fried on one side and the center needs to steam cook)

Like any other dosa pan, do not use your appam chatti for frying anything other than appams.
Prestige has a good non stick appam chatti that does not even require greasing between appams


In the first picture, appams are served with Pork Indad and in the second, they have been served with mutton stew.

Sunday, April 03, 2011

Recipe: Kori Rotti - Chicken Curry - Manglorean Style

Kori Rotti are thin sheets of ground rice rolled out and sun dried.

This is a traditional dish of the Bunts (Tulu Speaking) Community that originate from Mangalore. This dish is available in most Manglorean Restaurants in Bombay (majority of non-vegetarian Manglorean restaurants around India are owned by the Bunts)

This particular curry is poured over the Kori Rotti and the Rotti is eaten half crisp, half soggy. As far as I know the Rotti is no longer made in homes, it will be available in any Manglorean store in Bombay/Bangalore. I carry 4-5 packets of Rotti with me from Mangalore whenever I visit.

This dish can also be made with boiled eggs, for egg eating vegetarians and for strict vegetarians you can substitute chicken or eggs with potatoes.


The curry also goes well with plain rice or dosas, if you don't have access to Rotti.

Ingredients:
1 kg chicken
3 onions
1+1/2 coconut (or 1/2 coconut + 3-4 200ml packets of Dabur coconut milk)
1/2 lime sized tamarind
1/2 tsp turmeric powder
12 short red chillies
10 long red chillies
1 tbsp corriander seeds
1 tsp peppercorns
1/2 tsp methi seeds
1 tsp jeera
1 pod garlic
little oil
salt to taste
a few curry leaves

Method:
In 1 tbsp oil/ghee fry one sliced onion. Add half a scraped coconut, tamarind, haldi and dry roast for a while.
Dry fry chillies seperately.
Dry fry corriander, pepper, methi
Lastly add jeera and garlic.
Grind all these ingredients to a fine paste

Extract coconut milk from 1 coconut or use Dabur coconut milk.
Mix the ground paste into the thin coconut milk and put on a low fire When the masala begins to bubble, add chicken pieces and 1 sliced onion.

Add salt to taste and cook till done.
Put the fire on sim and add the thick coconut milk and give it a very slow single boil.
Temper with 1 deep fried onion
Serve with kori rotti or rice.
 Add more coconut milk if the curry is too spicy for you. If you run out of coconut milk, you can use regular milk to balance the spice quotient.

Saturday, April 02, 2011

Recipe: Utthappams

Utthappams are traditionally eaten at tea time with batter leftover from breakfast dosas, but now with refrigeration and other techniques, they are eaten for breakfast too.
The ingredients for utthappams are simple - leftover dosa batter and whatever toppings you choose. And a little eno fruit salt if required for aerating the batter. The batter needs to be slightly on the thicker side and slightly sour.

Onions, tomatoes, green chillies and corriander are the traditional toppings for utthappams and can be used in any combination. Since our house has slightly picky eaters: one wont eat raw tomato another doesn't eat raw onions, I normally have all these ingredients chopped but I don't mix them up. I then scatter the appropriate ingredient on the utthappam depending on whom I'm frying it for.
Method:
Bring the batter to room temperature.
Add some eno fruit salt to the batter to aerate it if required.
Heat a little oil in a frying pan.
Pour some batter into the pan and spread into a circle.
Sprinkle the toppings of choice on top of the dosa.

Once the bottom starts to crisp up, you can either flip it over (the toppings will get a bit fried) or cover the pan and steam it slightly (the slightly  raw sweet taste of the toppings remains) so the top is also cooked.

How much you fry the utthappam can also vary depending on personal preference. I like mine crispy like below for tea time and softer as further below for breakfast (and as you may have guessed from the pics below, I :) am the picky eater who doesn't like raw tomatoes)
Serve with chutney.
The picture above is with Green Tomato Chutney and the picture below is with Mummy's White Coconut Chutney and my MIL's Green Tomato Chutney

Utthappams are great for breakfast or an evening snack. But can also be your meal if you like.

Options:
While onions, tomatoes, green chillies and corriander are the traditional toppings for utthappams and can be used in any combination. Grated coconut is also an excellent topping if you like. You can experiment with any vegetables that cook quickly like shredded carrots, chopped bell peppers and pair them with appropriate chutneys or curries.

Grated cheese is also an option for fussy children who may not like the veggie toppings. (but try and avoid overturning the uttappam if this is the option you choose, instead cover the pan and cook till both sides are done.

You can even experiment with cooked minced meat if you like. The only things you need to keep in mind are:
1. the topping should be cooked within the time it takes for the utthappam to fry - so precook the topping if necessary
2. the toppings should not be too heavy, else the utthappam will collapse.

Also refer my previous post on Onion Utthappams

Saturday, October 16, 2010

Recipe : Onion Utthappam

Sometimes if all your idli or dosa batter doesn't get used up at the meal you planned it for, it tends to turn a bit sour by the time you next want to use it, or the fermentation falls flat when you refrigerate it. This doesn't make the batter completely useless. You can use it to make utthappams.

Ingredients:
Leftover idli/dosa batter
chopped onion
chopped green chilli
chopped corriander leaves
salt to taste

little oil to fry
eno fruit salt if required.

Method:
Bring the batter to room temperature.
Add some eno fruit salt to the batter to aerate it if required.
Mix the onion, chilli and corriander leaves.
Heat a little oil in a frying pan.
Pour some batter into the pan and spread into a circle.
Sprinkle the onion mixture ontop of the dosa.

Once the bottom starts to crisp up, you can either flip it over (the onions will get a bit fried) or cover the pan and steam it slightly (the raw sweet taste of the onions remain) so the top is also cooked.
Serve with chutney.
Its great for breakfast or an evening snack.

Since I served it as dinner, I also served some aloo methi with peas alongside.

Variations:
You can make tomato utthappams, coconut utthappams and basically any other topping you can think of.
If you don't want to sprinkle the mixture each time you make a dosa, then mix the cuttings into the batter itself and then fry. But you will have to finish up the batter quickly. It won't keep too long (until a next meal)

Thursday, August 26, 2010

Recipe: Tomato Omelette (Vegan) aka Besan Ka Chilla

As a child of 8 or so, I was suprised when the drive-in restaurant in our home town that was run and managed by Brahmins started offerring a dish called Tomato Omelette. While many Brahmins in Mangalore did eat fish and eggs, - it was unheard of, for an Udupi menu restaurant to actually serve eggs.

As a child of my generation you did not put such questions into words and since I'm not a great fan of fresh tomato chunks, I never tasted this dish until much later. It was then that I realised that what was called a Tomato Omelette in Mangalore, was a close relative of the besan ka chilla of North India.

While the chillas that I have had in North India, are much thinner (more water in the batter) and have a mix of onions, tomato, chilli, ginger and fresh corriander, the tomato omelette is a thicker batter with tomatoes and fresh corriander as the main ingredients.

What I make at home, is a combination of the 2. With the cuttings of North India and the thickness of South India almost like an Utthappam.


Ingredients:
1 small tomato
1 small onion
1 green chilli
a pinch or two of shredded ginger
a few sprigs of fresh corriander (dhaniya)
salt to taste
pinch of haldi
pinch of corriander powder - optional
2 small katoris of besan
Water - as required

Method:
Chop the tomato, onion, chilli and corriander. (My chunks of tomato are larger, so I can pull them out - still don't like taste/texture of fresh tomato)
Make a batter of the chopped cuttings, ginger, the besan and water.
Add a little turmeric powder, so that the omelette is yellow when cooked. (close to what an egg omelette colour is like)
Add salt to taste.
If you want to make it like Utthappams (thick and fluffy) add a bit of eno to the batter to aerate it.
Lightly grease a pan.
Pour batter and fry the omelette

You can flip it over and fry it on the other side too if you like.

This can be served with any number of combinations.
In Mangalore it is served with coconut chutney as a breakfast or snack item.
The husband prefers it with bhujiya or sev, so I serve it to him with a bhujiya ki sabji
For myself, I was in the mood for something sweet and spicy, so I had it with some homemade Jalapeno Jelly that a friend had given me.
With the humidity, the jelly was running all over the omelette, but it tasted excellent :)

You can even serve this with a vegetarian side dish, if you want to make a complete meal out of it.

Thursday, March 25, 2010

Recipe: Dosas & Idlis


This recipe is for dosas and idlis made from store bought batter. Will give a recipe for batter once I am confident of the proportions.

Empty the store bought batter into a bowl at least 2 hours before intending to use it. Add salt to taste.

Keep it overnight if you want to make this for breakfast. Leave the bowl in a warm place in your kitchen, so it can ferment. (with the pilot light on in your oven, if the weather is cold.
 Add a teaspoon of Eno before using, if you feel that the batter hasn't risen enough.

To make idlis, grease the idli moulds (so it will be easy to remove the idlis when done).
Pour batter in the moulds, leaving enough space in the mould, for the idli to expand when cooking.
Arrange moulds in such a way that the moulds are not exactly one on top of the other.
I steamed the idlis in the microwave for 5 minutes.
Serve hot with chutney & sambhar.

For dosas, lightly grease a pan
Pour a spoonful of batter in the pan and spread evenly (in spirals from center to outside) and slightly thinner in some places.
If you want your dosas really crispy, you will need to dot a few drops of oil or ghee on the dosa.

When done on one side, slip and lightly cook on the other side
Serve hot with chutney and sambhar.

With the leftover batter, I will make utthapams in the morning.
I will follow the same method for making dosas, but immediately after spreading the batter in the pan, I will sprinkle a combination of finely chopped onions+tomatoes+chillies+corriander. and fry on both sides.

For onion utthappam, add only onion
For tomato utthappam or tomato omlette as it is called in Mangalore. Mix the fnely chopped tomato into the batter with a hint of tureric powder.

Items in the plate are coconut chutney, sambhar,idlis, dosas and chutney made from chutney pudi

Tuesday, April 08, 2008

Recipe : Rava Idlis

Idlis are pretty simple to make. They are ground rice fermented overnight and steamed.

But given the constraints of finding the right kind of rice in Egypt, I prefer to make something called rawa idlis (rawa=semolina - the stuff used to make basbousa)

This one is pretty simple:
2 cups semolina dry roast it a bit
Once it has cooled down back to room temperature, add 2 cups of yoghurt and mix thoroughly with a little salt to taste.
Add enough water to turn it to a consistency similar to griddle cakes.


Let it sit for 20 minutes, then you steam them in little containers.

In the microwave, I steam it for 3 minutes in a container that looks similar to this

I think over the stove it needs to be steamed for 15 minutes in a container that looks like this the idlis are shaped in this
I don't know what you would use as a substitute for this but if you look closely you will realise that the circular crevices in which you put the batter have little holes at their base to allow the steam to cook the batter.

Variations:
I prefer to substitute 2 cups semolina with 1 cup semolina and 1 cup powdered oats.
This gives a lot more fibre content and slow breakdown of carbohydrates in the body, so keeps you feeling full for longer.

Above is the recipe for the basic batter.

You can add the following items to the batter
A few frozen peas
Some grated carrot
Chopped cilantro
Chopped chillies
A few chopped cashewnuts to make it fancy
Any herbs and spices you particularly like

If you want the idlis really puffy and light, you can add a pinch of Eno fruit Salt (unflavoured) - a mix of Sodium bicarbonate and citric acid - just before the steaming process.


Rava Idlis should turn out looking like this


Idlis can be eaten plain, with chutney, with any gravy item. The traditional accompaniments are coconut chutney and sambhar.
You can even enjoy them with a dollop of ghee on top and some chutney pudi if you have access to that.

LinkWithin

Related Posts with Thumbnails

ShareThis