Showing posts with label Breakfast. Show all posts

Saturday, August 22, 2020

Recipe : Andhra style Peanut Chutney (Vegan / Keto)


Once I'd left the batter for fermenting overnight, I was thinking up what chutneys I wanted to go with it. Since I was making the idlis with ragi, I knew I wanted a slightly more robust chutney too. A strong contender was the Maharashtrian fiery Garlic Chilli Coconut chutney. But since the sambhar would be the same colour and super spicy, I finally decided that I wanted to make an Andhra style peanut chutney as an ode to my 2 working stints in Hyderabad.

If you've read my other posts today, do you sense the theme?

A quick online search and a recipe from Neha at Whisk Affair seemed to be the flavours I was looking to recreate.


I absolutely loved this one and will definitely be making it again and again. It's a chutney that can be used as a substitute for peanut butter. Totally delicious!

For the original recipe and for loads of other yummy dishes too : please visit Neha's Blog - Whisk Affair

The recipe that follows has my minor tweaks.

Ingredients :

1 tsp neutral cooking oil

1 cup roasted peanuts

1 medium onion - roughly chopped

1 tsp ginger paste or 1 inch ginger

3 cloves garlic

4-5 dry red chillies

1 tsp tamarind paste

Salt to taste

1 tsp coconut oil (or any neutral oil)

pinch of hing

1 tsp urad dhal

1/2 tsp mustard seeds

1/2 tsp sesame seeds (optional - I just felt like using them today)

1 dry red chilli

a few curry leaves


Method :

Heat the neutral oil and gently fry the peanuts in it. Be careful not to burn it. Keep aside to cool

In the same pan, fry the onions, garlic, ginger, red chilli and fry for 3-4 minutes, then take off from the heat.

When everything has cooled, grind the roasted peanuts, onions, garlic, ginger, red chilli, tamarind to an almost fine paste - I like to leave a slight crunch to it..

Add water as needed when grinding.

Transfer the ground chutney to a serving bowl.

Adjust salt to taste and mix well.

Heat oil in a tempering vessel.

Add tempering ingredients quickly and don't let any of them burn.

Pour the seasoned oil and spices over the chutney. 

I made double the quantity of tempering and used the same one for both chutneys today.


Serve at room temperature with hot idlis / dosas or even rice and dhal or sandwiched between bread.


Recipe : Bangalore Thela style Green Coconut Chutney (Vegan)

Having lived and worked in Bangalore in two separate stints as a bachelorette :), on the rare occasions that I needed breakfast before office (normally an after effect of partying too hard on a week night), there used to be these thelawalas or cyclewalas who would serve just idli, vadas and a watery chutney.

I suspect that this chutney is more Tamilian in origin, since growing up in Mangalore, right next to Udupi, I'd not seen this particular chutney. Or maybe it was just the thelawalas ingenuity to let a little chutney go a long way and avoid having to carry a tin of sambhar too which would also need to be kept hot .


It is however, quite delicious and this is a chutney I made based on nostalgic memory which may be off the mark, but I loved it and that's what food is about right?

Ingredients :

1/2 cup channa dhal (split pigeon peas)

1/2 cup grated coconut

1/2 cup corriander leaves and stems

5 green chillies (spicy - adjust to your taste)

2 cloves garlic

Salt to taste

1 tsp coconut oil (or any neutral oil)

pinch of hing

1 tsp urad dhal

1/2 tsp mustard seeds

1/2 tsp sesame seeds (optional - I just felt like using them today)

1 dry red chilli

a few curry leaves


Method :

Dry roast the channa dhal on a medium flame and cool. Be careful not to burn it.

Grind the roasted dhal, coconut, corriander, chillies and garlic to a fine paste.

Add water as needed when grinding.

Transfer the ground chutney to a large bowl.

Add 1 - 2 cups water depending on how liquidy you want it. (Feel free to rinse your mixi with plain water and add it to the chutney - its what our grandmas taught us after all)

Adjust salt to taste and mix well.

Heat oil in a tempering vessel.

Add tempering ingredients quickly and don't let any of them burn.

Pour the seasoned oil and spices over the chutney. 

I made double the quantity of tempering and used the same one for both chutneys today.


Serve at room temperature with hot idlis / dosas.


Recipe : Ragi Idlis (Vegan)

I don’t remember the last time I made an overnight fermented batch of idlis from scratch (easy availability of ready made idli batter in most cities I've lived in or my instant rava idlis with sour curd recipe were the culprits 😁)

Totally inspired by Deepa (Paticheri)'s session at last weekends Desi Cultures workshop, I decided to make idlis from scratch.


I'd bought powdered ragi at the start of the lockdown and I knew I wanted to make idlis with ragi, rather than just rice to make it slightly more nutritious.

Using idli rava and ragi powder, helped shorten the process slightly. 

Ingredients:

1 cup urad dhal (split and skinned black gram)

1 tsp methi (fenugreek seeds)

1 cup ragi powder / ragi hittu / ragi flour

1 cup idli rava (this is ground idli rice)

Water to balance

Salt to taste


Method :

Soak the urad dhal & the methi seeds for  2 - 4 hours.

Grind smooth with a little water as necessary.

Transfer the ground urad dhal to a large vessel (10-12 cups volume)

Gently fold in the ragi flour and the idli rawa to the ground urad dhal.

Add water as necessary to get a thick idli batter.


Leave to ferment and rise for 8 hours / overnight.


Add salt to taste and give a gentle stir (I know some people add salt before fermenting, my nana always added salt just before cooking, so thats how I do it now)

Prepare your idli steamer (stove top or microwave)

Pour the batter into greased idli moulds (75% full) and steam until done.

It took me 5 minutes in my microwave steamer of 12 idlis at a time. The time is dependent on your steaming mechanism and how deep each idli mould is.

This quantity of batter gave me 36 medium idlis.

Take the idlis out of the moulds.

Serve hot with sambhar and chutney.


Today I served the idlis with spicy sambhar, Bangalore thela style green coconut chutney, Andhra style peanut chutney, a bit of chutney pudi in sesame oil.


Tips :

It’s been super cold here 3C in Joburg, but my friend Ajit Iyer & @paticheri’s tip to leave the maavu/batter in the oven with the pilot light on totally worked like a charm. 

Deepa's other suggestion, was to leave it on top of the fridge, but my fridge does not get warm on the top (rather on the rear)


Kim's Tips:

The batter is going to rise a lot, so when leaving it to ferment, put it in a vessel where it fills around half the volume.

Keep that vessel on a deep plate or bowl to catch any spills (especially if you are leaving to ferment overnight, inside your oven or on top of your fridge - it will save you valuable time if the batter overflows)

Work Backwards on timings. 

- If you want idlis for breakfast, you want to grind & mix everything just before you close the kitchen for the night. So soak the dhal around tea time.

- if you want idlis for dinner, then soak the dhal as soon as you wake up and give the batter at least 8 hours to fernent before you need to cook it for dinner.


Leftovers :

Leftover idlis work well later in the day, just give them a mild steam or sprinkle water and warm in a microwave.

Turn idlis into Masala Idlis.

Warm ghee, put some chutney powder in it and fry quartered idlis in it.

If batter remains and turns a bit sour, you can make ragi dosas from that batter or appes.

Friday, July 31, 2020

Recipe : Sheviyo Upma / Multigrain Vermicelli Upma - Vegan

I found a packet of dried multigrain vermicelli at the Indian store on our last trip. I had thought that I’d just steam it and serve it like sheviyos/idiyappam with coconut curry. But after the khao swey last week, this idea wasn’t as exciting and felt repetitive.

I remembered a dish that nana would make with leftover sheviyos and tried to recreate it. Not bad at all.


Ingredients:
200gms pack of multigrain or ragi vermicelli
1 tsp oil (coconut oil preferred, but any neutral oil works)
1 tbsp split channa dhal
2 tbsp split urad dhal
1/2 tsp mustard seeds
1-2 sprigs fresh curry leaves
2 dried red chillies - broken
1/2 cup fresh or frozen grated coconut
1-3 chopped green chillies for taste
Salt to taste
A squeeze of lime
Sugar - optional

Method :
Multigrain or ragi vermicelli is different from regular maida vermicelli and needs slightly different treatment.

If you packet comes with instructions, follow those.

If it doesn't have instructions, soak the multigrain or ragi vermicelli in warm to hot (not boiling water for precisely 3 minutes.

Don't leave it too long, it will start to dissolve.

Now drain the multigrain / ragi vermicelli and steam for 5-6 minutes either in a steamer or in a covered bowl in the microwave

If using, leftover sheviyos/idiyappam, they can be given a light steam only if they have begun to dry out too much, they don't need soaking

Take a wide bottom vessel, heat it and add the oil.

To this add channa and urad dhal and let them crisp up (not burn)

Now add mustard seeds, curry leaves and the dried red chilli.

When they splutter, add the coconut and stir fry for a bit, to your level of doneness 30sec - 4 minutes.

To this add the steamed vermicelli and stir fry. If it is too dry, add little splashes of water at a time.

Add chopped green chillies and salt to taste.

Mix well and take it off the heat. The vermicelli does not cook for more than 2 minutes.

Squeeze a bit of lemon on top.

Serving Options :
* a sprinkling of sugar
* a coconut chutney
* a salty mango pickle with a bit of coconut oil


Friday, July 24, 2020

Recipe : Peach Sheera / Sooji Halwa / Rava Halwa / Sweet Upma / Semolina Pudding - (Vegan option)

Sooji halwa in Mangalore and around is called sheera.

Pineapple sheera / pineapple kesari / kesari bath  is the most common variant of this dish and Hotel Woodlands in Mangalore used to make an excellent version.  However in the recent season, mango sheera has been all over my social media feeds.

Friends and family know my aversion to fruits. The smell of most fruits makes me nauseous.

However, I do enjoy a few types of fruits and I do love a very select few. Preserved peaches are not really fresh fruit, but I Love them.

I found this brand called Brenda’s here in Johannesburg that are organic and low on added sugar that I really love, so I pick up a couple of jars each time.

This time instead of adding sugar to the sheera, I used the sweetness of the raisins and peaches with a little canning liquid.


I'm first going to give you the recipe of regular sheera, that is often served as breakfast or tiffin in Mangalore / Udupi. One of my uncles, loves pairing it with pooris for a more filling start to the day. Our Manglorean version of Poori + Shrikhand I guess.

Mum often gave us this for breakfast before heading off to school

Ingredients :
2 tbsp ghee
2 tbsp raisins - (optional)
1 tbsp broken cashewnuts - (optional)
1 cup fine sooji / Bombay rava / semolina
2 cups milk (or water or a mix of the 2 - the more milk, the richer the taste)
1/2 cup sugar

Method :
Soak raisins in a little water to rehydrate.

Heat your liquid component - milk / water / milk + water to boiling hot.

In a large pan or kadhai, heat the ghee.

Toast the nuts to golden brown if using and remove from the pan.

Roast the soji / rava / semolina on a medium flame until lightly browned.

Now add the raisins if using.

Add the boiling liquid and stir continuously to prevent lumps.

When it smells cooked and starts to come together, add the sugar and mix well.

When it starts to dry, turn off the heat, add cashewnuts and serve hot.

You can also set it on a greased plate and cut shapes when cooled and serve it at room temperature.

Variations & Tips :
You can add 2 pinches of cardamom powder / cinnamon powder / nutmeg powder at the end, for a more fragrant version.

Since the liquid in preserved fruit always seems to get leftover, instead of 2 cups milk + 1/2 cup sugar, I used 1/2 cup canning liquid and 1.5 cup milk.

I think the original recipe would call for about 1 cup sugar, that's way too much for us and I have found that 1/2 cup works well. You may want to adjust the sweetness to your personal preference.

If you are making a fruit version, then remember to account for the sweetness of the fruit.

Fruit Versions - Pineapple kesari / Mango sheera/ Peach sheera ...
For the above quantities, use 1/2 cup - 3/4 cup fruit chopped fine (or even pulped if you want a super smooth version)

If you are using an acidic /sour fruit like pineapple, then the liquid is only water, no milk.

Fruits that are traditionally added are bananas or pineapple, but you can use mangoes, peaches or any other fruit that you have on hand.

The fruit is added AFTER you turn off the gas, as it really doesn't need to cook. It will just be gently warmed in the residual heat of the halwa / sheera.

A Note on Udupi Tiffin Rooms Menus:
Pineapple sheera is called kesari bath - the kesar (saffron) colour often coming from turmeric rather than the more expensive herb.

Kesari bath could also be just a yellow coloured sheera without pineapple - but definitely sweet.

Upma is referred to as khara bath (salty)

So if you see a dish called chow chow bath on the menu, it means one serving of sweet sheera and one serving of salty upma.


Saturday, July 11, 2020

Recipe : Gond aur Atte ka Halwa. Indian gum and wheat flour dessert. Kada Prasad

I’ve been craving something sweet for a couple of days. Pre-lockdown that normally meant buying one portion of dessert - cake / macaron / pudding / ice cream. But now I was stuck at home wanting something sweet, with no enthu to bake and I didn’t want kheer, but something with texture.

Aunty Shikha (My brothers MIL) used to whip up halwas so easily when I visited with her in February. Halwa and papad is a regular breakfast in her Rajasthani household. So I decided that a wheat halwa would be simple enough and hit the spot.


This literally took less than 15 minutes to prepare.

I started with a basic Kada Prasad idea - ghee : wheat flour : water : sugar :: 1 : 1 : 1 : 1.

I had gond (Indian gum - see how pretty it is) in my pantry (I think I originally bought it because of how pretty and shiny it is ☺️). Gond is used liberally in winter sweets in Gujarat and UP for its warming properties. Given that it’s winter here, I deep fried the Gond and a mix of nuts before starting on the halwa. Removed them and then added them when the halwa was done.


Ingredients :
1 cup ghee
2 tbsp gond - Indian gum - tragacanth gum - gond katira
2 tbsp nuts (your choice of almonds, cashews, pista)
1 cup wheat flour
1 cup hot water
1 cup sugar

Method:
Heat the ghee in a wide mouthed pan - ideally, a kadhai.

Drop the gond into it, and remove as soon as it fluffs up (a few seconds)


Now put the nuts in and take them out as soon as they are done (again, just a few seconds).

The ghee might turn a bit cloudy after the nuts are fried, don't worry about it.

Now add the wheat flour, stirring continuously, so it doesn't form lumps.

As soon as you start smelling that the wheat flour is roasted (a few seconds), add the hot water.

Stir continuously as you are adding water, so it doesn't form lumps.

Once it starts melding into a halwa, add the sugar and stir continuously.

When the ghee starts to separate from the mixture, your halwa is done.

Mix in the fried gond and the nuts before serving.

Yummy and very satisfying.The husband was delighted with the totally unexpected sweet treat .


For a traditional Gurudwara style Kada Prasad, drop the gondh and dry fruits and follow the rest of the recipe.

Kim's Tip 1 : Since this recipe cooks so quickly, measure all ingredients and keep ready before you start cooking.

Kim's Tip 2 : You can decrease the sugar if you want, but do not decrease the ghee, you can remove the ghee that separates from the halwa before serving, if you are worried about it.

Kim's Tip 4 : Gond can be very sticky like 'gum' when you eat it. If you don't like the sticky feeling in your mouth, you can powder it after you have fried it. It then blends in better and you don't get sticky lumps.


Since this is cooked in ghee, the recipe is vegetarian, not vegan.  My cousin Jenny who runs an organic cafe in Mumbai, recommends substituting the ghee with a nut butter, but given how the ghee is supposed to work in this dish,
I’m not sure if any vegan substitute would work here. Let me know if you have any other ideas.

Tuesday, July 07, 2020

Recipe : Haleem - Mutton and Wheat Porridge

Haleem is a traditional dish of meat (mutton) and wheat that is stewed overnight during Ramadan, so it can be had as a nutritious and filling breakfast before sunrise the following day. Hyderabad has the most amazing varities of Haleem available during this period and we endeavoured to taste our way through as many of them as possible. It's a dish that is definitely worth waking up early for , but these days its available all around the year.

Haleem at home is served with toppings on the side, so everyone can choose their favourite flavours.


Since I wanted to recreate the recipe at home with better quality boneless mutton, I followed the recipe from the Essential Andhra Cookbook by Bilkees Latif, with my minor adjustments


Ingredients :
1/2 kg boneless mutton (or chicken)
1 tbsp garlic paste
1 tbsp ginger paste
Juice of half a lime
1/2 kg broken wheat (dalia)
1 handful each masoor (Egyptian / red), channa (Bengal gram) and moong (husked green gram) dhals/lentils
2 tbsp ghee (Bilkees recommends 1/2 cup)
2 onions finely sliced
6 cloves
6 cardamom
2 " cinnamon
1 tbsp corriander powder
red chilli powder to taste
1 tsp ground caraway seeds - I skipped this
3-6 green chillies sliced or ground
1/2 tsp haldi - for colour I added
water
salt to taste

Options For Garnish :
chopped mint
quartered limes
chopped corriander leaves
chopped green chillies
ginger juliennes


Method :
Marinate mutton overnight in ginger garlic paste and lime juice.

Wash the dhals.
Soak dhals and broken wheat for 1 hour (or overnight if you want to cook this as soon as you wake up as a breakfast dish)

Heat ghee

Fry sliced onions till crispy brown and then remove from the pan.

In the same ghee, fry cloves, cardamoms, cinnamon for a minute.

Add the spice powders and stir a bit.

Before the powders begin to burn, add the meat and marinade and saute till brown.

Add green chillies, soaked wheat, soaked dhal, 4 cups water and close the pressure cooker.

Cook under pressure for 30-45 minutes.

Open and dry out to desired consistency (like porridge)

Mash the meat and wheat a bit.

Add salt to taste.

Garnish with your choice and combination of fried onions, chopped chillies, chopped mint, ginger  or chopped corriander

Sunday, July 05, 2020

Recipe : Sajjige Rotti / Rawa Rotti / Rulavanchi Bhakri / Thick Semolina Dosas

Sajjige rotti / rulavanchi bhakri / rava rotti / thick semolina dosas with 2 types of chutney.


I may have mentioned before, but weekend brunches are special. These are the only 2 days that the husband has time for a leisurely noonish meal - without being on a conference call or rushing for one.

While he loves eggs made any which way for a weekend brunch, I’m taking the opportunity during this lockdown to cook dishes from my childhood or other memories. I'm not a breakfast person at all. I normally have One Meal a Day, since long before OMAD was a thing. During our 5 years in London, weekends meant heading out to see / do  / experience something and breakfast / brunch was built into the day's schedule.

This is the first time, I'm actually cooking so many breakfast / brunches at home - albeit only on the weekends. This is also the 2 meals of the week that I enjoy a carb heavy meal (since its eaten so much earlier in the day) and a cup of coffee with sugar - during the week, its green tea without sugar.

Coming back to the sajjige rotti, the way I made today’s rotti was not the thinner crispy version that’s made like a crepe. This is a very rustic style thick batter (almost chapatti dough consistency) that is shaped by hand on the pan / tawa, so its much thicker like a bhakri.

Since I was doing the hand shaping for the first time, the first dosas / rotis were a bit uneven shaped. Once I got the hang of it, they became much rounder, but since they are slow fried on a low flame, we were gobbling them as soon as they came off the pan - so didn’t take a better picture.

Ingredients:
2 cups Bombay Rava - medium fine semolina
2 cups sour curd (slightly liquidy, not as thick as store bought yoghurt - for store yoghurt, make it 1.5 cups yoghurt + 1/2 cup water)
2 tbsp coconut / dessicated coconut (optional)

1 medium onion chopped
1-6 green chillies chopped (depending on spice tolerance)
2 sprigs curry leaves chopped (only leaf not stem)
2 sprigs corriander chopped - with stem
2 tsp chopped fresh ginger (don't use the stringy bits)
1 tsp jeera / cumin
salt to taste

oil to fry

Method:
Mix the Bombay rava, coconut if using and the curd / yoghurt.

Mix well and leave overnight.

You want a dough, that is much thicker than a dosa batter and actually comes together, but not as tight as a chapatti dough.


You can keep the dough for just 20-30 minutes too, but I like the way the flavour / sourness develops overnight.

It also means a tiny bit of extra sleep in the morning :)

If you have left it overnight, depending on the weather conditions, you may notice that your batter has become drier or wetter than the night before.

Don't adjust it at this stage.

Add  the onions, chillies, curry leaves, coriander leaves, ginger, jeera and mix well.

These are the traditional additions, feel free to experiment with flavours you like.  For eg. my chillies are now 3 weeks old (grocery run in the coming week), so I felt they weren't spicy enough, so I also added a 1/2 tbsp of crushed black pepper.

Mix well, preferably use your hands to get a more even mix. (be sure you have washed with soap and not just used santizer :) )

There will be some liquid content in the onions, ginger and herbs.

Now if the dough feels too dry, add a few drops of water.

If the dough feels too wet, add a little rava to the mix.


The picture above shows the consistency that you want.

Make portions. With the above quantities, I got about 10 portions.

The next step is shaping them.

Traditionally, the rottis are shaped on banana leaves or some other traditional leaves (I forget which ones my nana used) and flipped onto the pan.

Modern methods, involve shaping the rotti on a greased plate or on plastic sheets.


Personally, I found these methods very fiddly and also I was only cooking for 2, so I shaped them directly on the pan.

Take a flat frying pan  / crepe pan or dosa tawa.

Heat the pan on medium heat.

Grease the pan with a few drops of oil. The traditional method is to use a small onion or potato cut in half speared onto a fork (don't let the tines come all the way through, you will end up scraping your pan). I currently use a silicon pastry brush to grease the pan.

I made portions like above, popped one on the pan. Dipped hand in a bowl of water and then flattened  the dough directly on the pan itself.

You need wet hands to use this method, doughy hands will make the dough stick to your hands. So rinse hands in a bowl of water, before shaping the rotti.


Flatten the rotti evenly to between 1/2 - 1 cm thickness.

Don't make them too large or they will be very difficult to flip over.

Fry for a few minutes on each side until slightly browned.

I served it hot off the pan with 2 types of chutney, although I have to say that the coconut chutney went better with this dosa / rotti. The advantage of this rotti, is that it can even be eaten without chutney, making it a one pot meal.


A dab of white butter on top is also a perfect accompaniment.

Kim's Tip 1 : If you have just a little chutney left in the fridge, you can add it to the rotti dough.

Kim's Tip 2 : This recipe is an excellent way to use up curd / yoghurt that has turned a bit sour. If you don't have sour yoghurt, add a tsp of fresh lemon / lime juice to your yoghurt and use.

Let me know if you try this out.

We got a good warm bit of sun this winter noon.  So, after this meal, someone decided a nap was in order, followed by a cheery wake up with South Indian Filter Coffee.

While the other someone was out in the sun tending to the garden and feeding our sparrows, laughing doves, wagtails and other birds who have become extremely demanding. They chirrup loudly if the feeders are approaching empty to let me know it’s time for a top up.

Saturday, July 04, 2020

Recipe : Chattambade / Dalwada/ Parippu Vadai/ Masala Vada - Vegan

Chattambade/ Dalwada/ Parippu Vadai/ Masala Vada with Green Coconut Chutney.


This vegan fried snack made with split channa dhal / split Bengal gram / split chickpea lentils is made across India and is called different names across the country. Each household uses their own spicing and ratios. Some add a mix of different lentils to their wadas.

This one is my method and suits our tastebuds best.

Ingredients:
2 cups channa dhal / split chickpea lentils
1 chopped onion
2-10 chopped green chillies depending on spice tolerance
1 handful chopped coriander
2 tbsp chopped ginger
2 tbsp chopped curry leaves (optional)
Salt to taste

Oil to fry

Method:
Soak 2 cups channa dhal / split chickpea lentils overnight (8 hours at least)

Drain to remove as much of the water as possible.

Some people coarsely grind the entire lot. We like the crunch from the whole bits, so I coarsely grind 80% of the dhal and use 20% whole.

Mix the ground and whole lentils together.

Add all other ingredients except oil

The mix should be dry enough to form vadas/cutlets.


If it’s too wet, you can add besan/chickpea flour.

My batter was just a bit wet (I didn’t have time to leave the soaked dhal to dry), so I formed the wadas (slightly flattened balls) and left them on a sheet of kitchen roll to get rid of the slight excess.


Deep fry in hot oil on medium flame until golden.

Don't be tempted to increase the heat, you will get burnt outsides and raw insides.

Serve hot with chutney / ketchup.


Nana occasionally made these as a tea time snack, but we had these for brunch on a cold winter day.

Kim’s tip : If grinding fresh chutney, do that first and then grind the dhal in the same jar without rinsing/washing. The leftover chutney imparts good flavour to the dhal. 

Friday, October 18, 2019

Recipe : Gud aur Saunf Wala Atta ke Cheela - Vegan pancakes

Super high fibre vegan pancakes.

When Monica Manchanda of Sin-a-Mon Tales, posted this recipe for Gud aur Saunf Wala Atta ke Cheela’ over a year ago, I had promptly bookmarked it, but hadn't got around to making it for awhile.

Since I found myself with some super strong wheat flour to be used up, I remembered this recipe and dug it out.

I mostly followed Monica's recipe for these Jaggery and fennel seed wheat crepes, but I adjusted it to suit what I had on hand and needed to use up.


For the original recipe of Monica's Granny's Gud aur Saunf Wala Atta Ka Cheela recipe, please click on the link.

This is practically a 3 ingredient recipe.

Below is the recipe with my adjustments.

2 cups super strong stone ground wheat flour - its very high in fibre.
1/2 cup powdered jaggery (or melted jaggery)
2 tsp saunf / fennel seeds

I went really low on the jaggery, so it was just a mild hint of sweetness.

Mix together the wheat flour and the jaggery with a pinch of salt.

Slowly add water and keep stirring, till you have a batter of pancake (European not American) consistency.

Add saunf / fennel seeds and leave the batter for 30 minutes so the flavours blend.

Grease a flat frying pan with a little oil or ghee and pour a thin layer of batter into the pan and spread into a circle.

Fry on both sides for about 2 minutes each until the cheela starts to brown.

A little dab of ghee on top, just made it smell and taste wonderful, but can easily be avoided if you want to keep it vegan.

We loved having these for brunch. They didn’t need anything to accompany them.

Friday, August 15, 2014

Recipe : Corned Beef per Eedu (Parsi Inspired)

I've been dreaming of Grilled Hash & Eggs for a very very long time, but since we are doing our best to eat healthy at home (there's no moderation on food when we travel, and we travel 10-15 days a month) and husband has eliminated potatoes from his diet (along with white flour and a few other white carbs and sugars), it didn't seem worth the effort.

However, when I dreamed about it again, I put more thought into how I could adapt it to be faster and without the potatoes, and I remembered the string of Parsi Breakfast (or anytime dishes) of eggs on top of anything (per eedu). Eggs are put on top of anything from okra / bhindi / ladyfinger fry, onion, + tomato sauce, minced meat, potato wafers, and even jaggery+ghee.

So I adapted my older recipe for Grilled Hash & Eggs into a faster, slightly healthier version, which you can serve with bread for breakfast or dal & rotis for lunch or dinner.


Ingredients:
1 tin corned beef
2 medium onions chopped
2 medium tomatoes chopped
1-2 green chillies chopped
1 -2 tbsp kashundi (or any sharp mustard)
2 eggs
Pepper Powder (to taste)
Grated cheese (optional)

Method:
Choose a frying pan or flat bottomed shallow vessel (preferably non stick) which has a good lid that fits tight.

Heat the pan and add a few drops of oil.
Fry the onions, tomatoes and green chillies for a couple of minutes (I prefer the onions with a bite, but you can cook them till soft if you prefer)
If the tomatoes aren't juicy enough, add a tsp or so of tomato sauce.
Now add the kashundi and stir well.
Add the corned beef and mince it up a bit.
Stir and cook for a couple of minutes.
Now flatten/smoothen out the whole mixture in the pan.


Crack and drop 2 eggs on top of the mixture.

Sprinkle pepper on top.
Cover and cook till almost done. (soft or hard yolks of your choice)
If adding cheese, add at this stage.
Cover and cook again till done.

Serve hot with toast / pav  or rotis.

Note :
- Don't add salt, unless you absolutely need it, the corned beef will have enough salt.

- I used a brownish smoked cheese, that's why the topping looks brown rather than white or yellow

Friday, July 18, 2014

Recipe : Sanjukta's Mum-In-Law's Drunken Dates - Cornflakes Cake (Eggless)

My friend Sanjukta, recently shared her MIL's (Mrs Ranju Dutta) Drunken Dates - Cornflakes Cake Recipe. This time, the recipe was a little more detailed than her Assamese Pork Fry recipe :)

Since the recipe needed no butter or eggs or maida (all purpose flour) or sugar, I thought it would be a great after dinner dessert (we have stopped having desserts after dinner for calorie control - they can only be consumed after lunch right now)

Sanjukta's original recipe can be viewed at the end of this post, I made a few modifications, I skipped the whipped cream topping and added more dates and rum and used a mixture of wheat and cornflakes to up the fibre quotient.


The taste was quite yum with the rum soaked dates giving a blast of flavour in between bites, but when I made it the texture wasnt very cakelike, it was more like slightly soggy cornflakes. Husband did not mind it with the freshly chopped chilled mangoes, but I'm not sure if I would try this recipe again. It is however an interesting variation. Most of this "cake" got consumed as a slightly boozy weekend breakfast :)

It can also be made without the alcohol.

Ingredients :
1 handful dried dates
enough rum to cover the dates.
2 pinches cinnamon powder
1 pinch grated nutmeg
1 standard bowl (large katori) of cornflakes
1 standard bowl (large katori) of wheatflakes / branflakes
1 1/2 cups of milk
Fruit to serve

Method:
Soak the dates with little water and the Rum.
If you want to keep it non-alcoholic, use only water and omit the rum
Add the cinnamon and nutmeg powders.
(you can even add a hint of ginger powder, I think the flaour would work well)


After half an hour or so, the dates should get soft. So de-seed them and lightly mash by hand.
If the dates are really dry, then you can make a coarse paste in the mixi.

When your dates are completely prepped, in a bowl, add the cornflakes, wheatflakes and the milk (Just enough to soak the cornflakes).


Lightly mash it by hand (we don't want it pasty, crumb texture will work. is just fine.

Then add the mashed dates to the mixture and taste if its sweet enough (Normally the dates are sweet)
Adjust sugar if required and mix thoroughly.


Lightly grease a baking dish, add the Dates-Cornflakes mix and in a preheated oven, bake it at 180 deg for about 25 minutes.


Slice and serve hot or cold with fresh fruit.


Sanjukta / Ranju Dutta's Original Drunken (Rum) Dates - Cornflakes Cake

1)Dates- one fistful
2) Rum- about 30 ml
3) 2 standard bowls of cornflakes
3) 1 1/2 cups of milk
4) Whipped Cream
5)Butter for Greasing the baking dish

PROCEDURE:

1) Soak the dates with little water and the 30 ml Rum. De-seed it as it gets soft and mash it using hands. In case you are using the dried variety of dates, just run the mixer to make a coarse paste of the dates.

2) In a bowl, add the cornflakes and the milk (Just enough to soak the cornflakes). With your hands mash it up (We do no want a fine paste), so crumb texture is just fine.

3)Once done, add the dates to the cornflakes and taste if its sweet enough (Normally the dates are sweet and adjusts to the requirement of sugar). Mix it thoroughly.

4) In a baking dish, add the Dates-Cornflakes mix and in a preheat oven, bake it at 180 deg for a period of 25 minutes.

5)Once done, let it cool and turn the dish upside down. Once the cake comes off to the plate allow it to cool. Put it in the fridge to chill.

6) Beat Whipped Cream (I added a drop of orange colour to the cream). Pour it over the cake and again chill it for another hour plus.

Simple, tasty and healthy cake is ready to be savoured. I am enjoying my piece with my evening cup of tea

Friday, July 11, 2014

Recipe : Masala Idli (Vegan)

This recipe is a great way to finish leftover idlis or rava idlis. Rava Idlis normally have chillies, peas, seasoning and some other vegetables in them. If you are using plain idlis, you may want to use more masala and spice for more flavour.

The husband prefers to have the idlis nicely crisped up in this dish. But if your rava idlis have dried up with the temperature/ weather/ refrigeration - you can crumble them up totally and turn it into a masala upma.

Quantities would depend on the size of the idlis that you have made and the flavouring (if any) that you have used, so feel free to adjust measurements as you see fit.


Ingredients:
8 rava idlis (small microwave sized) quartered
1 tsp oil / ghee
pinch of fresh jeera
pinch of fresh methi
pinch of fresh mustard
1 dried red chilli
1 sprig clean curry leaves
1 medium onion chopped fine
1 medium tomato chopped fine
1" ginger grated
2-3 green chillies chopped fine to taste
Chopped coriander for garnish
2-3 tsps of your favourite chutney pudi / gun powder (optional)

Method:
Heat a wide pan, and add the oil.
When the oil is hot, season with methi, jeera and mustard seeds.
Add the chutney pudi if using, before it can brown add the crushed red chilli and curry leaves.
Now add the onions and fry till semi transparent.
Add the tomatoes, ginger and green chilli and fry till cooked.
Now add the quartered idlis and fry till done.
Serve hot garnished with freshly chopped coriander leaves.


Kim's Tip:
If you have too many idlis and the pan isn't wide enough or your idlis are too soft or too dry, it will turn to upma.


Friday, November 01, 2013

Recipe : Kadalekai Chatni / Peanut / Groundnut Chutney - Vegan

This is a chutney, I really loved as a child. It was a great break from the staple coconut chutneys and mum normally made this to accompany goli bajjes.


It was only after I started cooking on my own that I realised how much easier it is to grind a peanut chutney compared to a coconut chutney, so its practical and fast too.

Currently with all the diwali hampers coming home, we have also received quite a few packets of flavoured roasted peanuts (kadalekai) and most of these snacks are too salty for my taste. So on this occasion, I used half a cup of mixed flavoured peanuts, rather than fresh groundnuts and the rest of rhe ingredients balanced out the saltiness and the flavours added to the groundnuts, added to the chutney too.

This chutney can be served with idlis and dosas / poli like any other chutney. It also tastes great with rotis and its high in protein. Most kids love nuts, so they will love this chutney too and believe me when I say that it is much easier and faster to grind than coconut, even if you are using a food processor / mixi.

Ingredients :
1 cup peanuts / groundnuts (roasted and skinned or the flavoured roasted variety)
1/2 tsp oil (til/gingelly or sunflower)
1 cup chopped onions (normally we use the smaller sambhar onions/shallots, but regular onions will do)
4-8 dried red chillies (depending on spiciness and heat tolerance)
6 cloves of garlic (you can chose to omit this, if you prefer, chop them if they are large sized)
tamarind pulp to taste
salt to taste

Seasoning :
1 tsp oil (til/gingelly or sunflower)
a pinch of hing powder (asafoetida - aids in digestion of the heavy nuts)
1 tsp split black gram dhal (urad dhal)
1 tsp mustard seeds (sarson / rai)

1 sprig curry leaves


Method :
Roast the raw groundnuts in a hot pan till cooked and skin them (you can leave the skin on, but we don't like the taste)
If you are using roasted masala groundnuts, you can skip this step.
But if you have leftover roasted nuts that have gone a bit soft, then re-roasting them helps.
In 1/2 tsp oil saute the chopped onion, garlic and red chillies till slightly brown.Cool the fried mixture.

When cooled, add it to the mixi with the skinned peanuts and the tamarind pulp.
Whizz until it reaches your desired consistency. I like it slightly grainy, but some prefer it completely smooth.
You may need to add a little water to help the grinding process if it gets too dry.
Add salt to taste (if use flavoured groundnuts, remember they will already have salt, so adjust accordingly) and give it a quick spin.

Pour the chutney out in a bowl.

In a seasoning pan, heat 1 tsp oil.
Add the hing powder.
When it dissolves, add the urad dhal and fry till it turns light brown.
Add the mustard seeds and the curry leaves and let the seeds splutter.

Pour this tempering over the chutney.

Serve the chutney with idlis and dosas / poli or with phulkas and dhal.


The chutney keeps well in the fridge too for about a week.


Note: The pictures above show quantities for 1/2 cup peanuts

Kim's Tip : The water used to wash the mixi / grinding stone can't be added to the chutney as it will become too watery, but you can use it to knead atta for rotis and give your rotis a different flavour.

Tuesday, October 29, 2013

Recipe : Sweet Potato Tikkis / Shakarkhand - Vegan

We love Sweet Potatoes and the best way to have them is roasted on coals with tart and spicy flavours. But roasting on coals isn't an easy or fast option, so I had to settle for our second favourite way of eating them - FRIED!

My sister loves them batter fried, but we also love them as crisps, however to make them healthy, I pressure cooked them first and then pan fried them, rather than deep frying them.

Once you pressure cook the sweet potatoes, you can refrigerate them (but layer a napkin or towel on top and bottom to absorb the condensation in the fridge) and slice up a few and fry as needed.

The quantities of spices to be used as completely on taste, so feel free to experiment.

Ingredients :
1 kilo sweet potatoes / shakarkhand - washed and all mud removed
fresh lime - to taste
salt - to taste
jeera / cumin powder - to taste
chilli powder - to taste
1/2 tsp oil to fry

Method :
Pressure cook the sweet potatoes / shakarkhand for 3 whistles. Don't overcook them, or they will turn mushy.
When cool, slice into 1/4" - 1/2" thick slices.
Heat oil in a pan, fry till crisp on both sides.
Turn off the heat.
Squeeze lemon and sprinkle salt, chilli powder and cumin powder to taste.
Eat as is for breakfast or a snack or eat it with rotis for a meal.

Wednesday, July 03, 2013

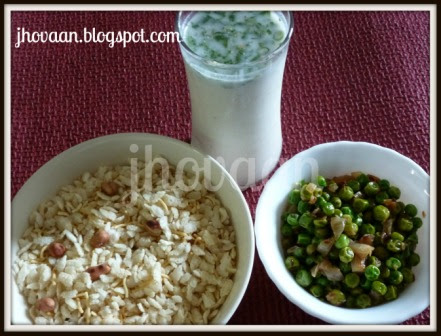
Recipe : Bihari Mattar Ghoogni Chiwda - Peas and Puffed Rice Flakes - Vegan

When we were in Jaipur in January this year, we stayed with our friends Anand & Anisha who are excellent hosts. they love food as much as we do, if not more and we had a lovely holiday with them, eating and catching up.

Surprisingly, although I lived for 2 years in Jamshedpur (which was still a part of Bihar in those days), I now realise, I never had the opportunity to eat Bihari food. All the cooks at our hostel were Bengali or Odiya, so that is the kind of food they served us. Plus with Jamshedpur being the Tata's Industrial town, there were a lot of restaurants serving Tandoori, Mughlai, Chinese, Pizza, South Indian etc, but there weren't any places serving litti chokha or anything else that could be classified as traditional Bihari food.


On our second morning in Jaipur, we were served this dish and we fell in love with it, so we kept asking for repeats at tea time and for breakfast on almost all the days that we were there. The taste and texture  is so addictive, that you can't help going back for seconds.

During winters, the dish is made with hara channa (fresh green chickpeas) or else it can be made with peas. Fresh peas are best, but frozen works quite well too. (Don't use dehydrated peas for this dish)

The peas or hara channa can also be served as a side with rotis or rice and dhal.

Anisha always has a big jar of homemade puffed rice flakes in her pantry, as they use it in many dishes. She says its just a matter of deep frying rice flakes (poha) and mixing it with salt and fried groundnuts. Here in Ahmedabad, I have found a ready made roasted version, to which I just add some roasted groundnuts. I've alsoo seen a recipe which says you can roast 1 bowl of poha in 1 tbsp of oil.

I tend to make the peas in large quantities - even half a kilo at a time because it gets wolfed down very quickly between the two of us. It keeps well in the fridge and can be reheated later.

Ingredients:
1 cup shelled peas / mattar or hara channa / fresh green chickpeas (if frozen, defrost by holding under running water)
1 medium onion chopped (less than 1/3 cup volume)
1/2 tsp cumin seeds / jeera
1" ginger grated (or to taste)
2 -3 green chillies chopped (or to taste)
salt to taste
juice of 1 small lime
1/2 tsp oil

Method:
Heat the oil.
Add the cumin seeds and wait for them to pop.
Then add the onions and stir fry until soft.
Add half the green chillies (if you don't like spicy, add all the chillies with the onions itself and cook them out), ginger and stir twice.
Add the peas / hara channa at room temperature.
Cook till done (don't close the pan while cooking, you might get a pool of liquid at the bottom)
When almost done, add the other half of the green chillies.
Give a quick stir and turn off the flame
Add salt and lime juice to taste.

Serve hot with  the puffed rice flakes + groundnuts mixture.


Mix the two and eat immediately. Its really tasty either for breakfast or a snack.
 

These peas can also be served with rotis or rice and dhal during a meal.

The drink in the background of these pictures is Masala Chaas / Chaach / Spiced Buttermilk / Ayran / Majjige

LinkWithin

Related Posts with Thumbnails

ShareThis