Showing posts with label From a Friend. Show all posts

Friday, July 18, 2014

Recipe : Sanjukta's Mum-In-Law's Drunken Dates - Cornflakes Cake (Eggless)

My friend Sanjukta, recently shared her MIL's (Mrs Ranju Dutta) Drunken Dates - Cornflakes Cake Recipe. This time, the recipe was a little more detailed than her Assamese Pork Fry recipe :)

Since the recipe needed no butter or eggs or maida (all purpose flour) or sugar, I thought it would be a great after dinner dessert (we have stopped having desserts after dinner for calorie control - they can only be consumed after lunch right now)

Sanjukta's original recipe can be viewed at the end of this post, I made a few modifications, I skipped the whipped cream topping and added more dates and rum and used a mixture of wheat and cornflakes to up the fibre quotient.


The taste was quite yum with the rum soaked dates giving a blast of flavour in between bites, but when I made it the texture wasnt very cakelike, it was more like slightly soggy cornflakes. Husband did not mind it with the freshly chopped chilled mangoes, but I'm not sure if I would try this recipe again. It is however an interesting variation. Most of this "cake" got consumed as a slightly boozy weekend breakfast :)

It can also be made without the alcohol.

Ingredients :
1 handful dried dates
enough rum to cover the dates.
2 pinches cinnamon powder
1 pinch grated nutmeg
1 standard bowl (large katori) of cornflakes
1 standard bowl (large katori) of wheatflakes / branflakes
1 1/2 cups of milk
Fruit to serve

Method:
Soak the dates with little water and the Rum.
If you want to keep it non-alcoholic, use only water and omit the rum
Add the cinnamon and nutmeg powders.
(you can even add a hint of ginger powder, I think the flaour would work well)


After half an hour or so, the dates should get soft. So de-seed them and lightly mash by hand.
If the dates are really dry, then you can make a coarse paste in the mixi.

When your dates are completely prepped, in a bowl, add the cornflakes, wheatflakes and the milk (Just enough to soak the cornflakes).


Lightly mash it by hand (we don't want it pasty, crumb texture will work. is just fine.

Then add the mashed dates to the mixture and taste if its sweet enough (Normally the dates are sweet)
Adjust sugar if required and mix thoroughly.


Lightly grease a baking dish, add the Dates-Cornflakes mix and in a preheated oven, bake it at 180 deg for about 25 minutes.


Slice and serve hot or cold with fresh fruit.


Sanjukta / Ranju Dutta's Original Drunken (Rum) Dates - Cornflakes Cake

1)Dates- one fistful
2) Rum- about 30 ml
3) 2 standard bowls of cornflakes
3) 1 1/2 cups of milk
4) Whipped Cream
5)Butter for Greasing the baking dish

PROCEDURE:

1) Soak the dates with little water and the 30 ml Rum. De-seed it as it gets soft and mash it using hands. In case you are using the dried variety of dates, just run the mixer to make a coarse paste of the dates.

2) In a bowl, add the cornflakes and the milk (Just enough to soak the cornflakes). With your hands mash it up (We do no want a fine paste), so crumb texture is just fine.

3)Once done, add the dates to the cornflakes and taste if its sweet enough (Normally the dates are sweet and adjusts to the requirement of sugar). Mix it thoroughly.

4) In a baking dish, add the Dates-Cornflakes mix and in a preheat oven, bake it at 180 deg for a period of 25 minutes.

5)Once done, let it cool and turn the dish upside down. Once the cake comes off to the plate allow it to cool. Put it in the fridge to chill.

6) Beat Whipped Cream (I added a drop of orange colour to the cream). Pour it over the cake and again chill it for another hour plus.

Simple, tasty and healthy cake is ready to be savoured. I am enjoying my piece with my evening cup of tea

Wednesday, March 19, 2014

Recipe : Assamese Style Pork Fry

Delicacy in Guwahati was my favourite Assamese restaurant for simple home style food. Their pork fry and pork patot diya (baked in banana leaves) were my favourite items on the menu.

I've been craving that pork fry so much since I left Guwahati, and neither of my North East recipe books (Penguins - The Essential North East Cookbook and Ambrosia from the Assamese Kitchen) seemed to have the recipe that I was looking for. So I requested my friend Sanjukta, who is Assamese if she knew a recipe for this dish. Sanjukta currently writes a Food Column for G Plus - a weekly news magazine in Guwahati.

She gave me a simple straightforward recipe, that I used as a starting point for my pork fry.
"Marinate pork in crushed ginger and garlic, salt, pepper and some red chill powder. Now take the marinated pork in a wok and cook on low flame for over an hour. Keep stirring from time to time to avoid burning of the meat Now once it's done, chop onions and fry it it little oil in high flame. Add some haldi if u want. Add some chopped green chillies and stirring add the cooked pork into it. Add some more salt if required. Fry for some more time until done"

My recipe follows. I used 20 green chillies and didn't find it as spicy as I remember, so I added another 10 towards the end. If you don't like your food spicy, you can ignore the green chillies completely or lower the quantity.


Ingredients:
2 kg pork cubes - about 1" size (I used a mix of 1 kg ribs and 1 kg boneless to get a good ratio of meat and fat, but any curry cut should be fine)
4 tbsp ginger garlic paste (freshly pounded is a better option, but packaged will do)
2 tbsp garlic paste
2 tbsp pepper

1 tbsp vinegar
1 tbsp chilli powder
1.5 tbsp salt
1 tbsp mustard oil
2 large onions (roughly chopped)
2 medium potatoes (chopped same size as pork cubes)
1 tbsp turmeric (haldi) powder
30 green chillies (slit - optional or adjust to taste)

Method :
Marinate pork in ginger garlic paste, garlic paste, pepper, vinegar, chilli powder and salt at least for an hour. Overnight or longer is a better option.

Heat the oil in a large pan or wok (the more surface area, the better)

Put the fat pieces in the pan (not the meat, so the fat cooks for longer and starts to break down)
Once the fat starts to break down, add the onions and potatoes and let the potatoes fry a bit in the fat.

Add turmeric, half the green chillies and mix well.

Then, add the meat and fry on a low flame till well cooked.

When almost done, add the other half of the green chillies.

Dry it completely and let the meat crisp up a bit.
Serve hot with rice and dhal.

Kim's Note:
If there is any meat leftover, reheat it with some water, it will form a thick curry and garnish with coriander leaves and serve with rice or rotis.


Served here with Kabuli Channa Pulao and Raita

Monday, February 24, 2014

Recipe : Gia's Choriz Pulao - Goan Sausage Pulao

I LOVE Choriz Pulao. The best ones I have ever had, are at O'Coqueiro and Martin's Corner in Goa. Every trip to Goa by me or my family would mean a nice little haul of Goan Sausages to be relished at home.

Goan sausages also called Choriz are an Indianised version of the Spanish Chorizo. This version involves drying and smoking pork chunks with Indian spices and vinegar.

My nana used to just sun dry them and store the sun dried pork in a bottle to be used when needed. She used to call in "lingis". Unfortunately, this is one of the recipes of hers that I never recorded, because at that time, I felt it was too laborious and she was always around to send me a bottle to fulfill my cravings.

Crescentia Fernandes and her husband Chris run a lovely Goan restaurant in Gurgaon called Bernardo's. Chowder Singh has recorded Crescentia's recipe and taken a video of the process, which is of immense help if you decide to make these sausages from scratch. Check the recipe and video - here.


Since my sausages are always store bought (even though I do occasionally find some excellent home made ones in the market), taste and quality tend to be iffy. Until you open a packet and start cooking with it, you really don't know what its going to taste like. Its quite a task to find a version whose salt, spice, vinegar, meat + fat balance you enjoy. Joao's is most consistent, otherwise its mostly hit and miss.

Now, while I have loved the Choriz Pulao, I've never been able to successfully replicate it. So I normally end up making a sausage and potato stirfry which is excellent as a starter or with pao bread or rice and dhal.

However, recently Gia Claudette Fernandes (I don't think she is directly related to Crescentia) shared her recipe for Choriz Pulao on one of my favourite foodie groups on facebook - Porkaholics!, so I couldn't wait to try it out.

Gia's recipe is extremely precise and I would recommend you following it. I am an eyeballing cook. Plus what I had was the rosary sausages (home made ones), so I really eye balled it.

I love using the sausage skins, so I fried them up first before adding the onions to crisp them up. I cooked it in a pan with a well fitted lid, but you can also use a pressure cooker.

Gia's recipe follows in her own words:

Gia Claudette Fernandes - Goan Sausage (Choriz) Pulao

Ingredients:
3 cups of basmati rice, washed and soaked in a lot of water for at least 30 mins
6 cups of hot water
1 packet of Goan sausage (500 gms)
4-5 large onions, thinly sliced

Method:

 
Put the raw onions into a non-stick or heavy-bottomed vessel. Tear open the sausage skins and remove the meat. Add this to the onions, separating the pieces with your fingers as you do this.

Put the pot/pan on high heat and mix the onions and sausage meat well. Do not add any extra oil, please! Toss continuously until the fat starts to melt and the onions get nicely fried in the oil. Do this for at least 10 to 15 mins until the onions become soft. Control the heat and reduce the flame when it gets too hot. You don’t want to burn the mixture.

When the sausages and onions are fried and the oil starts to separate, it’s time to add the rice. Drain away the water it was soaked in and add the rice. Mix well with the sausage-onion mix. Fry for 2-3 mins. Now pour in the hot water and stir. Check for seasoning, if you need more salt, add it. I like to add 1-2 Maggi stock cubes at this stage (veg or chicken). This adds extra flavour and balances the heat from the sausages. If you’re using the stock cubes, it’s a good idea to first dissolve them in the hot water that you’re supposed to add to the rice.

When it comes to a boil, turn the heat to sim and cook with the lid on for 8-10 mins (depending on your rice). Try and place a heavy object on the lid so that the steam doesn’t escape. After 8-10 mins, turn it off and don’t open for at least 10-15 mins.

Before serving, lightly fluff with a rice fork so that the grains do not get stuck.

You can also reserve some of the sausages and fry separately. Then mix into the pulao just before serving.

This is best had by itself when it’s piping hot. I still haven’t found anything that complements this dish well, except for chilled beer!

Bon Apetite!


The result was perfect, I used the soup cube and it helped tone down the sharpest flavours of the choriz. The husband doesn't normally like choriz too much, he finds the flavours too strong, especially the home made ones. But he loved this pulao.

Thanks a ton Gia!

Wednesday, July 03, 2013

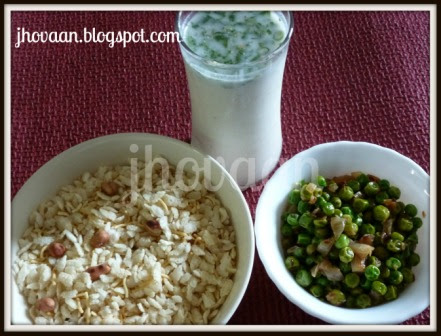
Recipe : Bihari Mattar Ghoogni Chiwda - Peas and Puffed Rice Flakes - Vegan

When we were in Jaipur in January this year, we stayed with our friends Anand & Anisha who are excellent hosts. they love food as much as we do, if not more and we had a lovely holiday with them, eating and catching up.

Surprisingly, although I lived for 2 years in Jamshedpur (which was still a part of Bihar in those days), I now realise, I never had the opportunity to eat Bihari food. All the cooks at our hostel were Bengali or Odiya, so that is the kind of food they served us. Plus with Jamshedpur being the Tata's Industrial town, there were a lot of restaurants serving Tandoori, Mughlai, Chinese, Pizza, South Indian etc, but there weren't any places serving litti chokha or anything else that could be classified as traditional Bihari food.


On our second morning in Jaipur, we were served this dish and we fell in love with it, so we kept asking for repeats at tea time and for breakfast on almost all the days that we were there. The taste and texture  is so addictive, that you can't help going back for seconds.

During winters, the dish is made with hara channa (fresh green chickpeas) or else it can be made with peas. Fresh peas are best, but frozen works quite well too. (Don't use dehydrated peas for this dish)

The peas or hara channa can also be served as a side with rotis or rice and dhal.

Anisha always has a big jar of homemade puffed rice flakes in her pantry, as they use it in many dishes. She says its just a matter of deep frying rice flakes (poha) and mixing it with salt and fried groundnuts. Here in Ahmedabad, I have found a ready made roasted version, to which I just add some roasted groundnuts. I've alsoo seen a recipe which says you can roast 1 bowl of poha in 1 tbsp of oil.

I tend to make the peas in large quantities - even half a kilo at a time because it gets wolfed down very quickly between the two of us. It keeps well in the fridge and can be reheated later.

Ingredients:
1 cup shelled peas / mattar or hara channa / fresh green chickpeas (if frozen, defrost by holding under running water)
1 medium onion chopped (less than 1/3 cup volume)
1/2 tsp cumin seeds / jeera
1" ginger grated (or to taste)
2 -3 green chillies chopped (or to taste)
salt to taste
juice of 1 small lime
1/2 tsp oil

Method:
Heat the oil.
Add the cumin seeds and wait for them to pop.
Then add the onions and stir fry until soft.
Add half the green chillies (if you don't like spicy, add all the chillies with the onions itself and cook them out), ginger and stir twice.
Add the peas / hara channa at room temperature.
Cook till done (don't close the pan while cooking, you might get a pool of liquid at the bottom)
When almost done, add the other half of the green chillies.
Give a quick stir and turn off the flame
Add salt and lime juice to taste.

Serve hot with  the puffed rice flakes + groundnuts mixture.


Mix the two and eat immediately. Its really tasty either for breakfast or a snack.
 

These peas can also be served with rotis or rice and dhal during a meal.

The drink in the background of these pictures is Masala Chaas / Chaach / Spiced Buttermilk / Ayran / Majjige

Friday, November 30, 2012

Recipe: Preserved Lemons (Morocco)

Preserved Lemons are an essential ingredient in Moroccan cooking and widely available in most Middle Eastern and North African Bazaars.

Like garam masala powder, jeera powder, chilli powder etc are widely used in Indian cooking, but rarely made at home in India, similarly most families in MENA (Middle East North Africa) buy their preserved lemons from the market.

This recipe is from a friends mother. I haven't tried making it at home yet, but a friend who saw my recipe for Mqualli - Moroccan Chicken Tajine with Preserved Lemon & Olives asked for a recipe that she could make at home, so I'm sharing it here.

I've approximated weights and measures a bit to compensate for aunty's eyeballing it version.

This is one of my bookmarked projects for the coming summer when the days are drier and hotter (the best time to make pickles). I'll add pictures at that time.

Ingredients:
10-12 lemons (not the tiny Indian limes, you want the larger ones closer in size to lemons)
3/4 cup (150-175 gms)of coarse sea salt
1/2 tsp black peppercorns
2 bay leaves
1/4 cup (50-60ml) lemon juice
boiling water to cover the lemons in the jar

Method:
Scrub the lemons and rinse well in running water.
Cut the lemons in quarters lengthways but leave a bit of the base at the bottom, so they continue to be held together like petals of a flower.
Seperate the quarters slightly (without breaking off) and salt the inside of the lemons.
Stack the lemons, base first (to prevent salt falling out) in a sterilised jar.
Sprinkle the peppercorns and insert the bay leaves between the salted lemons and pour in the lemon juice.
Add enough boiling water to submerge the lemons and almost fill the jar
Place a weight on the lemons to keep them submerged.
Seal the jar and store in a dark place for 1-4 months.

When ready to use, remove the weight and discard any white film that may have formed on the surface of the liquid.

If you are very careful with your handling, you can store the preserved lemons outside, but it may be safer to store in the refrigerator.

When cooking with preserved lemons, normally the flesh, seeds and membranes are scooped out and discarded. The skin is rinsed and cut to use in dishes. (Personally, I like using the flesh too, it reminds me of the taste & texture of Indian achaars.)


Kim's Tips:
Remember, if you are preserving skins of any fruit/vegetable (in jams or pickles) and live in Europe/North America, you need to be careful and consciously choose unwaxed fruit.

Since you are preserving lemons with salt (acid & salt) be sure to use a glass or ceramic jar ONLY for storing, preferably with a non metallic lid.

Since you have to add boiling water to the lemons, it needs to be a thicker glass jar/bottle to handle the heat without cracking.

The weight would be a stone of some kind, it needs to be non-organic and non-metallic.

The preserving liquid can be boiled and reused for the next batch to make it more intense, but it depends on how well the liquid has kept

Thursday, October 27, 2011

Recipe : Home Made Stuffed Naan on a Gas Stove Tandoor

In the run up to Diwali, my husbands mom and maami are beseiged with menu requests from their husbands and visiting children. On Chhoti Diwali, the final consensus was for stuffed naan and paneer ki sabji.


I have to mention here, that my husbands mom and maami cook almost identically to each other without the aid of any written recipes. On a blind taste test it would be almost impossible to identify who cooked what. So its equally difficult to identify whom to attribute a recipe to and hence I will alwasy attribute it to them both.

There are 2 ways to make naan at home. The instant way is to mix maida (plain flour) with a bit of sugar and salt and then make the dough using only soda water. The dough is ready for rolling after resting for 5-10 minutes. You can also rest this dough for a couple of hours if you prefer.

But if you have enough time to rest the dough, you will get tastier naans by mixing maida (plain flour) with a bit of sugar and salt, a teaspoon of ghee or butter, a little cream, a little yoghurt and a bit of yeast. If you do not want to use yeast, you can again just make a dough with soda water. Rest this dough in a warmish place, so it can rise. If using yeast, let it rise for at least 8 hours.

The main equipment you need, to make authentic naan at home is a tandoor. A coal burning tandoor isn't practical for most homes and the electric tandoors take up too much place if you live in an apartment and only use it occassionally. My mom-in-law has an ingenious contraption that fits over a regular gas burner but works like a tandoor. This needs to be preheated before you can start using it, much like how an oven would operate.

This time they decided to stuff the naans with paneer or grated cheese, so there were 2 varieties of stuffed naans that were being rolled out simultaneously.

Mami was working so quickly with her hands, I had to get her to stop and work in extreme slow motion so I could capture the basic steps.

Flatten out a ball of dough.

Drop some stuffing on it.

Draw the edges to the top and crimp shut.

Carefully flatten again, so the stuffing does not pop out.

Roll out the naans.

There are 2 ways of doing the next step. The traditional method would be to lightly moisten the inside of the dome of the tandoor contraption and stick the naan onto that. Giventhat it is burning hot, the easier option is to lightly pre fry the naans on a tawa kept on a low flame.

Then place the pre fried naans on the grill of the tandoor.

Keep turning over every minute or so until done.

Dot lightly with melted butter and serve hot with a bowl of steaming curry/korma like the paneer gravy below.

Edited on 29 Oct 2011 to add:

My friend Michelle from Food, Football and a Baby asked for better quantities, so upon checking, its roughly
1 cup maida (plain flour), salt to taste, sugar about a teaspoon or more if you want it sweeter, cream 1 teaspoon, yoghurt 1 tablespoon, ghee/butter - 1 tsp and enough soda water to make the dough (no other liquid at all). They prefer not to use yeast in general.

Wednesday, October 26, 2011

Recipe: Food made from Prashad of Gaay-Bachde ki Puja


The day before Dhanteras (i.e. 3 days before Diwali) is celebrated as Gaay-Bachde ki Puja - veneration of cows and calves by some families in UP. My husbands Naani (maternal grandmother) and Maami (mothers brother's wife) observe this, while his mother doesn't. (From what I have come to understand, married women here, observe the rites and rituals followed by the matriarchs of their husbands family and add on any rites and rituals from their own families if they feel very strongly about them - There are so many festivals and rituals in the UPite Hindu Calendar that there is ample choice to pick and choose.)

On this day, the women offer various kinds of grams/dhals/lentils to a cow and her calf and for the whole day, they only eat foods made from grams/dhals/lentils or their flours (primarily besan). While lentil soup/dhal seems the most straight forward option, it feels weird to eat just that without rice or rotis. So pakodas (deep fried balls) are what tends to be made of these dhals.

We reached after the puja was over, so I unfortunately don't have any pictures of that, but I do have plenty of pictures of the food.

Any kind of dhal needs to be soaked before it can be ground for pakodas. Urad dhal needs the longest time 6-8 hours. Channa dhal needs 4-6 hours and moong dhal can be soaked for an hour or so.

To make the pakodas, the soaked dhal is ground to a paste with enough water. You can then add flavourings like onions, green chilli, coriander leaves, ginger. But technically you only mix enough for them to be flavourings, but not so much that they turn into onion pakodas.


Urad dhal pakodas aren't very tasty on their own or even with cuttings, so these get turned into dahi vadas. Just grind soaked urad dhal, you can add a little ginger and green chilli if you like. Personally I also like to split a few raisins in half and add it to the batter. Drop little balls of batter into hot oil and deep fry.

As soon as you take them out of the pan, they are dropped into a bowl of water. If you want to cool them first, then they need to be soaked in hot water later. Soak for about 5-10 minutes (depending on size of your pakodas/vadas). Then squeeze out all the liquid from the soaked vadas.

Layer them in a deep bowl. Pour lightly whipped curd/yoghurt over these vadas.

Sprinkle with chilli and jeera powder.

Serve topped with sweet and sour chutneys.

Mamiji made some pakodas with channa dhal and some with moong dhal, some with onions and some without.


While most of us kept merrily popping these golden balls of deep fried goodness into our mouths, those who wanted a slightly more substantial snack, smashed them between slices of bread for a more filling option.

Guest Chef - Mrs Anju Mishra

Monday, June 13, 2011

Recipe: Mrs Nath's Mattar Parathas - Indian bread stuffed with peas

This is a recipe from my friend Arindam's mom. He served them to us at dinner at his place. The parathas were really very tasty and we gladly accepted the offer to take home leftovers to be refried the next day.. He has been kind enough to share the recipe.

Of course technique is key to making parathas and I'm terrible at stuffing and rolling out parathas (I can barely manage rotis), so my pictures look a bit mangled. But the taste was so good, that I had to share the recipe.

Ingredients:
Roti dough / paratha dough (made from wheat flour, a pinch of ghee and salt)
For the Stuffing:
1 cup fresh/frozen peas (not dried - you won't get the flavour from dried peas)
1 tsp saunf - fennel seeds
1-3 green chillies (adjust heat to your taste)

pinch of sugar
salt to taste
ghee to fry (or oil if you want to keep it vegan)

Method:
Puree the green peas (if frozen, let them come to room temperature) in a blender
Saute the pureed peas with the saunf, chillies, sugar and salt.
Fry on a low flame until it reaches the consistency slightly drier than mashed potatoes.
Stuff this filling into balls of dough and roll out the parathas (how much stuffing you manage to put in is completely dependent on your competence at stuffing- my MIL who is supremely competent in this art has more stuffing than dough in her parathas - something I can only aspire to)


Slowly fry the parathas in ghee (for best taste use at least a tsp per paratha) on a low flame till well cooked on both sides.


Serve hot.

The simplest accompaniment to stuffed parathas is  yoghurt and pickles.
You can get fancy and serve it with a raita.
Its a wonderful filling breakfast to start a busy day.
Stuffed parathas aren't normally served with dhal, if they are, it would be with a black dhal rather than a yellow dhal.
You can serve it with a dry vegetable side or a semi gravy side of meat. In the picture below, its served with tawa kebabs.

Saturday, November 27, 2010

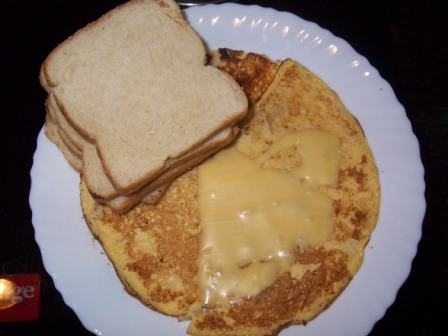
Recipe: Karina's Cheese Omlette

My sister isn't much of a cook. Don't get me wrong - she loves good food and is an appreciative audience to all my experiments with food, but she doesn't don the chefs hat herself, unless it is to prepare something quick and easy.

This is one of her favourite recipes and she has been egging me on to try it, especially on the days when my husband is travelling and I end up with a pack of ParleG and a glass of milk for dinner! It just feels like too much effort to cook a meal for one person.

So this time when the husband was away, I decided to give in and found it was worth the 5 minutes effort to prepare and wash up.

Ingredients:
2 Eggs
1 slice of cheese
1/2 tsp each of chopped onion, tomato, green chilli and corriander (optional - use whatever you like in your omlettes - I only used onion)
salt and pepper to taste
1 tsp milk
a drop of oil/butter to fry

Method:
In a bowl break in the eggs, and add, the milk, salt and pepper.
Beat with an egg beater to get a bit of a froth.
Mix in the onion, tomato, green chilli and corriander and beat lightly again.

Pop the frying pan on the fire, when warm add a drop of oil/butter/ghee and swirl around the pan.
Pour the egg mixture and fry till done on one side.
Turn it over and fry on the other side, or if you like it slightly runny, just take it off the pan.
(Kim's Tip: If you use onions and tomatoes in your omlette, it may become heavy and you may find it difficult to flip upside down. In this case, loosen the egg from the bottom and slide it carefully onto a plate. Then hold the plate firmly in one hand, cover it with the frying pan and turn it upside down in a smooth movement so the uncooked side of the egg is now facing the bottom of the pan)

Slide the fried omlette onto a plate. Top with a slice of cheese.
Pop in the microwave for 30 seconds till the cheese starts to melt and bubble.
Serve with bread or toast.
I have just half a slice of cheese on this omlette as the cat came running in when she smelt the cheese coming out of the fridge and begged till I fed her half a slice. Since she too goes into depression when the husband is away, I couldn't say no!

LinkWithin

Related Posts with Thumbnails

ShareThis