Tendlis are one of my favourite vegetables. Its one of the few veggies that really retains its crispness and also absorbs the flavour of whatever you cook it with.
The tendlis available here in Guwahati are very different than the ones we get in Mangalore. Manglorean tendlis are thin and long, the ones I got here are shorter and fatter and hence take longer to cook, but the taste is the same.
Looking at the seeds, tendlis are more likely to belong to the cucumber family, rather than the parval family, but I'm not too sure about this.
Ingredients:
200 gms tendlis quartered vertically
1 onion chopped
2 dry red chillis
4-5 methi dana (fenugreek seeds)
7-8 peppercorns (optional for heat)
1 tsp jeera (cumin)
2 tsp channa dal
2 tsp urad dhal
1 tsp mustard seeds
2 tsp vegetable powder
1-2 tsp tamarind paste
salt to taste
1-2 tsp of dessicated or fresh coconut to taste (optional)
1 sprig curry leaves (I've run out and they aren't available here, so I haven't used them)
1-2 tsps oil (preferably coconut, but any other refined oil is ok)
Take a look at the Manglorean tendlis to see what I'm talking about regarding size.
Method:
Keep all the seasoning ingredients ready, so you aren't fumbling when its time to put them in. (since there are so many of them, the risk of them burning while you search for ingredients is quite high)
Heat a pan (the wider the surface the better), add the oil to it. Now add seasoning ingredients in the following order: methi, peppercorns, channa dhal, urad dhal, jeera, curry leaves, red chilli, mustard seeds. The spacing between each is dependant on how long each one takes to cook and to avoid burning.
Add the onion and coconut, fry lightly for a minute or so.
Then add the quartered tendlis and fry on low heat.
When half cooked, add the tamarind paste (if its commercial check the salt content and dilute in a bit of water, so that it will spread out rather than stick in a ball) and vegetable powder.
Conitnue to cook on low heat until done.
Serve hot with rice and dhal or rotis.
This is a dish prepared by the Konkana community in Mangalore. I have also seen a version of this cooked in Andhra Pradesh.
I was inspired to cook by my Late Grandmother Mrs. Magdalene Aranha when I was barely 6 years old. I spent a lot of enjoyable days in her kitchen, smelling & tasting & sometimes helping prepare the food being cooked. This blog is dedicated to my Nana Maggie. I've lived in 5 countries and 18 cities, so I cook with a variety of influences and ingredients and that reflects in this blog.
Tuesday, October 18, 2011
Sunday, October 16, 2011
Recipe: Stuffed Capsicum (with leftover mince)
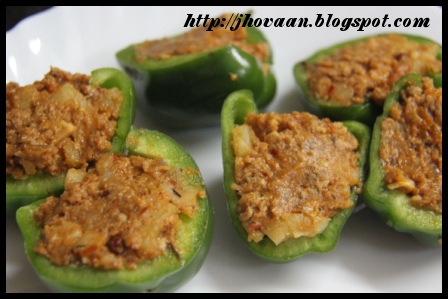
This is another lovely way to use up leftover mince rather than just making cutlets out of it. You need small capsicums for this dish and not the regular size. Chopping the capsicum into smaller pieces won't help, because we want the curve to hold the filling in.
Most mince dishes will go well with this recipe. I normally do this with an Indian recipe for mince, but I use others too. Leftover shepherds pie when all mixed together does the trick too. If you have mince from your burgers, that will work too but remember to cook the mince before stuffing it.
This time I had some leftover bolognese sauce made with chicken mince. I just dried off the sauce on a stove top and added some boiled potatoes to the mix so it would bind together.
Ingredients:
Leftover cooked mince (chicken/mutton/beef/burger)
Some boiled potato to bind it together if necessary
Baby capsicums (depending on how much leftover mince you have)
1-2 eggs beaten with some salt and pepper
Method:
Deseed the capsicum and split in half. You can leave it whole if you want to bake it in the oven.
Warm the mince to slightly above room temperature and stuff the capsicum halves with it.
Dip the capsicums in the egg batter and put them in a heated & lightly greased frying pan, mince side down first. The egg will slide down the rest of the capsicum, don't worry about it.
Fry it on a really low flame, so the egg won't burn but the edges of the capsicum touching the pan on this side can cook.
Then gently turn it over and fry on a low flame until the capsicum skin is slightly charred. and the capsicum turns to a cooked shade of green.
The dish may not be very pretty to look at, but I assure you its extremely tasty and you won't be able to stop popping them in your mouth.
They go well as a side dish or even smooshed up as a filler for sandwiches.
Most mince dishes will go well with this recipe. I normally do this with an Indian recipe for mince, but I use others too. Leftover shepherds pie when all mixed together does the trick too. If you have mince from your burgers, that will work too but remember to cook the mince before stuffing it.
This time I had some leftover bolognese sauce made with chicken mince. I just dried off the sauce on a stove top and added some boiled potatoes to the mix so it would bind together.
Ingredients:
Leftover cooked mince (chicken/mutton/beef/burger)
Some boiled potato to bind it together if necessary
Baby capsicums (depending on how much leftover mince you have)
1-2 eggs beaten with some salt and pepper
Method:
Deseed the capsicum and split in half. You can leave it whole if you want to bake it in the oven.
Warm the mince to slightly above room temperature and stuff the capsicum halves with it.
Dip the capsicums in the egg batter and put them in a heated & lightly greased frying pan, mince side down first. The egg will slide down the rest of the capsicum, don't worry about it.
Fry it on a really low flame, so the egg won't burn but the edges of the capsicum touching the pan on this side can cook.
Then gently turn it over and fry on a low flame until the capsicum skin is slightly charred. and the capsicum turns to a cooked shade of green.
The dish may not be very pretty to look at, but I assure you its extremely tasty and you won't be able to stop popping them in your mouth.
They go well as a side dish or even smooshed up as a filler for sandwiches.
Saturday, October 15, 2011
Recipe: Chawla's Cream Chicken
This is the first recipe that I cooked from The Food Trail of Punjab. Mr Yashbir Sharma says that this is the original Chawla's recipe for Cream Chicken.
The recipe in the book was for 700gms chicken, I had a 1.2 kilo chicken with me so I changed the quantitites around.
The ingredients are very simple and can be found around any pantry except perhaps the kasuri methi. Given how the dish tasted, when I make it next time, I will add more ginger and garlic and also a few split green chillies to contrast against the richness of this dish.
For this time, the pickled onions were a great contrast and palate cleanser between bites of the rich chicken.
Ingredients:
1.2kg chicken
12 cloves garlic crushed
2 tsp ginger paste
900 ml milk (room temperature or warm)
1.5 tbsp black peppercorns (kalimirch) crushed
3 tbsp kasuri methi coarsely ground
1 cup cream
salt to taste
Method:
Clean and dry the chicken and marinate it with garlic, ginger and salt for at least 10 minutes.
Heat a deep bottomed pan, drop the chicken into it (no need for oil if its a non stick) and slightly sear the chicken, it will start to give a nice caramelisation.
Add milk and boil for 10 minutes or so. (Don't worry if it looks like the milk is splitting, it will come back together when you add the cream later.)
Add pepper powder and kasuri methi and cook till alost done. Let the milk dry out a bit.
Add cream and cook on low flame for another 5-10 minutes. (This is the stage at which I would also add the split green chillis)
I just let it simmer gently until it reached the consistency that I wanted.
Serve hot with parathas or rotis. This dish when thickened, doesn't go as well with rice.
As you look at the ingredients, you will realise that this dish is very rich in calories. Its a lovely dish for the original Punjabis who used to work hard in their fields and then consumed a lot of milk, ghee, cream and butter with their meals. But not the lightest option for those of us with desk jobs.
Lower fat option:
I've found that I get a similar consistency and texture, by adding hung curd to the chicken marinade. That is a dish I've been cooking since quite a few years. Then, there is no need for milk or cream when cooking.
You just have to make sure that you bring the marinated chicken to room temperature before you start to cook it (so the curd won't split) and keep it on a low flame so it cooks gently.
The recipe in the book was for 700gms chicken, I had a 1.2 kilo chicken with me so I changed the quantitites around.
The ingredients are very simple and can be found around any pantry except perhaps the kasuri methi. Given how the dish tasted, when I make it next time, I will add more ginger and garlic and also a few split green chillies to contrast against the richness of this dish.
For this time, the pickled onions were a great contrast and palate cleanser between bites of the rich chicken.
Ingredients:
1.2kg chicken
12 cloves garlic crushed
2 tsp ginger paste
900 ml milk (room temperature or warm)
1.5 tbsp black peppercorns (kalimirch) crushed
3 tbsp kasuri methi coarsely ground
1 cup cream
salt to taste
Method:
Clean and dry the chicken and marinate it with garlic, ginger and salt for at least 10 minutes.
Heat a deep bottomed pan, drop the chicken into it (no need for oil if its a non stick) and slightly sear the chicken, it will start to give a nice caramelisation.
Add milk and boil for 10 minutes or so. (Don't worry if it looks like the milk is splitting, it will come back together when you add the cream later.)
Add pepper powder and kasuri methi and cook till alost done. Let the milk dry out a bit.
Add cream and cook on low flame for another 5-10 minutes. (This is the stage at which I would also add the split green chillis)
I just let it simmer gently until it reached the consistency that I wanted.
Serve hot with parathas or rotis. This dish when thickened, doesn't go as well with rice.
As you look at the ingredients, you will realise that this dish is very rich in calories. Its a lovely dish for the original Punjabis who used to work hard in their fields and then consumed a lot of milk, ghee, cream and butter with their meals. But not the lightest option for those of us with desk jobs.
Lower fat option:
I've found that I get a similar consistency and texture, by adding hung curd to the chicken marinade. That is a dish I've been cooking since quite a few years. Then, there is no need for milk or cream when cooking.
You just have to make sure that you bring the marinated chicken to room temperature before you start to cook it (so the curd won't split) and keep it on a low flame so it cooks gently.
Recipe: Low fat Parathas using the Roti Maker
As I've blogged befoe, using the roti maker has been a huge boon as it means so much less washing up. The husband is the only one who eats rotis at home and earlier the amount of cleanup and washing to make 3-4 rotis or parathas was just too much.
The roti maker eliminates all the extra flour used when rolling, which then flies all over the kitchen and gets into the holes on the gas burner. There is no chakla belan to be washed. And the roti maker itself, just has to be wiped clean with a damp cloth. so all I have to wash is the bowl in which I mix the dough or have stored the dough in.
Ingredients:
Whole wheat flour
salt to taste
water to make the dough
a little ajwain - optional
a little ghee/butter to fry
Method:
Make the dough, the same way that you would for rotis or phulkas.
When using the roti maker, don't press down as hard as you would for a roti, so that the parathas aren't too thin.
Fry on one side for 15-30 seconds, turn over.
Rub a drop of ghee on the top surface, turn over and repeat.
Keep turning over every few seconds until the paratha is cooked.
You can even close the roti maker in between, to speed up the cooking.
Parathas are much faster this way and I find that I use so much less ghee. Just 2 drops of ghee to a paratha.
Serve hot with any gravy or dry dish. In the first picture in this post, it has been served with Chawla's Cream Chicken and pickled onions.
The roti maker eliminates all the extra flour used when rolling, which then flies all over the kitchen and gets into the holes on the gas burner. There is no chakla belan to be washed. And the roti maker itself, just has to be wiped clean with a damp cloth. so all I have to wash is the bowl in which I mix the dough or have stored the dough in.
Ingredients:
Whole wheat flour
salt to taste
water to make the dough
a little ajwain - optional
a little ghee/butter to fry
Method:
Make the dough, the same way that you would for rotis or phulkas.
When using the roti maker, don't press down as hard as you would for a roti, so that the parathas aren't too thin.
Fry on one side for 15-30 seconds, turn over.
Rub a drop of ghee on the top surface, turn over and repeat.
Keep turning over every few seconds until the paratha is cooked.
You can even close the roti maker in between, to speed up the cooking.
Parathas are much faster this way and I find that I use so much less ghee. Just 2 drops of ghee to a paratha.
Serve hot with any gravy or dry dish. In the first picture in this post, it has been served with Chawla's Cream Chicken and pickled onions.
Monday, October 03, 2011
Book Review: Food Trail of Punjab
Rushina, had been very enthusiastic some time last year about the release of "The Food Trail of Punjab". She had met Mr Yashbir Sharma and was quite impressed with his love for food that drove him to self-publish. This is his second book after "The Dhabhas of Amritsar" She even helped him launch the book in Bombay. Unfortunately I was in Delhi at that time and missed the Bombay launch, but that did not stop me from buying a copy of my own.
I'd flipped through "The Food Trail of Punjab" when I was in Delhi, but it wasn't a very serious effort. Punjabi food was easily available within 15 minutes of dialling a number, so I didn't bother cooking anything Punjabi while I was in Delhi.
Now that I'm in Guwahati and my favourite Punjabi restaurant here: Khalsa Parivaar has been closed for 3 months with no signs of reopening in the immediate future, I needed to take a closer look at my Punjabi cookbooks. Why Punjabi? No I'm not craving the ghee :) Punjabi food while rich with milk products is also very simple to put together. Ingredients needed are minimal and easy to find in any kitchen pantry or even Guwahati's food stores.
Given my paucity of food ingredients here, I've been thinking that Punjabi food will be much easier for me to cook here, than pasta or stir fries.
So I sat down to flip through "The Food Trail of Punjab" again. And this time I was hooked. The wealth of information is amazing. If a foodie were to try and visit all the eateries mentioned in the book, they wouldn't be able to cover more than one page in a day.
Food Trail starts with a brief travelogue of Amritsar and Wagah, before proceeding to Jalandhar, Ludhiana & Patiala. Then Mr Sharma gets down to buisness, he starts listing out all the eateries he has eaten at and what their specialities are with a bit of background to the history of some of the eateries and some recipes that he managed to get these long term khansamas to share (which is a heroic feat in itself).
As I had expected, the recipes are simple and when I cook them at home, I can lower the ghee and malai (cream) content in most of the savoury dishes. (Never compromise on ghee, cream and butter in sweet recipes, the results will be disastrous)
The pictures aren't what you would see in a glossy Hermes House or Good Housekeeping cookbook, but the recipes are very authentic. If you buy cookbooks for the pretty pictures, then this one isn't for you. But if you buy the Penguin "The Essential" cookbook series because there are some great recipes in there, then you will be happy just to have pictures in this book.
A beginner cook or someone who isn't familiar with the names of these dishes, may have some trouble with some recipes in this book, because steps aren't as clear as could be. But anyone who is comfortable improvising while cooking, will be able to figure out the instructions very easily.
For eg to make motichoor laddoos:
Step 1 Mix besan and meetha soda together and sieve.
Step 2 Mix desi ghee, milk and a little water to make a thick batter.
If you understood that the ingredients of step 2 have to be added to those in step 1 to get the batter, you will be able to cook from this book.
The only other problem with this book is the editing. This could just be my editing experience speaking, but I really wish I could have got my hands on the manuscript before it was published. The content is vast and information tremendous. It would just have been so much pleasanter to read if the grammatical errors and misused turn of phrases had been caught before publishing. Mr Sharma if you plan to publish another food book or need to reprint this one, I volunteer my services for the editing.
Contentwise the book as I mentioned before, is marvellous. You can plan a 2-3 week holiday in Amritsar just for sampling the fare from the eateries montioned in this book. The recipes are simple, ingredients required are very basic. Other than paneer, brains, curry patta and baby corn I should be able to procure them quite easily here. And ingredients like garam masala, chaat masala and black salt, you will be able to source quite easily from Indian/Pakistani/Bangladeshi stores elsewhere in the world.
Some ingredients like yellow chilli powder, I have not yet come across and some like magaz had me rushing to google. But there is a glossary on the last page for a handy translation for most ingredients.
Some recipes like the chicken chaat are so simple, a child could assemble it whereas the motichoor laddus will take more experience if you plan to make the boondi/motis too at home. I've already bookmarked some recipes to try in the near future. Will let you know how it goes.
The book is not yet available on Amazon, but it is available on flipkart
I'd flipped through "The Food Trail of Punjab" when I was in Delhi, but it wasn't a very serious effort. Punjabi food was easily available within 15 minutes of dialling a number, so I didn't bother cooking anything Punjabi while I was in Delhi.
Now that I'm in Guwahati and my favourite Punjabi restaurant here: Khalsa Parivaar has been closed for 3 months with no signs of reopening in the immediate future, I needed to take a closer look at my Punjabi cookbooks. Why Punjabi? No I'm not craving the ghee :) Punjabi food while rich with milk products is also very simple to put together. Ingredients needed are minimal and easy to find in any kitchen pantry or even Guwahati's food stores.
Given my paucity of food ingredients here, I've been thinking that Punjabi food will be much easier for me to cook here, than pasta or stir fries.
So I sat down to flip through "The Food Trail of Punjab" again. And this time I was hooked. The wealth of information is amazing. If a foodie were to try and visit all the eateries mentioned in the book, they wouldn't be able to cover more than one page in a day.
Food Trail starts with a brief travelogue of Amritsar and Wagah, before proceeding to Jalandhar, Ludhiana & Patiala. Then Mr Sharma gets down to buisness, he starts listing out all the eateries he has eaten at and what their specialities are with a bit of background to the history of some of the eateries and some recipes that he managed to get these long term khansamas to share (which is a heroic feat in itself).
As I had expected, the recipes are simple and when I cook them at home, I can lower the ghee and malai (cream) content in most of the savoury dishes. (Never compromise on ghee, cream and butter in sweet recipes, the results will be disastrous)
The pictures aren't what you would see in a glossy Hermes House or Good Housekeeping cookbook, but the recipes are very authentic. If you buy cookbooks for the pretty pictures, then this one isn't for you. But if you buy the Penguin "The Essential" cookbook series because there are some great recipes in there, then you will be happy just to have pictures in this book.
A beginner cook or someone who isn't familiar with the names of these dishes, may have some trouble with some recipes in this book, because steps aren't as clear as could be. But anyone who is comfortable improvising while cooking, will be able to figure out the instructions very easily.
For eg to make motichoor laddoos:
Step 1 Mix besan and meetha soda together and sieve.
Step 2 Mix desi ghee, milk and a little water to make a thick batter.
If you understood that the ingredients of step 2 have to be added to those in step 1 to get the batter, you will be able to cook from this book.
The only other problem with this book is the editing. This could just be my editing experience speaking, but I really wish I could have got my hands on the manuscript before it was published. The content is vast and information tremendous. It would just have been so much pleasanter to read if the grammatical errors and misused turn of phrases had been caught before publishing. Mr Sharma if you plan to publish another food book or need to reprint this one, I volunteer my services for the editing.
Contentwise the book as I mentioned before, is marvellous. You can plan a 2-3 week holiday in Amritsar just for sampling the fare from the eateries montioned in this book. The recipes are simple, ingredients required are very basic. Other than paneer, brains, curry patta and baby corn I should be able to procure them quite easily here. And ingredients like garam masala, chaat masala and black salt, you will be able to source quite easily from Indian/Pakistani/Bangladeshi stores elsewhere in the world.
Some ingredients like yellow chilli powder, I have not yet come across and some like magaz had me rushing to google. But there is a glossary on the last page for a handy translation for most ingredients.
Some recipes like the chicken chaat are so simple, a child could assemble it whereas the motichoor laddus will take more experience if you plan to make the boondi/motis too at home. I've already bookmarked some recipes to try in the near future. Will let you know how it goes.
The book is not yet available on Amazon, but it is available on flipkart
Labels:
Book Review,
Cookbook,
Indian,
Punjabi
Location:
Punjab, India
Saturday, October 01, 2011
Recipe: Grilled Breakfast Hash & Eggs
I've been extremely remiss with this blog for a couple of months and its only fair to let you - my readers know why. First our cat whom we adopted 4 years ago and who has shifted 3 countries with us was sick with a very serious case of jaundice and we almost lost her. Fortunately the brilliant doctors at CGS Hospital, whom we went to for a second opinion before putting her to sleep were able to save her with intense medication, 6 hourly drips and constant care over a month. Not a very conducive mindframe for cooking, you must admit.
As soon as she was fit to travel, we moved from Delhi to Guwahati and had to live in the guesthouse for a month until we found a place of our own to move into. Couldn't step on the cooks toes, by taking over the kitchen here, could I?
Setting up house in Guwahati has been a challenge because of supply issues. We are now in the North East of India and can completely sympathise with the general feeling of being cut off from mainland India.
Guwahati is a small town, supplies of manufactured products have to come in from Calcutta or Delhi. Basic food items that I took for granted like skimmed milk, 30 liter water jars and yoghurt are just not available here, forget gourmet cheeses and sauces. If I want chicken, I have to buy the whole chicken from the market, no special cuts. (I've finally found a guy who supplies boneless chicken) If I want to buy mutton, I have to take whatever the guy at the butcher shop decides to give me and it is minimum 70% of bones and skin and kidneys and liver.
Fish is river fish and we are sea fish eaters. Vegetables are completely seasonal (a concept I confess I had forgotten) and there are a lot of them that I have never seen before. A couple of trials cooking them and the tastes still haven't grown on us. Food items are expensive. Coconuts are 50Rs a piece. Tomatoes 45Rs a kilo. Mutton (70% bones and skin & spare parts) 250Rs/kilo. And on top of all of this I have a really tiny kitchen. I've never before worked in such a tiny kitchen.
Plus in the last 4 months since we moved, I've made trips to Delhi, Shillong, Canada and London and the dh has been travelling much more than that. So I haven't really found a reason or the inspiration to cook. I'm not someone who decides a menu and then goes out shopping. I go out to the market, see what looks freshest and what inspires me and then I bring it home and dishes suggest themelves in my head as I start prepping my ingredients.
So its been a challenge for me to cook anything more than dal-chawal-sabji and if its just me at home, its chawal and chutney pudi or achaar.
However, its also quite depressing for me to keep eating unimaginative food, so I have to kick myself out of this rut and find ways to work with the limited ingredients I can buy here or carry from Delhi in a suitcase when I visit.
Today the husband asked for something baked with eggs and cheese, so I immediately remembered a recipe for Bacon Hash and Broiled Eggs that I read just yesterday in my quest for online inspiration and thought I could tweak it to accomodate the ingredients that I had in my cupboards. Hopefully I can keep finding enough inspiration to keep our meals exciting, so wish me luck!
Ingredients:
100 gms Bacon (thats all I had left) cut into strips across the grain
2 large potatoes diced (not too fine, but small enough to cook quickly))
1 large onion diced (I kept the pieces large enough to be able to bite into and taste their caramalised flavour in the finished dish)
2 tsp kasundi (local whole grain mustard) for flavour
400gms of corned beef
7-8 eggs
salt & pepper to taste
100 gms of cheese (I used a mixture of smoked cheese and mozarella)
Method:
In a large pan, fry the bacon until it renders the fat.
Then add the potatoes and onions and cover and cook for a while.
When the potatoes are half cooked, add the corned beef and mustard and stir well. I did not add any salt because the bacon and corned beef were salty enough. So test your mixture before adding any salt.
Keep frying till the mixture is dry and starting to crisp up.
Turn the gas off and start plating this mixture into ramekins, leaving enough space on top for the egg and cheese. I got 7 ramekins.
Drop a raw egg on the top of each ramekin and sprinkle with a little pepper (I again avoided salt because of the processed meats)
While the original recipe calls for broiling, I set the microwave on grill and grilled the ramekins for 4 minutes.
As soon as the eggs look cooked well enough for your taste (we like them a little runny) take the ramekins out.
Sprinkle cheese on top of the eggs and grill again for 2 minutes or until the cheese melts.
Serve hot.
While this seems like a classic breakfast combination, we had this quite happily for dinner. The dh loved it with toast and I just had it with a salad on the side.
Kim's Tips:
From what I saw today, it would be better to make a well in the centre of the mixture in the ramekins. The yolk will then stay in the center. If the yolk does not directly touch the sides of the ramekin, the risk of it splitting open is minimised.
Do not press the mixture in tight into the ramekins, you will lose texture when the ingredients get smashed.
You can cook the mix as long as you like before grilling. Personally, we prefer it crispy rather than soft.
Note: All cheese and cold meat was carried from Delhi/London on my last trip.
As soon as she was fit to travel, we moved from Delhi to Guwahati and had to live in the guesthouse for a month until we found a place of our own to move into. Couldn't step on the cooks toes, by taking over the kitchen here, could I?
Setting up house in Guwahati has been a challenge because of supply issues. We are now in the North East of India and can completely sympathise with the general feeling of being cut off from mainland India.
Guwahati is a small town, supplies of manufactured products have to come in from Calcutta or Delhi. Basic food items that I took for granted like skimmed milk, 30 liter water jars and yoghurt are just not available here, forget gourmet cheeses and sauces. If I want chicken, I have to buy the whole chicken from the market, no special cuts. (I've finally found a guy who supplies boneless chicken) If I want to buy mutton, I have to take whatever the guy at the butcher shop decides to give me and it is minimum 70% of bones and skin and kidneys and liver.
Fish is river fish and we are sea fish eaters. Vegetables are completely seasonal (a concept I confess I had forgotten) and there are a lot of them that I have never seen before. A couple of trials cooking them and the tastes still haven't grown on us. Food items are expensive. Coconuts are 50Rs a piece. Tomatoes 45Rs a kilo. Mutton (70% bones and skin & spare parts) 250Rs/kilo. And on top of all of this I have a really tiny kitchen. I've never before worked in such a tiny kitchen.
Plus in the last 4 months since we moved, I've made trips to Delhi, Shillong, Canada and London and the dh has been travelling much more than that. So I haven't really found a reason or the inspiration to cook. I'm not someone who decides a menu and then goes out shopping. I go out to the market, see what looks freshest and what inspires me and then I bring it home and dishes suggest themelves in my head as I start prepping my ingredients.
So its been a challenge for me to cook anything more than dal-chawal-sabji and if its just me at home, its chawal and chutney pudi or achaar.
However, its also quite depressing for me to keep eating unimaginative food, so I have to kick myself out of this rut and find ways to work with the limited ingredients I can buy here or carry from Delhi in a suitcase when I visit.
Today the husband asked for something baked with eggs and cheese, so I immediately remembered a recipe for Bacon Hash and Broiled Eggs that I read just yesterday in my quest for online inspiration and thought I could tweak it to accomodate the ingredients that I had in my cupboards. Hopefully I can keep finding enough inspiration to keep our meals exciting, so wish me luck!
Ingredients:
100 gms Bacon (thats all I had left) cut into strips across the grain
2 large potatoes diced (not too fine, but small enough to cook quickly))
1 large onion diced (I kept the pieces large enough to be able to bite into and taste their caramalised flavour in the finished dish)
2 tsp kasundi (local whole grain mustard) for flavour
400gms of corned beef
7-8 eggs
salt & pepper to taste
100 gms of cheese (I used a mixture of smoked cheese and mozarella)
Method:
In a large pan, fry the bacon until it renders the fat.
Then add the potatoes and onions and cover and cook for a while.
When the potatoes are half cooked, add the corned beef and mustard and stir well. I did not add any salt because the bacon and corned beef were salty enough. So test your mixture before adding any salt.
Keep frying till the mixture is dry and starting to crisp up.
Turn the gas off and start plating this mixture into ramekins, leaving enough space on top for the egg and cheese. I got 7 ramekins.
Drop a raw egg on the top of each ramekin and sprinkle with a little pepper (I again avoided salt because of the processed meats)
While the original recipe calls for broiling, I set the microwave on grill and grilled the ramekins for 4 minutes.
As soon as the eggs look cooked well enough for your taste (we like them a little runny) take the ramekins out.
Sprinkle cheese on top of the eggs and grill again for 2 minutes or until the cheese melts.
Serve hot.
While this seems like a classic breakfast combination, we had this quite happily for dinner. The dh loved it with toast and I just had it with a salad on the side.
Kim's Tips:
From what I saw today, it would be better to make a well in the centre of the mixture in the ramekins. The yolk will then stay in the center. If the yolk does not directly touch the sides of the ramekin, the risk of it splitting open is minimised.
Do not press the mixture in tight into the ramekins, you will lose texture when the ingredients get smashed.
You can cook the mix as long as you like before grilling. Personally, we prefer it crispy rather than soft.
Note: All cheese and cold meat was carried from Delhi/London on my last trip.
Wednesday, July 27, 2011
World's 50 most delicious foods & Global Foods we can't live without
A friend of mine pointed me towards CNNGo's World's 50 most delicious foods and that took me on a journey to a lot of interesting food related articles on the CNN Go website.
I wanted to save the series and addresses and thought most of you would like to browse through the articles too:
40 Mumbai foods we can't live without
From street food spice bombs to favorite fasting foods and meat dishes fit for a Mughal invader, here are a selection of foods that any true Mumbaiker revels in
40 Thai foods we can't live without
Some iconic, some obscure, these are the dishes that make Bangkok one of the world's finest eating cities
40 Hong Kong foods we can't live without
Street-style comfort foods, reptiles, and a lot of pork -- here are our picks of the most delicious and iconic food items of this foodie's paradise
40 Shanghai foods we can't live without
From simple street fare to Bund-style cuisine, here are our picks for the most delicious and iconic food items that define the Shanghai food scene
I wanted to save the series and addresses and thought most of you would like to browse through the articles too:
40 Mumbai foods we can't live without
From street food spice bombs to favorite fasting foods and meat dishes fit for a Mughal invader, here are a selection of foods that any true Mumbaiker revels in
40 Thai foods we can't live without
Some iconic, some obscure, these are the dishes that make Bangkok one of the world's finest eating cities
40 Hong Kong foods we can't live without
Street-style comfort foods, reptiles, and a lot of pork -- here are our picks of the most delicious and iconic food items of this foodie's paradise
40 Shanghai foods we can't live without
From simple street fare to Bund-style cuisine, here are our picks for the most delicious and iconic food items that define the Shanghai food scene
Saturday, June 25, 2011
A Toast to Buttered Toast
I rarely dedicate an entire blog post, to a post made by someone else.
But this particular article resonated so strongly with me and seemed to express everything I thought and never got around to saying, but in a much better way than I could ever frame it.
So from the author of Dork: The Incredible Adventures of Robin Einstein Varghese
here is an awesome piece on food (Sidin's first as far I can tell) :
A toast to buttered toast
I completely identified with :
"When you’re staying in hotels, for instance, tanking up on toast somehow seems a waste of all the other scrambled, fried, poached and griddled delicacies. Especially if a breakfast buffet is involved."
And his final advice for all:
"Scoop a generous helping of warm butter in one go, enough for the slice and then come. Then dab it strategically at one or two points towards one edge. Then work it across the whole slice in broad, confident strokes. Only in one direction please. Otherwise you will apply, remove, apply, remove, apply, remove like Pakistani life cricket ban. At the end take any excess butter and throw it away. Do not reuse. Especially don’t think you can move quickly and butter another slice with this. That is the kind of reckless, wasteful adventurism that led to Pune Warriors."
Read the entire article at : A toast to buttered toast
But this particular article resonated so strongly with me and seemed to express everything I thought and never got around to saying, but in a much better way than I could ever frame it.
So from the author of Dork: The Incredible Adventures of Robin Einstein Varghese
A toast to buttered toast
I completely identified with :
"When you’re staying in hotels, for instance, tanking up on toast somehow seems a waste of all the other scrambled, fried, poached and griddled delicacies. Especially if a breakfast buffet is involved."
And his final advice for all:
"Scoop a generous helping of warm butter in one go, enough for the slice and then come. Then dab it strategically at one or two points towards one edge. Then work it across the whole slice in broad, confident strokes. Only in one direction please. Otherwise you will apply, remove, apply, remove, apply, remove like Pakistani life cricket ban. At the end take any excess butter and throw it away. Do not reuse. Especially don’t think you can move quickly and butter another slice with this. That is the kind of reckless, wasteful adventurism that led to Pune Warriors."
Read the entire article at : A toast to buttered toast
Monday, June 13, 2011
Recipe: Mrs Nath's Mattar Parathas - Indian bread stuffed with peas
This is a recipe from my friend Arindam's mom. He served them to us at dinner at his place. The parathas were really very tasty and we gladly accepted the offer to take home leftovers to be refried the next day.. He has been kind enough to share the recipe.
Of course technique is key to making parathas and I'm terrible at stuffing and rolling out parathas (I can barely manage rotis), so my pictures look a bit mangled. But the taste was so good, that I had to share the recipe.
Ingredients:
Roti dough / paratha dough (made from wheat flour, a pinch of ghee and salt)
For the Stuffing:
1 cup fresh/frozen peas (not dried - you won't get the flavour from dried peas)
1 tsp saunf - fennel seeds
1-3 green chillies (adjust heat to your taste)
pinch of sugar
salt to taste
ghee to fry (or oil if you want to keep it vegan)
Method:
Puree the green peas (if frozen, let them come to room temperature) in a blender
Saute the pureed peas with the saunf, chillies, sugar and salt.
Fry on a low flame until it reaches the consistency slightly drier than mashed potatoes.
Stuff this filling into balls of dough and roll out the parathas (how much stuffing you manage to put in is completely dependent on your competence at stuffing- my MIL who is supremely competent in this art has more stuffing than dough in her parathas - something I can only aspire to)
Slowly fry the parathas in ghee (for best taste use at least a tsp per paratha) on a low flame till well cooked on both sides.
Serve hot.
The simplest accompaniment to stuffed parathas is yoghurt and pickles.
You can get fancy and serve it with a raita.
Its a wonderful filling breakfast to start a busy day.
Stuffed parathas aren't normally served with dhal, if they are, it would be with a black dhal rather than a yellow dhal.
You can serve it with a dry vegetable side or a semi gravy side of meat. In the picture below, its served with tawa kebabs.
Of course technique is key to making parathas and I'm terrible at stuffing and rolling out parathas (I can barely manage rotis), so my pictures look a bit mangled. But the taste was so good, that I had to share the recipe.
Ingredients:
Roti dough / paratha dough (made from wheat flour, a pinch of ghee and salt)
For the Stuffing:
1 cup fresh/frozen peas (not dried - you won't get the flavour from dried peas)
1 tsp saunf - fennel seeds
1-3 green chillies (adjust heat to your taste)
pinch of sugar
salt to taste
ghee to fry (or oil if you want to keep it vegan)
Method:
Puree the green peas (if frozen, let them come to room temperature) in a blender
Saute the pureed peas with the saunf, chillies, sugar and salt.
Fry on a low flame until it reaches the consistency slightly drier than mashed potatoes.
Stuff this filling into balls of dough and roll out the parathas (how much stuffing you manage to put in is completely dependent on your competence at stuffing- my MIL who is supremely competent in this art has more stuffing than dough in her parathas - something I can only aspire to)
Slowly fry the parathas in ghee (for best taste use at least a tsp per paratha) on a low flame till well cooked on both sides.
Serve hot.
The simplest accompaniment to stuffed parathas is yoghurt and pickles.
You can get fancy and serve it with a raita.
Its a wonderful filling breakfast to start a busy day.
Stuffed parathas aren't normally served with dhal, if they are, it would be with a black dhal rather than a yellow dhal.
You can serve it with a dry vegetable side or a semi gravy side of meat. In the picture below, its served with tawa kebabs.
Labels:
Breakfast,
From a Friend,
One Dish Meal,
Photo Essay,
Recipe,
Roti,
Vegan,
Vegetarian
Sunday, June 12, 2011
Recipe: Cucumber & Peanut Salsa Salad
In the heat of Delhi, its quite a painful process to even attempt any cooking, and also you know that no one has the appetite to eat anything piping hot or heavy.
We end up having lots of milk shakes, lassis and ice cream for lunch alternated by the occassional healthy salad and this is one of those easy to assemble salads if you roast and skin the peanuts in advance. If you have cooked skinned peanuts, then you don't even need to turn on the gas, which is something I dread doing in the afternoon heat.
I also assemble the salad without adding the peanuts (so they don't lose their crunch) and pop it in the fridge for upto a day and mix the nuts just before eating. So the cucumber is really chilled and its even more refreshing on a hot summer day.
Kid's love it, but depending on your child's spice tolerance you may want to balance the chillies.
Ingredients:
1 cucumber - skinned and diced (deseeded if you prefer)
1 small onion - diced (optional)
1 green chilli - finely chopped (deseed, if you don't want it too spicy)
1 handful of peanuts - roasted and skinned (or boiled and skinned for a different texture)
juice of half a lime (I had some salted green mangoes that I needed to finish off as they were dis-coloring, so I used a few slices of that chopped up - it imparts both a salty and sour flavour)
salt to taste
Method:
Just mix all the ingredeints and serve as is or slightly chilled.
If you want to preassemble: Mix everything upto a day before. Except the peanuts - add those just before serving.
The peanuts are high in protein, so its quite balanced to have as an entire meal.
Or serve it as a salsa side with grilled meat or a salad with Indian food
Options:
You can add a handful of sprouted gram to make it healthier.
Onions give a different taste if added
Personally, I'm not a fan of raw tomato, but its also an option.
Use chaat masala instead of salt
I've submitted this recipe for Kid's Delight - Cool Comforts which is part of Srivalli’s Kids delight event.

Click here to view the 80 other entries.
We end up having lots of milk shakes, lassis and ice cream for lunch alternated by the occassional healthy salad and this is one of those easy to assemble salads if you roast and skin the peanuts in advance. If you have cooked skinned peanuts, then you don't even need to turn on the gas, which is something I dread doing in the afternoon heat.
I also assemble the salad without adding the peanuts (so they don't lose their crunch) and pop it in the fridge for upto a day and mix the nuts just before eating. So the cucumber is really chilled and its even more refreshing on a hot summer day.
Kid's love it, but depending on your child's spice tolerance you may want to balance the chillies.
Ingredients:
1 cucumber - skinned and diced (deseeded if you prefer)
1 small onion - diced (optional)
1 green chilli - finely chopped (deseed, if you don't want it too spicy)
1 handful of peanuts - roasted and skinned (or boiled and skinned for a different texture)
juice of half a lime (I had some salted green mangoes that I needed to finish off as they were dis-coloring, so I used a few slices of that chopped up - it imparts both a salty and sour flavour)
salt to taste
Method:
Just mix all the ingredeints and serve as is or slightly chilled.
If you want to preassemble: Mix everything upto a day before. Except the peanuts - add those just before serving.
The peanuts are high in protein, so its quite balanced to have as an entire meal.
Or serve it as a salsa side with grilled meat or a salad with Indian food
Options:
You can add a handful of sprouted gram to make it healthier.
Onions give a different taste if added
Personally, I'm not a fan of raw tomato, but its also an option.
Use chaat masala instead of salt
I've submitted this recipe for Kid's Delight - Cool Comforts which is part of Srivalli’s Kids delight event.
Click here to view the 80 other entries.
Wednesday, May 11, 2011
Recipe : Mutton Chops - Kerala Style - from Flavours of the Spice Coast
I roughly followed Mrs K M Mathew's Recipe from Flavours of the Spice Coast
. I had earlier tried Chicken Piralen from the same book. While her book is wonderful and has some lovely looking dishes, I wouldn't recommend it to a newbie cook or someone completely unfamiliar with Malyali (Kerala) cuisine. The instructions aren't precise, so unless you know where you are headed and have a fair idea of what you want you dish to taste like, you may find the book quite confusing.
When I made the dish, I mainly used her ingredients with a few changes and roughly followed her recipe with some modifications. It was quite easy to throw together as I just had to chop up some onions, everything else I used powders and pastes.
Ingredients:
1 kg mutton
salt to taste
1 cup water
1 tsp oil - (regular not coconut)
3-4 onions chopped (1.5 cups)
2 tsp ginger garlic paste
1/2 tsp turmeric powder
1.5 tsp chilli powder
1 tsp pepper powder
juice of 1 lemon (or more to taste)
1 tsp jeera (cumin) seeds
4 cloves
4" cinnamon
2 pods of cardamom
Method:
Wash & clean mutton and cook on low flame with the water and some salt.
Drain and reserve stock.
Heat oil, add onion and fry till brown
Add ginger garlic paste and fry some more.
In a bowl, mix all the powders with a little water and add to the onions
Fry well, then add the meat and brown.
Add 1 cup stock(add water if not enough stock) and lime juice, lower heat and simmer for about 10 minutes.
Powder the whole spices roughly and add to the mutton.
When gravy thickens, take off the fire. Garnish with corriander leaves and serve hot with rice or Roti
Read a review of Flavours of the Spice Coast in The Hindu
When I made the dish, I mainly used her ingredients with a few changes and roughly followed her recipe with some modifications. It was quite easy to throw together as I just had to chop up some onions, everything else I used powders and pastes.
Ingredients:
1 kg mutton
salt to taste
1 cup water
1 tsp oil - (regular not coconut)
3-4 onions chopped (1.5 cups)
2 tsp ginger garlic paste
1/2 tsp turmeric powder
1.5 tsp chilli powder
1 tsp pepper powder
juice of 1 lemon (or more to taste)
1 tsp jeera (cumin) seeds
4 cloves
4" cinnamon
2 pods of cardamom
Method:
Wash & clean mutton and cook on low flame with the water and some salt.
Drain and reserve stock.
Heat oil, add onion and fry till brown
Add ginger garlic paste and fry some more.
In a bowl, mix all the powders with a little water and add to the onions
Fry well, then add the meat and brown.
Add 1 cup stock(add water if not enough stock) and lime juice, lower heat and simmer for about 10 minutes.
Powder the whole spices roughly and add to the mutton.
When gravy thickens, take off the fire. Garnish with corriander leaves and serve hot with rice or Roti
Read a review of Flavours of the Spice Coast in The Hindu
Tuesday, May 10, 2011
Recipe: Mosaranna - Curd Rice
The minute summer sets in, then the body starts craving cooling foods. Better still if they can be served at room temperature or colder.
Curd Rice is an extremely common item on the menu of many South Indian vegetarian families on a daily basis. At the most basic level, the final serving of rice is mixed with curd (yoghurt) and salt and eaten as is or with pickle.
Curd Rice can be prepared in a myriad of ways and how simple or complicated you make it is upto you.My mum never had curd rice on the menu when we were growing up as the rice that we eat is the red rice and that is definitely not conducive to this dish - you need a soft white rice - also neither me nor my siblings like curd in general. However I now enjoy curd in a few dishes - with sweet curd with parathas, raita with biriyani, curd marinades for meat, curd based curries and the occasional curd rice. I'm not a lassi drinker, nor do I like plain yoghurt with my meals - much to the consternation of my MIL who serves curd with every meal and exclaims - "But you are South Indian!"
When I make Curd rice, its normally the only item on the menu other than pickles and at the maximum a spicy crisply stir fried vegetable on the side. So I incorporate vegetables and proteins into the curd rice itself.
The method I have given below is the most elaborate curd rice that I prepare. You can use just one item in your seasoning if you prefer (I would advise combination of curry leaves and mustard seeds) and skip the vegetables completely. Go ahead - mix & match and suprise yourself with the results.
Fresh pomegrante pods also make their appearance in quite a few versions of this dish and give a nice sweet contrast and a change in texture when eating curd rice.
Ingredients:
3-4 cups cooked rice (preferably a day old - needs to have dried out a bit)
1-2 cups curd (how thick or watered down you like it is a matter of personal preference - beat lightly so its is smooth)
1/2 cup of groundnuts roasted & skinned ( I do this in the same pan that I use for cooking but before I start assembling the rest of the dish)
1 carrot grated
2 onions finely chopped
2-6 green chillies chopped (depending on how spicy you like it)
1/2" - 1" ginger grated or finely sliced
salt to taste
For Tempering:
1 sprig of curry leaves
2- 3 dried red chillies
1 tsp mustard seeds
8-10 black peppercorns
1/2 tsp methi (fenugreek seeds)
1 tsp jeera seeds (cumin)
1 tsp ajwain (caraway / carom seeds)
a pinch of heeng (asafoetida)
1 tsp oil or ghee (don't use a strongly flavoured oil, as the rest of the ingredients have very delicate flavours)
You must note that all these tempering ingredients are very healthy and healing for the body in summer or good for the digestive system.
Method:
In the pan in which you roasted the groundnuts, add the oil and slowly start adding the tempering ingredients Methi & pepper go in first as they are the thickest & take the longest to cook.
The curry leaves and chillies go last as these will burn the fastest. You can add them once the jeera and mustard seeds start popping.
Now add the groundnuts, when they brown lightly, add the onions and green chillies and give a stir fry. The onions should remain crisp not soften.
Then add the carrot and give a quick twist in the pan and turn off the heat - you don't want to cook the carrot at all.
Let the mixture come down to room temperature then add the curd (else it could split) and let it soak for a few minutes - so the curd absorbs flavours as well as releases flavour into the other ingredients.
Finally add the rice and mix well. I prefer the curd rice to a firmer consistency just a little more soggy than a pulao.
Tip: Keep a little extra rice on hand or add just half the curd at first and then slowly adjust the balance of rice to curd to suit you.
Serve with pickles and papad or a crsp dry vegetable on the side
Curd Rice is an extremely common item on the menu of many South Indian vegetarian families on a daily basis. At the most basic level, the final serving of rice is mixed with curd (yoghurt) and salt and eaten as is or with pickle.
Curd Rice can be prepared in a myriad of ways and how simple or complicated you make it is upto you.My mum never had curd rice on the menu when we were growing up as the rice that we eat is the red rice and that is definitely not conducive to this dish - you need a soft white rice - also neither me nor my siblings like curd in general. However I now enjoy curd in a few dishes - with sweet curd with parathas, raita with biriyani, curd marinades for meat, curd based curries and the occasional curd rice. I'm not a lassi drinker, nor do I like plain yoghurt with my meals - much to the consternation of my MIL who serves curd with every meal and exclaims - "But you are South Indian!"
When I make Curd rice, its normally the only item on the menu other than pickles and at the maximum a spicy crisply stir fried vegetable on the side. So I incorporate vegetables and proteins into the curd rice itself.
The method I have given below is the most elaborate curd rice that I prepare. You can use just one item in your seasoning if you prefer (I would advise combination of curry leaves and mustard seeds) and skip the vegetables completely. Go ahead - mix & match and suprise yourself with the results.
Fresh pomegrante pods also make their appearance in quite a few versions of this dish and give a nice sweet contrast and a change in texture when eating curd rice.
Ingredients:
3-4 cups cooked rice (preferably a day old - needs to have dried out a bit)
1-2 cups curd (how thick or watered down you like it is a matter of personal preference - beat lightly so its is smooth)
1/2 cup of groundnuts roasted & skinned ( I do this in the same pan that I use for cooking but before I start assembling the rest of the dish)
1 carrot grated
2 onions finely chopped
2-6 green chillies chopped (depending on how spicy you like it)
1/2" - 1" ginger grated or finely sliced
salt to taste
For Tempering:
1 sprig of curry leaves
2- 3 dried red chillies
1 tsp mustard seeds
8-10 black peppercorns
1/2 tsp methi (fenugreek seeds)
1 tsp jeera seeds (cumin)
1 tsp ajwain (caraway / carom seeds)
a pinch of heeng (asafoetida)
1 tsp oil or ghee (don't use a strongly flavoured oil, as the rest of the ingredients have very delicate flavours)
You must note that all these tempering ingredients are very healthy and healing for the body in summer or good for the digestive system.
Method:
In the pan in which you roasted the groundnuts, add the oil and slowly start adding the tempering ingredients Methi & pepper go in first as they are the thickest & take the longest to cook.
The curry leaves and chillies go last as these will burn the fastest. You can add them once the jeera and mustard seeds start popping.
Now add the groundnuts, when they brown lightly, add the onions and green chillies and give a stir fry. The onions should remain crisp not soften.
Then add the carrot and give a quick twist in the pan and turn off the heat - you don't want to cook the carrot at all.
Let the mixture come down to room temperature then add the curd (else it could split) and let it soak for a few minutes - so the curd absorbs flavours as well as releases flavour into the other ingredients.
Finally add the rice and mix well. I prefer the curd rice to a firmer consistency just a little more soggy than a pulao.
Tip: Keep a little extra rice on hand or add just half the curd at first and then slowly adjust the balance of rice to curd to suit you.
Serve with pickles and papad or a crsp dry vegetable on the side
Seen above: this curd rice has been served with bhindi/ladiesfinger/okra crisps, ambade/baby mango pickle and gongura/sour greens from Andhra pickle
Labels:
Healthy,
One Dish Meal,
Recipe,
Rice,
Summer,
Vegetarian
Subscribe to:
Posts (Atom)