The ice cream flavours I have swimming in my head, can't be matched by any ice cream chain. Yet its not very easy to churn out ice creams at home, without an ice cream maker (hint hint to the husband)
While its easy to churn out sundaes with store bought ice cream, why not take it to the next step? All you need is imagination and a large bowl.
I always have a brick of vanilla ice cream in the freezer and that's all you need. In Delhi, I prefer to use Mother Dairy's ice cream.
Kim's Tip: I transfer the brick out of its cardboard box into a freezable plastic box, so I can easily cut out a bit whenever I'm in the mood for ice cream without a mess. Also, inside the box, the ice cream doesn't absorb other smells from the freezer, so it lasts much longer.
I absolutely love Nutella. For me, its truly happiness in a bottle. 1 tsp is a sure mood lifter for me. So I always have a bottle or 2 in my pantry.
This is so easy to assemble, you can either mix an individual bowl for yourself, or refreeze after mixing and serve your own signature ice cream at your next dinner or party.
The pictures are of a bowl I mixed for myself, so its not very "neat", but I thought it was a recipe worth sharing.
Take 2 scoops of vanilla ice cream in a bowl.
Using a pastry cutter or sharp spoon, roughly cut up the ice cream into uneven bits.
Drizzle 1 tsp of nutella over the ice cream.
Sprinkle 1 tsp of roasted cashewnuts.
Now mix thoroughly and reform into a ball or pack tight into a box (if serving later)
You can refreeze this mixture until ready to serve or dig in immediately.
I also like to sprinkle a crushed amaretto bisuit on top after reforming.
Other options:
You can mix finely chopped fruit (don't refreeze for too long if using fruit), nuts, baby marshmallows, m&m's, bits of chocolates, syrups. Your imagination is the only thing that can limit you, so unleash it and go crazy.
Remember, don't freeze fruit or ingredients that can turn soggy for too long.
Kim's Tip: To roast nuts, just warm a pan and rol the nuts around for awhile till they brown slightly.
Let me know what combinations you try and how it goes :)
I was inspired to cook by my Late Grandmother Mrs. Magdalene Aranha when I was barely 6 years old. I spent a lot of enjoyable days in her kitchen, smelling & tasting & sometimes helping prepare the food being cooked. This blog is dedicated to my Nana Maggie. I've lived in 5 countries and 18 cities, so I cook with a variety of influences and ingredients and that reflects in this blog.
Sunday, October 03, 2010
Thursday, September 30, 2010
Recipe: Bihari Chicken Biryani
I just picked up Pratibha Karan's Biryani a few weeks ago and I've been itching to cook from it. I will be cooking a few Biryani's from this book, before I review the cookbook on this blog.Personally, I like to minimise the use of ghee and oil in my biryanis. (A concept that seems alien to the restaurants in Delhi) This way I don't feel like I'm clogging my arteries with every bite!
For my first attempt from this book, I chose the Bihari Chicken Biryani (pg 137). It is low on spices, not too many ingredients, quite fast and can be cooked in one pot, so not much washing and rather easy to assemble.
I halved the quantities in the book, adjusted some others and minimised the ghee/oil. I also decreased the green chilli paste quantity as BB was recovering from food poisoning. I would use much more chilli than recommended, the next time I cook this dish, just to give it a bit of bite.
This is a very mildly flavored biryani, more like a pulao, so its not what you would traditionally expect of a biriyani. It did remind me of my Egg Pulao
Ingredients:
1/2 kilo chicken (whatever you prefer, I used drumsticks, but I think boneless chunks would be best)
1 tsp ginger paste
1 tsp garlic paste
1/6 cup green chilli paste (I would use more than this, next time)
2-3 medium onions ground to paste
1/6 cup poppy seeds (khus khus) finely ground (you could substitute cashewnuts for the creamy texture and nutty flavour that these seeds provide - they are easier to grind and not banned in Middle East countries :) )
1/2 cup yoghurt whisked smooth
1/2 tsp pepper powder
250 gms long grain rice
2 green cardamom
1" cinnamon
3 cloves
2 bay leaves
1/2 tsp cumin seed (jeera)
1 tbsp ghee
a little oil
salt to taste
Method:
Mix together the ginger paste, garlic paste, chilli paste, onion paste, khus khus paste, yoghurt and pepper powder with salt to taste. (I ground the khus khus first and then added the ginger, garlic and onions in the mixi)
Marinate the chicken in this mixture for at least one hour.
Wash and soak the rice for about 20 minutes, drain and set aside.
Assemble:
Heat 1/2 tsp ghee and some oil in the pan (I used a pressure cooker)
Put the whole spices in - Cardamom, cinnamon, cloves, bay leaves and cumin seeds.
Stir fry the spices and then add the chicken and the marinade.
Cook till the oil rises to the surface (this is essential, otherwise the onion paste will not be cooked and that doesn't taste good at all - if you feel your chicken is getting overcooked but the masala is not yet cooked, take out the chicken for awhile and keep frying the masala) and the chicken turns golden brown.
Add the rice and fry for 2-3 minutes.
Then add water upto an inch above the rice and chicken.
Bring to a boil.
Add a little more ghee
Lower the flame.
Cook covered for 15-20 minutes till done (3 whistles in a Hawkins pressure cooker)
Serve hot with chilled raita
Equipment Used:
Sunday, September 26, 2010
Recipe: Bacon, Onion and Cheddar Biscuits
I've been following the Brown Eyed Baker (Michelle) since quite awhile. But with the moving and the power outages, I haven't baked for quite awhile. (I bake in my microwave)
Today being a Sunday, the chance of a power outage was much lower and I thought it would be great to make these Bacon, Onion and Cheddar Biscuits as a snack/ light dinner, for the husband who was watching the cricket 20-20 finals. Michelle's Bacon, Onion and Cheddar Biscuits are adapted from the Pioneer Woman's Bacon, Onion and Cheddar Biscuits. But I followed Michelle's Recipe
It was pretty quick to assemble (Didn't need to bring out the mixer) and the smell of baking cheese has left the house smelling heavenly. The cat was wandering around head tilted upwards, sniffing all over the place.
For my first lot, I just loosely placed the dough in the muffin pan.
For the second lot, I shaped the biscuits into smoother shapes and these looked much better as a finished product.
While I did use my hands to mix the first few ingredients, I think its essential to use a plastic/rubber/silicone spatula once you add the cheese. Otherwise the heat of your hands could melt the cheese into indistinguishability.
Although the Brown Eyed Baker recommends 20-22 minutes at 375F (190C), I found that I needed to bake my biscuits for 35 minutes at 200C. The good thing with baking in a micro is that you can see the colours of the baked goodies, without opening the oven and letting cold air in.
What would I change?
I diced the onion quite fine this time, but I would chop it a little larger next time. The sweet onion was a nice contrast to the salty bacon and salty cheese and I would have liked to taste more of it.
I'd like to experiment with different herbs in the mix. Some thyme or oregano might go well.
Freshly cracked pepper might be awesome.
I think this recipe would also taste good with flavoured cheeses. I have some Moroccan spicy cheese in the fridge, I might try that next.
The husband found them a little dry after the 2nd one and wanted ketchup on the side. Any ideas on how to decrease the dry feeling in the throat (compounded by the saltiness of the cheese and bacon)?
Any ideas on what to serve this with?
I was thinking olive oil and balsamic vinegar dip.
Something light, without strong flavours, just to add a bit of moistness while eating.
Equipment needed:
Today being a Sunday, the chance of a power outage was much lower and I thought it would be great to make these Bacon, Onion and Cheddar Biscuits as a snack/ light dinner, for the husband who was watching the cricket 20-20 finals. Michelle's Bacon, Onion and Cheddar Biscuits are adapted from the Pioneer Woman's Bacon, Onion and Cheddar Biscuits. But I followed Michelle's Recipe
It was pretty quick to assemble (Didn't need to bring out the mixer) and the smell of baking cheese has left the house smelling heavenly. The cat was wandering around head tilted upwards, sniffing all over the place.
For my first lot, I just loosely placed the dough in the muffin pan.
For the second lot, I shaped the biscuits into smoother shapes and these looked much better as a finished product.
While I did use my hands to mix the first few ingredients, I think its essential to use a plastic/rubber/silicone spatula once you add the cheese. Otherwise the heat of your hands could melt the cheese into indistinguishability.
Although the Brown Eyed Baker recommends 20-22 minutes at 375F (190C), I found that I needed to bake my biscuits for 35 minutes at 200C. The good thing with baking in a micro is that you can see the colours of the baked goodies, without opening the oven and letting cold air in.
What would I change?
I diced the onion quite fine this time, but I would chop it a little larger next time. The sweet onion was a nice contrast to the salty bacon and salty cheese and I would have liked to taste more of it.
I'd like to experiment with different herbs in the mix. Some thyme or oregano might go well.
Freshly cracked pepper might be awesome.
I think this recipe would also taste good with flavoured cheeses. I have some Moroccan spicy cheese in the fridge, I might try that next.
The husband found them a little dry after the 2nd one and wanted ketchup on the side. Any ideas on how to decrease the dry feeling in the throat (compounded by the saltiness of the cheese and bacon)?
Any ideas on what to serve this with?
I was thinking olive oil and balsamic vinegar dip.
Something light, without strong flavours, just to add a bit of moistness while eating.
Equipment needed:
Friday, September 10, 2010
Recipe: Mutton Liver Fry
In recognition of Eid, I felt like cooking mutton liver. A dish that a friends mother had cooked for me a couple of years ago when we were invited to iftaar (the evening meal that breaks the days fast).
Its been a really really low key Eid this year. The last 4 years we have celebrated Eid in Egypt, Turkey, Morocco and Dubai. So it feels weird to be in Delhi this year where Ramdan and Eid celebrations are restricted to a few quarters of the city, rather than the whole country celebrating and observing what could be considered the most important event in the Muslim calendar.
We didn't visit the old city during Ramadan this year. The rains, the CWG mess and B's tryst with food poisoning a couple of weeks ago, made eating roadside food too risky given his weakened digestive system.
So just to feel a bit festive and to mark this occassion, I decided to cook this mutton liver dish at home and served it with hot phulkas.
I used mutton liver in this recipe, but it can be easily replaced with chicken liver. Chicken liver cooks much faster, so make sure the masala is completely cooked before adding the liver.
Ingredients:
1/4 kilo mutton liver - clean, wash rinse and cubed
2 medium onions - chopped
2 medium tomatoes - chopped
2-3 green chillies (optional) - sliced or slit (depends on how you like it, sliced will be more spicy while eating)
corriander leaves to garnish - chopped
juice of half a lime
1 tbsp fresh grated coconut (optional - don't use dessicated)
1 sprig curry leaves
2 tsp ginger garlic paste
1/2 tsp turmeric powder
1/2 tsp chilli powder
2 tsps of your favorite meat masala (biryani masala or kitchen king masala or rajma masala can be substituted - if you don't have any of these, just add 1/2-1 tsp garam masala)
salt to taste
oil
Method:
Pour some oil in a hot pan. (I used just 1 tsp, but it really tastes best if you use 2-3 tbsps)
Drop the curry leaves into the hot oil and give a quick swirl so the curry leaf taste infuses the oil.
When leaves crispen, add the chopped onion.
When it turns pinkish, add the chopped tomatoes, green chillies, ginger garlic paste and coconut if using.
Fry well until cooked and the oil seperates from the mix.
Add the chilli, turmeric and meat masala powders and mix well.
Then add the liver and fry/saute on low flame till its done about 10-15 minutes
The liver should be light pink on the inside, if its too red then its undercooked. If it gets overcooked, it will be dry and crumbly
Squeeze the juice of half a lime. Liver is high in iron and sprinkling lemon juice aids the absorption capacity of the body
Take off the flame when done, garnish with corriander leaves and serve hot with rotis or rice and dhal.
Its been a really really low key Eid this year. The last 4 years we have celebrated Eid in Egypt, Turkey, Morocco and Dubai. So it feels weird to be in Delhi this year where Ramdan and Eid celebrations are restricted to a few quarters of the city, rather than the whole country celebrating and observing what could be considered the most important event in the Muslim calendar.
We didn't visit the old city during Ramadan this year. The rains, the CWG mess and B's tryst with food poisoning a couple of weeks ago, made eating roadside food too risky given his weakened digestive system.
So just to feel a bit festive and to mark this occassion, I decided to cook this mutton liver dish at home and served it with hot phulkas.
I used mutton liver in this recipe, but it can be easily replaced with chicken liver. Chicken liver cooks much faster, so make sure the masala is completely cooked before adding the liver.
Ingredients:
1/4 kilo mutton liver - clean, wash rinse and cubed
2 medium onions - chopped
2 medium tomatoes - chopped
2-3 green chillies (optional) - sliced or slit (depends on how you like it, sliced will be more spicy while eating)
corriander leaves to garnish - chopped
juice of half a lime
1 tbsp fresh grated coconut (optional - don't use dessicated)
1 sprig curry leaves
2 tsp ginger garlic paste
1/2 tsp turmeric powder
1/2 tsp chilli powder
2 tsps of your favorite meat masala (biryani masala or kitchen king masala or rajma masala can be substituted - if you don't have any of these, just add 1/2-1 tsp garam masala)
salt to taste
oil
Method:
Pour some oil in a hot pan. (I used just 1 tsp, but it really tastes best if you use 2-3 tbsps)
Drop the curry leaves into the hot oil and give a quick swirl so the curry leaf taste infuses the oil.
When leaves crispen, add the chopped onion.
When it turns pinkish, add the chopped tomatoes, green chillies, ginger garlic paste and coconut if using.
Fry well until cooked and the oil seperates from the mix.
Add the chilli, turmeric and meat masala powders and mix well.
Then add the liver and fry/saute on low flame till its done about 10-15 minutes
The liver should be light pink on the inside, if its too red then its undercooked. If it gets overcooked, it will be dry and crumbly
Squeeze the juice of half a lime. Liver is high in iron and sprinkling lemon juice aids the absorption capacity of the body
Take off the flame when done, garnish with corriander leaves and serve hot with rotis or rice and dhal.
Sunday, September 05, 2010
Recipe: Bengali inspired Mustard fish in Banana Leaves
When I picked up fish from INA market the other day, I thought I would try my luck to check if the veggie guys stocked banana leaves (I'm still considering a traditional banana leaf plated dinner for our harvest festival on the 8th of September). They produced some leaves from their inner chamber and I decided to buy one and try steaming fish in banana leaves for the first time.
I did slip up a bit, but this recipe contains the corrections and pointers on what to watch out for.
I did not follow any recipe, just went with what I felt like I wanted in there, but it did taste quite good.
Ingredients:
1-2 Banana Leaves
1 kilo of boneless fish fillets - cut into equal sizes
(the fish has to be cut into equal pieces so that they cook at a uniform rate, my slightly thinner pieces dried out a bit)
Couple of tablespoons kasundi - (Bengali mustard paste available readymade in some markets)
Finely chopped or ground green chillies to taste
1-2 tbsp mustard oil
salt to taste
I used some pinches of sumac to increase sourness of the marinade, you can add aamchoor or vinegar if you like, but dont make the marinade too watery.
Method:
Mix all ingredients for the marinade and form an emulsion.
Leave the fish in the marinade for at least half an hour.
Prep the Banana Leaves
Then wrap fish pieces individually in strips of banana leaves and form little parcels.
Steam the parcels for 5-10 minutes depending on the thickness of your fish fillets.
You can also microwave them for 7-15 minutes depending on the thickness of your fish fillets.
If microwaving them, use more marinade as the microwave tends to dehydrate the fish while cooking.
Serve hot with rice and dhal. Husband loved it with rotis and dhal.
I also had a few pieces of fish left over, once the plaintain leaves were used up. I just sauteed them on a medium flame and this too, tasted awesome.
I did slip up a bit, but this recipe contains the corrections and pointers on what to watch out for.
I did not follow any recipe, just went with what I felt like I wanted in there, but it did taste quite good.
Ingredients:
1-2 Banana Leaves
1 kilo of boneless fish fillets - cut into equal sizes
(the fish has to be cut into equal pieces so that they cook at a uniform rate, my slightly thinner pieces dried out a bit)
Couple of tablespoons kasundi - (Bengali mustard paste available readymade in some markets)
Finely chopped or ground green chillies to taste
1-2 tbsp mustard oil
salt to taste
I used some pinches of sumac to increase sourness of the marinade, you can add aamchoor or vinegar if you like, but dont make the marinade too watery.
Method:
Mix all ingredients for the marinade and form an emulsion.
Leave the fish in the marinade for at least half an hour.
Prep the Banana Leaves
Then wrap fish pieces individually in strips of banana leaves and form little parcels.
Steam the parcels for 5-10 minutes depending on the thickness of your fish fillets.
You can also microwave them for 7-15 minutes depending on the thickness of your fish fillets.
If microwaving them, use more marinade as the microwave tends to dehydrate the fish while cooking.
Serve hot with rice and dhal. Husband loved it with rotis and dhal.
I also had a few pieces of fish left over, once the plaintain leaves were used up. I just sauteed them on a medium flame and this too, tasted awesome.
A quick primer on the use and prepping of a Banana Leaf
Historically banana leaves were commonly used as plates at meal times in parts of Southern India.
While the advent of stainless steel and melamine plates, the banana leaf is no longer used as a plate in households where it was commonly used, until a couple of decades ago.
In Southern India, most temples still serve meals on banana leaves. You will also get to see the banana leaf being used as a plate at traditional South Indian brahmin weddings. In some cases, you no longer will be seated cross legged on the floor, you may be seated at canteen style tables, but will still be served on a leaf.
Eating off a banana leaf involves a practiced technique to keep all the liquid items like sambhar, rasam, dhali tove (lentils), vegetable curries and payasams (kheer) from running (flowing) off the leaf and onto the floor. This normally involves forming a sturdy well in the center of your rice and instructing the servers to pour your curry of choice into the center. The technique also extends into how you mix your rice and curry in little portions without destroying the structural stability of that well.
For people who are not familiar or comfortable with this technique, most South Indian restaurants that strive to be authentic(in the North of India and abroad) have come up with 2 innovations. The first is to provide a set of katoris (small bowls) placed on the leaf, for the gravy items. The second is to cut the banana leaf to fit inside a plate with high rims. Both techniques serve to save the unaccustomed diner the embarassment of having curry flow off their leaves and onto their laps.
Etiquette pointers when eating off a Banana Leaf:
A meal eaten on a banana leaf is traditionally eaten with ones right hand without implements while the left hand rests on your lap.
Before you are served any food, you will be provided with some water in a glass, sprinkle a few drops of water with your right hand onto the leaf and brush it off with the lower edge of your palm away from your body. (the leaves would be clean, this is more symbolic than an actual cleansing process)
When you are finished eating, fold the leaf along the spine away from you, never towards you.
Prepping the Banana Leaf
If you are planning to serve food on a banana leaf or cook in it. Wash the leaf with plain water and wipe dry with a clean cloth.
Sometimes, you may find a white fluff on the underside of the leaf. This too can be wiped off with a damp cloth.
Banana leaves are an excellent material to wrap fish and chicken in - for steaming. It traps all the moisture inside without destroying the taste of the dish.
If you want to cook/steam in the leaf:
Fold the leaf in half along its spine.
Using a sharp knife, cut off the spine in one smooth motion.
Make sure none of the tough spine remains, it will make folding the leaf difficult and the leaves will tear.
Then cut the halves into whatever size and shape you require.
A kitchen scissors will work as well as a knife
While the advent of stainless steel and melamine plates, the banana leaf is no longer used as a plate in households where it was commonly used, until a couple of decades ago.
In Southern India, most temples still serve meals on banana leaves. You will also get to see the banana leaf being used as a plate at traditional South Indian brahmin weddings. In some cases, you no longer will be seated cross legged on the floor, you may be seated at canteen style tables, but will still be served on a leaf.
Eating off a banana leaf involves a practiced technique to keep all the liquid items like sambhar, rasam, dhali tove (lentils), vegetable curries and payasams (kheer) from running (flowing) off the leaf and onto the floor. This normally involves forming a sturdy well in the center of your rice and instructing the servers to pour your curry of choice into the center. The technique also extends into how you mix your rice and curry in little portions without destroying the structural stability of that well.
For people who are not familiar or comfortable with this technique, most South Indian restaurants that strive to be authentic(in the North of India and abroad) have come up with 2 innovations. The first is to provide a set of katoris (small bowls) placed on the leaf, for the gravy items. The second is to cut the banana leaf to fit inside a plate with high rims. Both techniques serve to save the unaccustomed diner the embarassment of having curry flow off their leaves and onto their laps.
Etiquette pointers when eating off a Banana Leaf:
A meal eaten on a banana leaf is traditionally eaten with ones right hand without implements while the left hand rests on your lap.
Before you are served any food, you will be provided with some water in a glass, sprinkle a few drops of water with your right hand onto the leaf and brush it off with the lower edge of your palm away from your body. (the leaves would be clean, this is more symbolic than an actual cleansing process)
When you are finished eating, fold the leaf along the spine away from you, never towards you.
Prepping the Banana Leaf
If you are planning to serve food on a banana leaf or cook in it. Wash the leaf with plain water and wipe dry with a clean cloth.
Sometimes, you may find a white fluff on the underside of the leaf. This too can be wiped off with a damp cloth.
Banana leaves are an excellent material to wrap fish and chicken in - for steaming. It traps all the moisture inside without destroying the taste of the dish.
If you want to cook/steam in the leaf:
Fold the leaf in half along its spine.
Using a sharp knife, cut off the spine in one smooth motion.
Make sure none of the tough spine remains, it will make folding the leaf difficult and the leaves will tear.
Then cut the halves into whatever size and shape you require.
A kitchen scissors will work as well as a knife
Thursday, August 26, 2010
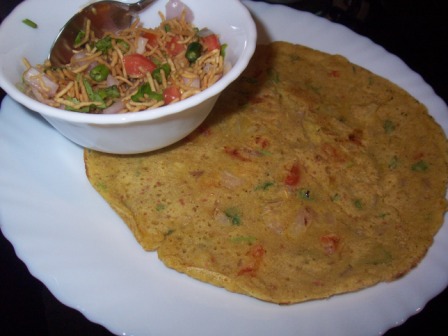
Recipe: Tomato Omelette (Vegan) aka Besan Ka Chilla
As a child of 8 or so, I was suprised when the drive-in restaurant in our home town that was run and managed by Brahmins started offerring a dish called Tomato Omelette. While many Brahmins in Mangalore did eat fish and eggs, - it was unheard of, for an Udupi menu restaurant to actually serve eggs.
As a child of my generation you did not put such questions into words and since I'm not a great fan of fresh tomato chunks, I never tasted this dish until much later. It was then that I realised that what was called a Tomato Omelette in Mangalore, was a close relative of the besan ka chilla of North India.
While the chillas that I have had in North India, are much thinner (more water in the batter) and have a mix of onions, tomato, chilli, ginger and fresh corriander, the tomato omelette is a thicker batter with tomatoes and fresh corriander as the main ingredients.
What I make at home, is a combination of the 2. With the cuttings of North India and the thickness of South India almost like an Utthappam.
Ingredients:
1 small tomato
1 small onion
1 green chilli
a pinch or two of shredded ginger
a few sprigs of fresh corriander (dhaniya)
salt to taste
pinch of haldi
pinch of corriander powder - optional
2 small katoris of besan
Water - as required
Method:
Chop the tomato, onion, chilli and corriander. (My chunks of tomato are larger, so I can pull them out - still don't like taste/texture of fresh tomato)
Make a batter of the chopped cuttings, ginger, the besan and water.
Add a little turmeric powder, so that the omelette is yellow when cooked. (close to what an egg omelette colour is like)
Add salt to taste.
If you want to make it like Utthappams (thick and fluffy) add a bit of eno to the batter to aerate it.
Lightly grease a pan.
Pour batter and fry the omelette
You can flip it over and fry it on the other side too if you like.
This can be served with any number of combinations.
In Mangalore it is served with coconut chutney as a breakfast or snack item.
The husband prefers it with bhujiya or sev, so I serve it to him with a bhujiya ki sabji
For myself, I was in the mood for something sweet and spicy, so I had it with some homemade Jalapeno Jelly that a friend had given me.
With the humidity, the jelly was running all over the omelette, but it tasted excellent :)
You can even serve this with a vegetarian side dish, if you want to make a complete meal out of it.
As a child of my generation you did not put such questions into words and since I'm not a great fan of fresh tomato chunks, I never tasted this dish until much later. It was then that I realised that what was called a Tomato Omelette in Mangalore, was a close relative of the besan ka chilla of North India.
While the chillas that I have had in North India, are much thinner (more water in the batter) and have a mix of onions, tomato, chilli, ginger and fresh corriander, the tomato omelette is a thicker batter with tomatoes and fresh corriander as the main ingredients.
What I make at home, is a combination of the 2. With the cuttings of North India and the thickness of South India almost like an Utthappam.
Ingredients:
1 small tomato
1 small onion
1 green chilli
a pinch or two of shredded ginger
a few sprigs of fresh corriander (dhaniya)
salt to taste
pinch of haldi
pinch of corriander powder - optional
2 small katoris of besan
Water - as required
Method:
Chop the tomato, onion, chilli and corriander. (My chunks of tomato are larger, so I can pull them out - still don't like taste/texture of fresh tomato)
Make a batter of the chopped cuttings, ginger, the besan and water.
Add a little turmeric powder, so that the omelette is yellow when cooked. (close to what an egg omelette colour is like)
Add salt to taste.
If you want to make it like Utthappams (thick and fluffy) add a bit of eno to the batter to aerate it.
Lightly grease a pan.
Pour batter and fry the omelette
You can flip it over and fry it on the other side too if you like.
This can be served with any number of combinations.
In Mangalore it is served with coconut chutney as a breakfast or snack item.
The husband prefers it with bhujiya or sev, so I serve it to him with a bhujiya ki sabji
For myself, I was in the mood for something sweet and spicy, so I had it with some homemade Jalapeno Jelly that a friend had given me.
With the humidity, the jelly was running all over the omelette, but it tasted excellent :)
You can even serve this with a vegetarian side dish, if you want to make a complete meal out of it.
Recipe: Bhujiya ki Sabji
The husband loves to munch on sev and bhujiyas of different kinds. He enjoys the crispy taste and texture as a topping to most breakfasts - upma, poha, dosas etc.
He also enjoys it as a snack between meals. While sev and bhujiyas are extremely tasty, they are not the healthiest of options, being deep fried, high on salt and commercially made with preservatives etc (I avoid deep frying at home as far as possible)
To help fill his stomach faster and with a dose of healthy bits in it. I sometimes make a sev/bhujiya ki sabji inspired in parts by dishes of this kind served in Gujarat and Maharashtra and a bit by bhel puri.
I do this by adding chopped onions, tomatoes, green chillies and fresh corriander and mixing it all up. You can add a dash of lime juice too if you like a bit of tartness in your snack.
It has to be eaten as soon as it is mixed up, else it will turn soggy from the water content of the onions and tomatoes.
You can try adding chopped cucumbers or grated carrots too.
He also enjoys it as a snack between meals. While sev and bhujiyas are extremely tasty, they are not the healthiest of options, being deep fried, high on salt and commercially made with preservatives etc (I avoid deep frying at home as far as possible)
To help fill his stomach faster and with a dose of healthy bits in it. I sometimes make a sev/bhujiya ki sabji inspired in parts by dishes of this kind served in Gujarat and Maharashtra and a bit by bhel puri.
I do this by adding chopped onions, tomatoes, green chillies and fresh corriander and mixing it all up. You can add a dash of lime juice too if you like a bit of tartness in your snack.
It has to be eaten as soon as it is mixed up, else it will turn soggy from the water content of the onions and tomatoes.
You can try adding chopped cucumbers or grated carrots too.
Kitchen Essentials: Besan / Gram Flour / Sanya Peet
Many Indian recipes call for gram flour or besan. It is the main ingredient for batter frying pakodas, making dishes like kadhi and desserts like besan ki laddu and mysorepak among others.
It is high in proteins and low on gluten and sometimes used as an egg substitute by vegans.
American stores may sell this as Garbanzo flour or Chickpea flour.
I did not find this ingredient in Egyptian markets, even though garbanzo beans - hummus are very widely consumed. But I did find the chickpea lentils in Egypt.
The first bottle to the left, contains chickpeas / garbanzo beans / channa / hummus.
The middle bottle has the chickpea lentils / channa dhal which is available commercially. Essentially this is chickpeas that are cooked, cooled, roasted and dried.
The final bottle contains besan which is normally a pale yellow shade.
Besan can be made by powdering roasted chickpea lentils, in case you cannot find it easily in a market in your city.
Its also available on Amazon.
It is high in proteins and low on gluten and sometimes used as an egg substitute by vegans.
American stores may sell this as Garbanzo flour or Chickpea flour.
I did not find this ingredient in Egyptian markets, even though garbanzo beans - hummus are very widely consumed. But I did find the chickpea lentils in Egypt.
The first bottle to the left, contains chickpeas / garbanzo beans / channa / hummus.
The middle bottle has the chickpea lentils / channa dhal which is available commercially. Essentially this is chickpeas that are cooked, cooled, roasted and dried.
The final bottle contains besan which is normally a pale yellow shade.
Besan can be made by powdering roasted chickpea lentils, in case you cannot find it easily in a market in your city.
Its also available on Amazon.
Monday, August 23, 2010
Onam Sadya with Mrs. Leelavathi Menon (Recipes Included)
I know I've been remiss about blogging for the last couple of months. Onam is a time for new beginnings, so it seemed like a perfect reason to get back to writing. A Malyali friends mother invited us over to join the family for their Onam Sadya and Aunty very kindly explained to me the details of the traditional meal. Errors, if any, in this article will be due to my own incomplete understanding or regional differences in practices.
Onam is a festival celebrated in Kerala to rejoice in the rice harvest among other reasons. Most South Indian states will also be celebrating their own Rice Harvest Festivals in the coming days. My community in Mangalore, celebrates it on the 8th of September each year. (we follow the Western calendar) I may just write about that next week. (fingers crossed) :)
As Onam is also the festival of rain flowers, beautiful designs are created on the floor with different flowers called Onapookkalam or Rangoli as it is known in Hindi speaking parts of India.
While traditionally Onam is celebrated over 10 days and sadyas (meals) are eaten over plaintain leaves, it is difficult to find these traditions in their entirety outside of Kerala. Convenience and lack of availability of key ingredients means some things have to be planned way in advance or compromised upon.While our meal today wasn't as traditional with banana leaf et al, the spirit and enthusiasm of Mrs Leelavathi Menon's family made it a wonderful experience.
Like most cooks of her generaton, Aunty cooks without precise measurements. Its a handful of this and a pinch of that. The recipes that follow are hers and without measurements. If you would like me to try and pin down the measurements for something, do let me know. Hopefully the pictures of the finished products will help you decide on quantities.
Traditionally, there is an order in which food needs to be served and where it is placed on the leaf. I have seen this in other South Indian Brahmin communities, but have not observed this in the North Indian style except for Rotis before Rice
The first course of an Onam Sadya is always Parippu & Nayya with Appalams & Rice.
Nayya is Ghee. Appalams are the Kerala papads that have to be deep fried traditional style, no nonsense of roasting or microwaving them.
Parippu is a preparation involving Moong Dhal.
Roast the Moong Dhal for a bit and then add water and cook it with some salt and a coarsely ground mixture of coconut, jeera and green chillies.
When cooked, season it with raw ghee and raw curry leaves.
(The consistency is thick like a Dhal Makhni, but much lighter on the stomach)
Serve with hot rice, ghee and Appalams
From Left to Right: Sambhar, Olan, Parippu, Avial and Cabbage+ Carrot Thoran. The Central large dish is the Kalan
Olan is next. A dish made with Red Lobia.
Presure cook the red lobia with a little salt.
When done, add some pumpkin (kaddhu and cook again until the pumpkin turns soft.
Mash the mixture slightly, like you would while making chhole.
Add some coconut milk and take off the fire just before it bubbles.
Season with coconut oil (uncooked) and raw curry leaves
Avial is the next dish on the menu.
This is a dish most easily identified with Vegetarian Malyali cooking.
Any combination of vegetables is cut into crudites
The vegetables are cooked with turmeric, salt and a pinch of chilli powder.
When cooked, add finely b eaten curd to the mix.
Then add a coarsely ground mixture of coconut, cumin (jeera), green chillies and curry leaves.
Season with fresh coconut oil and fresh curry leaves.
Thoran is the dry dish served with all these Vegetarian curries.
Thoran can be made with beans or cabbage or carrots or a combination of vegetables.
For this dish, the vegetables need to be grated or sliced thinly
Coarsely, dry grind some coconut, onions, cumin (jeera), green chillies and curry leaves.
Heat some oil in a pan.
Add mustard seeds, when they splutter, add urad dhal or raw rice to complete the seasoning.
To this seasoning, add chopped onions and curry leaves.
When the onions are between translucent and light brown, add the vegetables and some salt and cover and cook till done
(Note: Do not add any water to the vegetables unless you are cooking beans)
When the vegetables are cooked, add the coarsely ground coconut mixture.
Stir well and remove from the flame.
Sambhar or Kalan is the next course.
Kalan is a curry made with Yam (Jhimikand), Ash Gourd (Petha) and/or Kerala Bananas (Nandarkai)
Kalan can be made with a combination of these vegetables or any one of them.
Lightly cook the vegetables with a little turmeric powder, chilli powder and salt.
Finely grind some coconut with cumin and pepper corns. You can add water or curd/yoghurt to smoothen and moisturise the mix.
Add some beaten curd and the coconut mixture to the cooked vegetables.
When it starts to boil, remove fromheat and season with mustard, fenugreek seeds (methi), dry red chillies and curry leaves.
Kerala Bananas (Nandarkai) are a major part of the Onam Sadya. They are served as chips - both savoury (salted) and sweet (coated with jaggery and deep fried)
Often times it will also be served just chopped up (1 banana chopped into 3 equal pieces)
Pulinji is a ginger-tamarind chutney that is made in large quantities during Onam.
Finely chop fresh ginger and green chillies.
Heat some oil, season with mustard seeds, then add the ginger and green chillies and fry till the ginger turns light brown.
Add tamarind juice (imli paste), turmeric powder, salt and curry leaves.
Boil well until the mixture turns slightly thick.
Add jaggery and cook well.
This chutney will keep well for awhile.
Pulinji and other chutneys and pickles are also an integral part of the sadya.
Sweets as always, are an extremely important finish to all Indian feastive meals.
Ada or Paalada Payasam is a kheer made with ada.
Ada is made by grinding rice, rolling it into thin sheets on banana leaves, boiling the leaves with the rice paste and then cutting it into small pieces. Nowadays, readymade ada is available in specialty markets. Kheer is then made the same way, just substituting Ada for rice or vermicilli (sevaiyan).
Parippu Prathaman is a kheer made with moong dhal and sago (tapioca pearls / sabudana) but with jaggery and not sugar. This gives a hint of saltiness to the kheer.
This preparation is supposed to be so good, that even if you are absolutely stuffed, you will always have enough space for a bowl. That's what Parippu Prathaman means.
Both sweets can be eaten either hot or cold.
Like most good and healthy Indian meals, even though we ate until we couldn't eat another morsel, it has been extremely light on our stomachs. The dishes are all easily digestible and even the endless supply of rice with all those curries hasn't made me sleepy or lethargic.
Thank you Aunty Leela for a wonderful evening and we look forward to many more. Aunty also makes the most awesome idli sambhar that I have eaten. But I have never been able to stop to take pictures before eating. oh well, there will always be a next time :)
Onam Ashamsagal!
Onam is a festival celebrated in Kerala to rejoice in the rice harvest among other reasons. Most South Indian states will also be celebrating their own Rice Harvest Festivals in the coming days. My community in Mangalore, celebrates it on the 8th of September each year. (we follow the Western calendar) I may just write about that next week. (fingers crossed) :)
As Onam is also the festival of rain flowers, beautiful designs are created on the floor with different flowers called Onapookkalam or Rangoli as it is known in Hindi speaking parts of India.
While traditionally Onam is celebrated over 10 days and sadyas (meals) are eaten over plaintain leaves, it is difficult to find these traditions in their entirety outside of Kerala. Convenience and lack of availability of key ingredients means some things have to be planned way in advance or compromised upon.While our meal today wasn't as traditional with banana leaf et al, the spirit and enthusiasm of Mrs Leelavathi Menon's family made it a wonderful experience.Like most cooks of her generaton, Aunty cooks without precise measurements. Its a handful of this and a pinch of that. The recipes that follow are hers and without measurements. If you would like me to try and pin down the measurements for something, do let me know. Hopefully the pictures of the finished products will help you decide on quantities.
Traditionally, there is an order in which food needs to be served and where it is placed on the leaf. I have seen this in other South Indian Brahmin communities, but have not observed this in the North Indian style except for Rotis before Rice
The first course of an Onam Sadya is always Parippu & Nayya with Appalams & Rice.
Nayya is Ghee. Appalams are the Kerala papads that have to be deep fried traditional style, no nonsense of roasting or microwaving them.
Parippu is a preparation involving Moong Dhal.
Roast the Moong Dhal for a bit and then add water and cook it with some salt and a coarsely ground mixture of coconut, jeera and green chillies.
When cooked, season it with raw ghee and raw curry leaves.
(The consistency is thick like a Dhal Makhni, but much lighter on the stomach)
Serve with hot rice, ghee and Appalams
From Left to Right: Sambhar, Olan, Parippu, Avial and Cabbage+ Carrot Thoran. The Central large dish is the Kalan
Olan is next. A dish made with Red Lobia.
Presure cook the red lobia with a little salt.
When done, add some pumpkin (kaddhu and cook again until the pumpkin turns soft.
Mash the mixture slightly, like you would while making chhole.
Add some coconut milk and take off the fire just before it bubbles.
Season with coconut oil (uncooked) and raw curry leaves
Avial is the next dish on the menu.
This is a dish most easily identified with Vegetarian Malyali cooking.
Any combination of vegetables is cut into crudites
The vegetables are cooked with turmeric, salt and a pinch of chilli powder.
When cooked, add finely b eaten curd to the mix.
Then add a coarsely ground mixture of coconut, cumin (jeera), green chillies and curry leaves.
Season with fresh coconut oil and fresh curry leaves.
Thoran is the dry dish served with all these Vegetarian curries.
Thoran can be made with beans or cabbage or carrots or a combination of vegetables.
For this dish, the vegetables need to be grated or sliced thinly
Coarsely, dry grind some coconut, onions, cumin (jeera), green chillies and curry leaves.
Heat some oil in a pan.
Add mustard seeds, when they splutter, add urad dhal or raw rice to complete the seasoning.
To this seasoning, add chopped onions and curry leaves.
When the onions are between translucent and light brown, add the vegetables and some salt and cover and cook till done
(Note: Do not add any water to the vegetables unless you are cooking beans)
When the vegetables are cooked, add the coarsely ground coconut mixture.
Stir well and remove from the flame.
Sambhar or Kalan is the next course.
Kalan is a curry made with Yam (Jhimikand), Ash Gourd (Petha) and/or Kerala Bananas (Nandarkai)
Kalan can be made with a combination of these vegetables or any one of them.
Lightly cook the vegetables with a little turmeric powder, chilli powder and salt.
Finely grind some coconut with cumin and pepper corns. You can add water or curd/yoghurt to smoothen and moisturise the mix.
Add some beaten curd and the coconut mixture to the cooked vegetables.
When it starts to boil, remove fromheat and season with mustard, fenugreek seeds (methi), dry red chillies and curry leaves.
Kerala Bananas (Nandarkai) are a major part of the Onam Sadya. They are served as chips - both savoury (salted) and sweet (coated with jaggery and deep fried)
Often times it will also be served just chopped up (1 banana chopped into 3 equal pieces)
Pulinji is a ginger-tamarind chutney that is made in large quantities during Onam.
Finely chop fresh ginger and green chillies.
Heat some oil, season with mustard seeds, then add the ginger and green chillies and fry till the ginger turns light brown.
Add tamarind juice (imli paste), turmeric powder, salt and curry leaves.
Boil well until the mixture turns slightly thick.
Add jaggery and cook well.
This chutney will keep well for awhile.
Pulinji and other chutneys and pickles are also an integral part of the sadya.
Sweets as always, are an extremely important finish to all Indian feastive meals.
Ada or Paalada Payasam is a kheer made with ada.
Ada is made by grinding rice, rolling it into thin sheets on banana leaves, boiling the leaves with the rice paste and then cutting it into small pieces. Nowadays, readymade ada is available in specialty markets. Kheer is then made the same way, just substituting Ada for rice or vermicilli (sevaiyan).
Parippu Prathaman is a kheer made with moong dhal and sago (tapioca pearls / sabudana) but with jaggery and not sugar. This gives a hint of saltiness to the kheer.
This preparation is supposed to be so good, that even if you are absolutely stuffed, you will always have enough space for a bowl. That's what Parippu Prathaman means.
Both sweets can be eaten either hot or cold.
Like most good and healthy Indian meals, even though we ate until we couldn't eat another morsel, it has been extremely light on our stomachs. The dishes are all easily digestible and even the endless supply of rice with all those curries hasn't made me sleepy or lethargic.
Thank you Aunty Leela for a wonderful evening and we look forward to many more. Aunty also makes the most awesome idli sambhar that I have eaten. But I have never been able to stop to take pictures before eating. oh well, there will always be a next time :)
Onam Ashamsagal!
Labels:
Curry,
Festival,
From a Friend,
Guest Chef,
Healthy,
Kerala,
Photo Essay,
Recipe,
Traditions,
Vegetarian
Subscribe to:
Posts (Atom)