Monday, November 29, 2010

Recipe: Kharam - Manglorean Cucumber Salad - Vegan

This dish is one of my favourites from my grandmothers repertoire of Manglorean vegetarian dishes. On the 8th of September for the Feast of the Nativity - Monthi Saibin Festh which our community also celebrates as the Harvest Festival, we eat an odd number of vegetarian dishes. When grandma was in charge, this normally meant 7 or 9 vegetables. With mum it was 5 (because her fussy children would protest about too many veggies in one meal) and if its me, we are lucky if I even make 3 vegetables Manglorean style.


This is essentially because my community focuses so much on meat and seafood in its meals, that the vegetables are an afterthought and just around for their fibre content. Not much effort is expended in cooking vegetables and we don't have too many varieties, so they all end up tasting the same. Till today, I have never ever cooked vegetables in the Fugath or Tel Piyao style - which is how vegetables are cooked at home 98% of the time.

This dish however is an exception. And I would always beg grandma to include this in the Nativity Menu. There is no cooking involved, but there is the grating and grinding of coconut. So its not a quick dish in that sense, unless you have access to fresh grated coconut like in the supermarkets of Bombay. 

Kharam is similar to a Kerala dish called Vellarikka Tharichathu, but there's no yoghurt in the Manglorean version.

Ingredients:
4 Manglorean cucumbers (Manglorean cucumbers are plump, so if your cucumbers are on the thinner side, use 5-6)
1 coconut grated
4 large green chillies (adjust to taste)
1/2" ginger
3-4 cloves garlic
1 tsp mustard
salt to taste
fresh tamarind to taste (dried tamarind gives a dark blackish color, so I substituted with skinned green mango)

Method:
Coarsely grind everything except cucumbers.
You should still be able to sense the texture of the coocnut.
Dice the cucumbers, apply a little salt and leave for awhile to remove excess water. If the cucumber seeds are large, remove the seeds when dicing.
Mix the coconut mixture and serve slightly chilled as a salad/ acompaniment/ vegetable side dish.

I find that it also goes well with some kinds of Biryani

Saturday, November 27, 2010

Recipe: Sabudana Khichdi/ Tapioca Pearl / Pearl Sago Snack - Vegan

Sabudana is a common ingredient in breakfasts in Maharashtra. On a 3 month contract with one of my clients in Mumbai, I ended up having Sabudana Khichdi or Sabudana Vadas almost everyday for breakfast in the office canteen.
Sabudana is also consumed in certain kinds of fasts when grains and lentils are prohibited. Sabudana Pearls could refer either to Tapioca Pearls or Sago Pearls. While Sago Pearls come from the Sago Palm, Tapioca Pearls come from the Tapioca Roots. In either case, they are both made from starch and are high in carbohydrates and low in any other nutrition, hence dishes made with sabudana are best kept for the morning or afternoon, when the energy from the carbohydrates will get expended.
Almost every savoury dish I have tasted that was made with Sabudana includes potatoes and groundnuts in the dish, so traditionally, I assume this means it was accepted as the best combination.

Ingredients:
200 gms Sabudana
2 medium potatoes cubed (about the same volume as the soaked sabudana - you can par boil them to use a little less oil when cooking)
100 gms groundnuts (1/2 the volume as the soaked sabudana)
1-2 tsp oil (this is unavoidable. You can't add water when cooking, so you will need the moisture from the oil for lubricating the dish, even if you are cooking it in a non stick pan)
1 tsp mustard seeds
1 tsp cumin seeds
1 stalk curry leaves (rinse and dry)
1-3 green chillies chopped (depending on your heat preference)
1 tsp sugar
salt to taste
lemon juice to taste
1-2 tbsp grated coconut (optional)
2-4 stalks chopped corriander to garnish


Method:
Soak Sabudana for 30 minutes, then drain the water completely. Leave the moist sabudana for 8 hours for best results. Leaving it longer won't hurt it. But if you don't leave it long enough, it will not be soft enough. If you soak it in water for more than 30 minutes, the starch in the sabudana will start to dissolve and if you leave it in too much water overnight, you might as well just dilute it further and use it to starch your cotton clothes : )

Roast the groundnuts. Skin the groundnuts and crush them coarsely. You can use a mixi or a coffee grinder. I prefer to crush groundnuts with a rolling pin in a ziploc bag or in a tea towel. It gives me more control over the size - since I don't want it too finely crushed and it doesn't get too oily.

Heat oil in a pan, add mustard seeds and fry till it splutters. Then add the cumin seeds, curry leaves and green chillies.
Add the potatoes and salt and fry till the the potatoes are completely cooked through.

Add the sugar and the soaked sabudana and keep frying till the sabudana pearls turn glossy and start sticking to one another.


Add the groundnuts and lemon juice and stir well for a minute.

Top with the corriander leaves.

Serve with a wedge of lemon and sweetened curd/yoghurt (this traditional accompaniment for sabudana khichdi in Maharashtra is just a combination of sugar and yoghurt).

Recipe: Karina's Cheese Omlette

My sister isn't much of a cook. Don't get me wrong - she loves good food and is an appreciative audience to all my experiments with food, but she doesn't don the chefs hat herself, unless it is to prepare something quick and easy.

This is one of her favourite recipes and she has been egging me on to try it, especially on the days when my husband is travelling and I end up with a pack of ParleG and a glass of milk for dinner! It just feels like too much effort to cook a meal for one person.

So this time when the husband was away, I decided to give in and found it was worth the 5 minutes effort to prepare and wash up.

Ingredients:
2 Eggs
1 slice of cheese
1/2 tsp each of chopped onion, tomato, green chilli and corriander (optional - use whatever you like in your omlettes - I only used onion)
salt and pepper to taste
1 tsp milk
a drop of oil/butter to fry

Method:
In a bowl break in the eggs, and add, the milk, salt and pepper.
Beat with an egg beater to get a bit of a froth.
Mix in the onion, tomato, green chilli and corriander and beat lightly again.

Pop the frying pan on the fire, when warm add a drop of oil/butter/ghee and swirl around the pan.
Pour the egg mixture and fry till done on one side.
Turn it over and fry on the other side, or if you like it slightly runny, just take it off the pan.
(Kim's Tip: If you use onions and tomatoes in your omlette, it may become heavy and you may find it difficult to flip upside down. In this case, loosen the egg from the bottom and slide it carefully onto a plate. Then hold the plate firmly in one hand, cover it with the frying pan and turn it upside down in a smooth movement so the uncooked side of the egg is now facing the bottom of the pan)

Slide the fried omlette onto a plate. Top with a slice of cheese.
Pop in the microwave for 30 seconds till the cheese starts to melt and bubble.
Serve with bread or toast.
I have just half a slice of cheese on this omlette as the cat came running in when she smelt the cheese coming out of the fridge and begged till I fed her half a slice. Since she too goes into depression when the husband is away, I couldn't say no!

Friday, November 26, 2010

Recipe: Chhole Biryani - Chickpea / Kabuli Channa Biryani

If I make channa at home, then the husband craves puris or bhaturas to go with it. As these are the classic combination for channa. But, I avoid deep frying as much as possible at home, so if I want to eat Channa then I need to think up different ways to cook it. So I end up with hummus, channa chaat or something on those lines. My favourite though, is the channa biryani. Its a one dish meal and if the channa has been well soaked and cooked with methi/jeera/hing it is much easier to digest than a heavy meat biryani, yet it is equally tasty and has interesting textures.
 The dish does take some planning to soak the channa in advance and it does take a little less than 2 hours for everything to be cooked, so its not a quick recipe. But the flavours are quite worth it.

Ingredients:
1 cup rice - wash and soak for 10-30 minutes
1/2 cup kabuli channa / chhole / chickpeas
2 medium onions - finely chopped
6 - 8 green chillies (adjust for heat)
1/2" ginger chopped fine
2 cloves garlic chopped fine
1 tsp ginger garlic paste
2 tomatoes chopped
pinch of soda bicarb (optional)
2-3 peppercorns
1" + 1" cinnamon
1 all spice (biryani flower)
3 cloves
1 cardamom
1 tsp jeera - cumin seeds
6-8 stalks corriander leaves
1/2 lime - juice extracted
2 cups water
1-2 tsp oil
salt to taste

Method:

Wash & soak the channa for at least 8 hours (I add a pinch of jeera, heeng - asafoetida and methi - fenugreek seeds at this stage to cut the gassy nature of channa).
In a Pressure cooker mix the channa, a few slices of onion, 1 green chilli, ginger, garlic, 1 piece of cinnamon and the peppercorns.
Add 2 cups of water and cook for 2 whistles, adding soda bicarb if you like. I find that good quality channa doesn't need the addition of soda bicarb.
Let the pressure dissipate on its own.
Strain the channa, reserving the stock for later.
You can remove the whole spices if you like, I prefer to leave them in as I feel it just keeps adding flavour to the dish.

Grind the remaining green chillies and corriander together ( I have sometimes just chopped them fine and it tastes as good, but the grinding gives a nice green colour to the biryani)
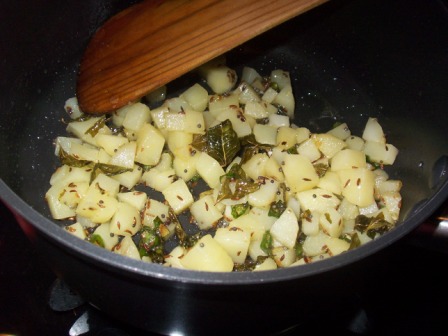
Heat the oil, add the remaining whole spices - cinnamon, all spice, cloves, cardamom.
Once they start to release their aroma, add the onions, tomatoes and jeera and fry.
When lightly browned, add the cooked channa and fry for 3-5 minutes (If your channa has got overcooked, don't worry, add it all as it will impart flavour to the dish, but be careful to not overfry at this stage as it will smash up the channa further)
Add the corriander chilli paste, the ginger garlic paste, salt to taste, lime juice and stir for 1-2 minutes.
Add 2 cups of the reserved stock (add water if you don't have enough stock) and bring to a boil.
When it boils, add the soaked and drained rice and give it a good stir, so all the flavours mix into the rice.
Pressure cook on the lowest flame for 1-2 whistles or you can cook it the regular way you cook a biryani on dum.

Serve hot with Raita

Kim's Tip: When cooking biryani in a pressure cooker, ALWAYS let the pressure reduce on its own, don't force it otherwise you may end up with a soggy biryani. Allowing the cooker to cool and let off its own steam is better for the water balance of your biryani.

Monday, November 22, 2010

Recipe: Chicken Piralen - Kerala Style - from Flavours of the Spice Coast

Chicken Piralen is technically a semi dry dish, I left a little more gravy in it than normal because I wasn't in the mood to make a dhal or another curry for dinner.

I roughly followed Mrs K M Mathew's Recipe from Flavours of the Spice Coast. While her book is wonderful and has some lovely looking dishes, I wouldn't recommend it to a newbie cook or someone completely unfamiliar with Malyali (Kerala) cuisine. The instructions aren't precise, so unless you know where you are headed and have a fair idea of what you want you dish to taste like, you may find the book quite confusing.

Based on feedback from my other foodie friends, I think most of her dishes would taste best if cooked in a mud pot. But today I was in too much of a hurry.

When I made the dish, I mainly used her ingredients and roughly followed her recipe with some modifications. It was quite easy to throw together as I just had to chop up some onions and hand pound some spices, everything else I used powders and pastes.

Ingredients:
1 kg chicken (I used skinless legs)
3 tbsp corriander powder
2 tbsp chilli powder (adjust if you want it more/less spicy)
1/2 tsp turmeric powder
1/2 tsp pepper powder
1/2 tsp jeera powder
1/4 cup shallots sliced (I used small onions)
2 tbsp garlic paste
1 tbsp ginger paste

2 tbsp vinegar
1 sprig curry leaves
salt to taste
water for curry

Pound/Powder together
1" cinnamon
8 cloves
2 white/green cardamoms
1 tsp aniseed (saunf/fennel seed)

Method:
Mix all the ingredients except chicken and water to form a marinade.
Add the chicken (I didn't marinate this time, but I'd like to marinate for at least 1 hour next time, especially since the legs were rather large and fleshy).
Add enough water to make a gravy or semi gravy.
Cook on a low fire till done.

I served it as a curry. Mrs Mathew recommends taking the cooked chicken out of the gravy and shallow frying the chicken, drying out the gravy and then mixing the 2 again ad frying for awhile longer.

You may also like to take a look at Ria's version which looks much more like Mrs Mathew's Chicken Piralen while also omitting the frying step.

Read a review of Flavours of the Spice Coast in The Hindu

Sunday, November 21, 2010

Reminiscence: British Style Breakfast

I can eat so called "British style breakfast" at any hour of the day or night. My husband finds it really wierd that I can eat it at midnight, just before settling in for the night. I used to order it at the British Community Association - BCA in Cairo around 8pm and I regularly order the Santa Fe Skillet at the All American Diner at IHC whether its before or after an evening of theatre.
In a strange way, this is comfort food for me. In the days when I did eat breakfast, while I was going to school, Mum would rustle up bread and eggs-to-order each morning. We'd get exotic cheeses or bacon or ham, if dad had just returned from one of his trips. The locally made cured meats (from Farm Stores in Mallikatta or this guy who had a cold freeze near Shedigudda) were extremely expensive in those days and were only bought if one of the 4 of us had done very well in our exams.

So a solid breakfast with baked beans, and cold meats in addition to the bread and eggs either meant that dad was home or we were celebrating a minor scholastic success. It meant all 6 of us gathered around the dining table in our little apartment quickly sharing a meal before running off in our respective directions.

Potatoes were never a part of this morning feast at mums, so I never add hash browns or mashed potatoes or fries when I make this meal at home.

I normally start with a cured meat - bacon, ham or sausages. Once this has been fried, I pop in some onions saute for awhile and then add sliced mushrooms with a little salt and pepper and fresh or dried herbs depending on my mood at the moment. This provides the veggies and fibre for the meal. Once I've plated this, I fry an egg or 2 in the pan. The egg absorbs the flavours of the onion, mushrooms and cooks in the meat fat. The eggs go into a different plate. I then warm up some bread in the pan since I prefer lightly warmed bread to toast.

I occasionally spoon a teaspoon or 2 of baked beans onto the plate, but mostly I just use tomato sauce. I love tomato ketchup with omlettes and scrambled eggs.


Friday, November 19, 2010

Recipe: May's Chilli Chicken - Dynamited

My friend May, recently posted a recipe for Chilly Chicken She spoke about how it reminded her of the chilli chicken at RR restaurant in Bangalore. Our personal favourtie Andhra joint in Bangalore is Nandinis and they make a really fiery Andhra chilli chicken. If I had to guess the ratio, I'd say they use about 500gms chilli to 1 kilo chicken. This is our favourite dish on the menu.
 The chilli chicken I normally make at home is chicken pieces marinated in soya sauce, finely chopped green chilli and a bit of sugar to cut the heat a bit. This only goes well with Chinese style fried rice or noodles. But May's recipe seemed like something I could adapt to eat with rice and dhal. If you are looking for an Indian Chinese version, head over to May's blog. If you want a further Indianised, bit of dynamite to spice up a simple meal of rice and dhal, keep reading.

Ingredients:
1/2 kilo chicken
1 onion finely chopped
1": ginger finely chopped
12 slit green chillies (I warned you its gonna be hot, decrease, if you can't handle spice)
1.5 tbsp soya sauce
3 tablespoon tomato sauce (I increased this to counterbalance the heat)
1/2 tsp pepper powder
1/2 tbsp cornflour dissolved in 1 tbsp water
salt to taste (remember the soya sauce will be salty too)
a few drops of oil.

Method:
Clean & chop chicken, the smaller the better since we aren't marinating the meat.
Take a pan large enough for most of the chicken pieces to touch the base.
In the heated pan, splash a few drops of oil.
Quickly stir fry the onion, 8 green chillies and the ginger for 2-3 minutes on high heat.
Add the chicken pieces, quickly stir fry till the chicken changes colour (gets seared).
Add the pepper powder, soya sauce, tomato sauce and salt.
Cover and cook till chicken is tender.
Add the remaining 4 slit green chillies (adding chillies at 2 stages, gives 2 different kinds of heat when eating one from the crisply fried green chillies and one from the moist slightly cooked green chillies) and fry for a minute or so.
Add the cornflour dissolved in water (though the dish is dry, it give s a bit of crispness to the chicken pieces) and fry till completely dry.
Serve hot with rice and dhal.
The husband absolutely loved the dish and ate only chicken in his second helping. A huge compliment to the dish from a born vegetarian (recently turned non-vegetarian).

This will also go really well as a snack with drinks.

I've entered this dish in Torview's Food palette red event giveaway


Thursday, November 18, 2010

Recipe: Chorizo & Cheddar Biscuits

When I made the Sweet Corn Cheddar Biscuits for my Sister-in-law, I also needed to make a non-vegetarian option for myself :) I had some unsliced chorizo in the fridge and I wanted to incorporate that into the biscuits. I knew the chorizo would have enough flavour of its own and not need any other additional flavouring.

The sausage added a wonderful spicy and tangy note to the biscuits. Next time, I may skip the cheese entirely and just use the chorizon.
There was some sweet corn leftover from the tin I had opened to make the Sweet Corn Cheddar Biscuits, so I added that too.


Although the original recipe for the Bacon, Onion and Cheddar Bisuits called for the pre-frying of the bacon, I decided not to pre fry the chorizo as it would not emit as much fat as the bacon. Also, I wasn't in the mood to chop onions, so I decided to do without them. I do think they would add a nice sweet note to the biscuits. So if I repeat this recipe, I would add a cup of roughly chopped onions fried in a bit of fat or butter.


Ingredients:
2 cups All Purpose Flour - Maida
1 tsp baking powder
1 tsp salt
4 tbsp white (unsalted) butter

10 tbsp milk
4 tbsp vegetable oil - olive/corn/rice bran
1 egg

1.5 cup chopped chorizo
1 cup shredded/grated cheddar cheese
a few tsp of sweet corn kernels - pre cooked (optional)


Method:
Preheat oven to 200C.
Sieve together the flour, baking powder and salt.
Work the butter into the flour mixture, till it turns crumbly.
Lightly blend the egg, milk and oil together, I used an egg beater.
Pour this mixture over the flour and knead lightly, till it comes together.
Add the chorizo chunks and sweet corn if using. Lightly mix again
Add the cheese and mix very quickly so you don't melt the cheese with your body heat.
Spoon into a muffin pan - I got 10 biscuits.
Bake at 200C for 35-40 minutes till lightly browned on top.
Serve with a dip or on the side with a salad.

Recipe: Sweet Corn and Cheddar Biscuits - Vegetarian

My Sister-in-law came back with us post Diwali and has been holidaying with us for a week while awaiting her results. They were announced yesterday and she is now a Doctor! So that's the 3rd sister-in-law (of 4) who is now a Doctor.

Like most of my husbands family, she is also vegetarian and I wanted to make her something special that she hadn't tasted before and isn't really available in a restaurant.

I remembered the Bacon, Onion & Cheddar Biscuits, I had baked in September and decided to twist the recipe. She loves sweet corn, so a sweetcorn cheddar biscuit seemed a natural choice.

She absolutely loved them, so for my vegetarian friends, this recipe does work.
Warning - Contains eggs.


Ingredients:
2 cups All Purpose Flour - Maida
1 tsp baking powder
1 tsp salt
4 tbsp white (unsalted) butter
10 tbsp milk
4 tbsp vegetable oil - olive/corn/rice bran
1 egg
1 .5 cup tinned sweet corn kernels
1 cup shredded/grated cheddar cheese
1 tsp pink peppercorns (optional)
5-6 basil leaves finely chopped (optional)
Method:Preheat oven to 200C.

Sieve together the flour, baking powder and salt.
Work the butter into the flour mixture, till it turns crumbly.
Lightly blend the egg, milk and oil together, I used an egg beater.
Pour this mixture over the flour and knead lightly, till it comes together.
Add the sweet corn, basil and peppercorns if using. Lightly mix again
Add the cheese and mix very quickly so you don't melt the cheese with your body heat.
Spoon into a muffin pan - I got 8 biscuits.
Bake at 200C for 35-40 minutes till lightly browned on top.
Serve with a dip or on the side with a salad or for breakfast.

 They taste best when hot, so you will need to microwave them before serving, but they keep quite well in the refrigerator for a couple of days.

Friday, November 12, 2010

2 Cookbook Prizes in a Week

Looks like the Diwali season has brought its own foodie blessings upon me. I had entered 2 food contests last week, before I left on my diwali trip to the inlaws place and both results came within 24 hours - since yesterday. I won them both. Yay!

The first contest was hosted by Rushina of A Perfect Bite. She had asked her readers "If you could be a spice, what would you be and why?
Best answer wins a copy of The Mainland China Cookbook!
I'd like to be a pod of garlic or a fiery chilli - unforgettable and addictive!"


My response was "Cinnamon - I go well with everything (sweet, savoury, drinks) and just add a subtle hint, yet my presence is not unnoticed. Also enjoyable completely undiluted and a bit of me, can be relished for hours leaving behind a fresh feeling."


So thats the Mainland China cookbook in the mail for me. I'm really happy with this one as it was released just a month or so ago and I haven't been able to find it in any of the Delhi bookstores or Flipkart either. Was thinking I would have to trek to Gurgaon to eat at Mainland China and check up if they had any books in stock. Given the high possibility of non availability, I've been postponing that for a bit :)


The Second Contest was held by Pratibha Jain and Jigyasa Giri of Pritya Books, the authors of 2 wonderful collections of Heritage Recipes: Cooking with Pedatha and Sukham Ayu. The Ayurvedic Cookbook - Sukham Ayu stood second in the category of  "Best Health & Nutrition Cookbook in the World" by the Gourmand awards (2009) organization.

The Contest asked "Can you think of a traditional, vegetarian, festival dish which is your favourite? Write a description and your reasons for liking it in 100 words".

Well, I do love to write about food and there are plenty of festive dishes that are so much a part of my memory. The best memories and experiences of cooking festive foods was the assembly line of my mom, her sisters and some of the kids that was set up around the dining table under the eagle eye of my grandma (to whom this blog is dedicated) - who supervised the proceedings and of course the sneaking of bits and bites of the fillings and batter during the processes.

Now to choose just one, a Vegetarian one (all dishes with eggs were out) and to describe it within 100 words, seemed nigh impossible. But this is what I finally sent in: "Kidiyos (khulkhuls) - maida and coconut milk shaped into little worms (kidis) on the back of a fork and then deep fried are my favourite kuswar (Christmas Goodies). As a special treat, one batch would be dipped in sugar syrup and left to crystallise. These treated kidiyos would have the sweet crunch of a layer of frosted sugar, followed by the crisp outer shell that had been deep fried and the soft heart that had not been directly exposed to the boiling oil. A combination of textures and flavors that even today make me miss grandma more than ever.

It won FIRST place. You can take a look at the other entries on The Contest Page. I would love to hear your favourites too, so leave me a comment.

I'm now waiting for my copies of the Mainland China Cookbook and Sukham Ayu.

LinkWithin

Related Posts with Thumbnails

ShareThis